TWiki Reference Manual (01-Sep-2001)
This page contains all documentation topics as one long, complete reference sheet.
Doubleclick anywhere to return to the top of the page. Related Topics: TWikiSite, TWikiHistory, TWikiPlannedFeatures, TWikiEnhancementRequests
Warning: Can't find topic TWiki.TWikiImplementationNotes
for the latest updates to this guide and supplemental information for installing or upgrading TWiki, including notes on installing TWiki on different platforms, environments and web hosting sites.
If you are upgrading from a previous version of TWiki, you probably want to read TWikiUpgradeGuide instead.
which generates the contents for an Apache config file for TWiki based on your inputs.
While this installation guide specifically describes installation on an Apache web server on Linux, TWiki should work fine with any web server and OS that meet the system requirements (see below). For additional notes on installing TWiki on other systems, see TWiki:TWiki.InstallingTWiki#OtherPlatforms.
If you are installing TWiki without Unix/Linux root (administrator) privileges (for example, on a hosted domain), see "Notes on Installing TWiki on Non-Root Account" below for supplemental instructions to the basic steps presented below.
If you are upgrading from an earlier major version of TWiki such as Cairo (TWiki-3) or TWiki 4.x you will need the information found at TWikiUpgradeGuide.
One of the more difficult tasks is installation of additional CPAN libraries. See TWiki:TWiki.HowToInstallCpanModules for detailed information on how to install CPAN libraries.
If you need help, ask a question in the TWiki:Support.WebHome web or on TWiki:Codev.TWikiIRC (irc.freenode.net, channel #twiki).
as well as the example .
.
These are the steps for enabling "Template Login" which asks for a username and password in a web page, and processes them using the Apache 'htpasswd' password manager. Users can log in and log out.
, and TWiki:TWiki.SecuringTWikiSite for further information about managing users and security of your TWiki site.
Note: The other includes this section when you choose ApacheLogin. In the example .
which offers tips and tricks for customizing your TWiki site. Many of these are appropriate to implement immediately after installing TWiki and before adding content so now's a good time to look at these.
is an extensive library of plugins for TWiki, that enhance functionality in a huge number of ways. A few plugins are pre-installed in the TWiki distribution. For more information on these, see InstalledPlugins.
You activate installed plugin in the Plugins section of .
Some plugins require that you define their settings in on TWiki.org, the supplemental documentation that help you install TWiki on different platforms, environments and web hosting sites. For example: .
If you need help, ask a question in the TWiki:Support web or on TWiki:Codev/TWikiIRC (irc.freenode.net, channel #twiki)
and contrib modules exist which enhance and expand TWiki's capabilities; they may have additional requirements.
, a GNU Free Software package. TWiki is developed in a basic Linux/Apache environment. It also works with Microsoft Windows, and should have no problem on any other platform that meets the requirements.
for detailed information on how to install CPAN libraries
The following Perl CPAN modules are used by TWiki:
for detailed information on how to install CPAN libraries
Most of them will probably already be available in your installation. You can check version numbers with the .
for updates.
 After the extensions are installed (or upgraded) in step 2, take a "golden" backup. That will come in handy for your next patch or upgrade: By checking the differences between the golden copy and your production copy, you will be able to identify all the modifications that you have applied to the core or extensions.
topic to keep up to date with the discussion how to get back support for earlier Perl versions.
After the extensions are installed (or upgraded) in step 2, take a "golden" backup. That will come in handy for your next patch or upgrade: By checking the differences between the golden copy and your production copy, you will be able to identify all the modifications that you have applied to the core or extensions.
topic to keep up to date with the discussion how to get back support for earlier Perl versions.
New
A new
has an option to protect file attachments.
Tip: TWiki:TWiki.TWikiUserAuthenticationSupplement on TWiki.org has supplemental documentation on user authentication.
 Note: If you are restricting the entire Main web to TWikiGuest, you are required to add TWikiRegistrationAgent to ALLOWWEBCHANGE in your
 No Login (select
No Login does exactly what it says. Forget about authentication to make your site completely public - anyone can browse and edit freely, in classic Wiki style. All visitors are given the TWikiGuest default identity so you can't track individual user activity.
Note: This setup is not recommended on public websites for security reasons; anyone would be able to change system settings and perform tasks usually restricted to administrators.
At this time TWikiAccessControls cannot control access to files in the You can create a custom version of the TWikiRegistration form by copying the topic, and then deleting or adding input tags in your copy. The The default new user template page is in TWiki.NewUserTemplate. The same variables get expanded as in the template topics. You can create a custom new user profile page by creating the Main.NewUserTemplate topic, which will then override the default.
).
The advantage of this scheme is that if you have an existing website authentication scheme using Apache modules, such as and CPAN:CGI::Cookie modules to track sessions. These modules are de facto standards for session management among Perl programmers. If you can't use Cookies for any reason, CPAN:CGI::Session also supports session tracking using the client IP address.
You don't have to enable sessions to support logins in TWiki. However it is strongly recommended. TWiki needs some way to remember the fact that you logged in from a particular browser, and it uses sessions to do this. If you don't enable sessions, TWiki will try hard to remember you, but due to limitations in the browsers, it may also forget you (and then suddenly remember you again later!). So for the best user experience, you should enable sessions.
There are a number of TWikiVariables available that you can use to interrogate your current session. You can even add your own session variables to the TWiki cookie. Session variables are referred to as "sticky" variables.
Special read-only session variables: attack. Once a hacker has an SID they can pretend to be that user.
To help prevent these sorts of attacks, TWiki supports IP matching, which ensures that the IP address of the user requesting a specific session is the same as the IP address of the user who created the session. This works well as long as IP addresses are unique to each client, and as long as the IP address of the client can't be faked.
Session IDs are usually stored by TWiki in cookies, which are stored in the client browser. Cookies work well, but not all environments or users permit cookies to be stored in browsers. So TWiki also supports two other methods of determining the session ID. The first method uses the client IP address to determine the session ID. The second uses a rewriting method that rewrites local URLs in TWiki pages to include the session ID in the URL.
The first method works well as long as IP addresses are unique to each individual client, and client IP addresses can't be faked by a hacker. If IP addresses are unique and can't be faked, it is almost as secure as cookies + IP matching, so it ranks as the fourth most secure method.
If you have to turn IP matching off, and cookies can't be relied on, then you may have to rely on the second method, URL rewriting. This method exposes the session IDs very publicly, so should be regarded as "rather dodgy".
Most TWiki sites don't use SSL, so, as is the case with most sites that don't use SSL, there is always a possibility that a password could be picked out of the ether. Browsers do not encrypt passwords sent over non-SSL links, so using Apache Login is no more secure than Template Login.
Of the two shipped login managers, Apache Login is probably the most useful. It lets you do this sort of thing:
wget --http-user=RogerRabbit --http-password=i'mnottelling http://www.example.com/bin/save/Sandbox/StuffAUTOINC0?text=hohoho,%20this%20is%20interesting
i.e. pass in a user and password to a request from the command-line. However it doesn't let you log out.
Template Login degrades to url re-writing when you use a client like dillo that does not support cookies. However, you can log out and back in as a different user.
Finally, it would be really neat if someone was to work out how to use certificates to identify users.....
See TWiki:TWiki.SecuringTWikiSite for more information.
Tip: TWiki:TWiki.TWikiAccessControlSupplement on TWiki.org has additional documentation on access control.
Please Note:
Note: TWiki has strict formatting rules. Make sure you have a real bullet. (In raw edit it is three or six spaces, an asterisk, and an extra space in front of any access control rule.)
If the same setting is defined multiple times the last one overrides the previous. They are not OR'ed together.
Since TWiki 4.0 and prior to TWiki 6.0 setting DENYTOPICVIEW, DENYTOPICCHANGE, or DENYTOPICRENAME to an empty value meant "do not deny anyone regardless of the corresponding ALLOWTOPICX", which is no longer the case. Back then, setting an empty value to DENYTOPICX was the only way to open up a topic to everybody in a restricted web. Now that we have AllUsersGroup and AllAuthUsersGroup, there is no need for that behaviour, which caused a lot of confusion and debate.
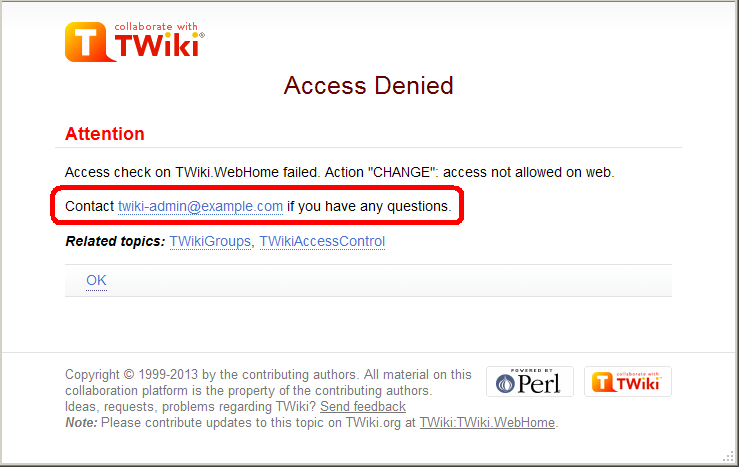 You may want to customize the passage annotated in the red rectangle.
For example, with a web restricting access, you may want to show the link to an access request form.
You can achieve that by setting Tip: To hide access control settings from normal browser viewing, you can put them into the topic preference settings by clicking the link Note: Obfuscating a web without view access control is very insecure, as anyone who knows the URL can access the web.
You may want to customize the passage annotated in the red rectangle.
For example, with a web restricting access, you may want to show the link to an access request form.
You can achieve that by setting Tip: To hide access control settings from normal browser viewing, you can put them into the topic preference settings by clicking the link Note: Obfuscating a web without view access control is very insecure, as anyone who knows the URL can access the web.
Tip: TWiki:TWiki.TWikiTemplatesSupplement on TWiki.org has supplemental documentation on TWiki templates.
Tip: If you want to override existing templates, without having to worry that your changes will get overwritten by the next TWiki update, change the
When you create a new topic using the
Note: You can create a topic in one step, without going through the edit screen. To do that, specify the  The TIP: You can use the
Note: TWiki.org has no marketing budget, e.g. we rely on TWiki users to spread the word of TWiki. You can support the open source project by adding logos that point back to TWiki.org, and by mentioning TWiki in social media.
The standard TWiki skins show the logo in the Note: Two skin names have reserved meanings; Note: Make sure templates do not end with a newline. Any newline will expand to an empty
The format of tables of file versions in the Upload screen can also be changed, using the macros:
The
and TWiki:Plugins/SkinDeveloperFAQ
-- Contributors: TWiki:Main.PeterThoeny, TWiki:Main.MikeMannix, TWiki:Main.CrawfordCurrie

The default can be defined with a default parameter (
%FAVORITE{ DISH="Sushi" DRINK="Sake" }%
%FAVORITE{}%
%FAVORITE{ "preferred" }%
All TWiki Variables:
ACTIVATEDPLUGINS, ADDTOHEAD, ALLVARIABLES, AQUA, ATTACHURL, ATTACHURLPATH, AUTHREALM, BASETOPIC, BASEWEB, BB, BB2, BB3, BB4, BLACK, BLUE, BR, BROWN, BUBBLESIG, BULLET, CALC, CALCULATE, CARET, CHILDREN, COLORPICKER, COMMENT, CONTENTMODE, COPY, DASHBOARD, DATE, DATEPICKER, DISPLAYTIME, DISPLAYTIME2, EDITACTION, EDITFORM, EDITFORMFIELD, EDITTABLE, ENCODE, ENDBG, ENDCOLOR, ENDCOLUMNS, ENDSECTION, ENTITY, ENV, EXAMPLEVAR, FAILEDPLUGINS, FORM, FORMFIELD, FOURCOLUMNS, GET, GMTIME, GMTIME2, GRAY, GREEN, GROUPS, H, HEADLINES, HIDE, HIDEINPRINT, HOMETOPIC, HTTP, HTTPHOST, HTTPS, I, ICON, ICONURL, ICONURLPATH, IF, INCLUDE, INCLUDINGTOPIC, INCLUDINGWEB, JQENDTAB, JQENDTABPANE, JQTAB, JQTABPANE, LANGUAGE, LANGUAGES, LAQUO, LIME, LOCALSITEPREFS, LOGIN, LOGINURL, LOGOUT, LOGOUTURL, M, MAINWEB, MAKETEXT, MAROON, MDREPO, META, METASEARCH, N, NAVY, NBSP, NOP, NOTIFYTOPIC, OLIVE, ORANGE, P, PARENTBC, PARENTTOPIC, PINK, PLUGINDESCRIPTIONS, PLUGINVERSION, PUBURL, PUBURLPATH, PURPLE, Q, QUERYPARAMS, QUERYSTRING, RAQUO, RED, REDBG, REG, REMOTEADDR, REMOTEPORT, REMOTEUSER, RENDERLIST, REVINFO, REVINFO2, S, SCRIPTNAME, SCRIPTSUFFIX, SCRIPTURL, SCRIPTURL2, SCRIPTURLPATH, SCRIPTURLPATH2, SEARCH, SERVERTIME, SERVERTIME2, SESSIONID, SESSIONVAR, SESSIONVARIABLE, SET, SETGETDUMP, SILVER, SITENAME, SITESTATISTICSTOPIC, SLIDESHOWEND, SLIDESHOWSTART, SPACEDTOPIC, SPACEOUT, STARTINCLUDE, STARTSECTION, STATISTICSTOPIC, STOPINCLUDE, SYSTEMWEB, T, TABLE, TEAL, THREECOLUMNS, TM, TOC, TOC2, TOPIC, TOPICLIST, TOPICTITLE, TOPICURL, TWIKISHEET, TWIKIWEB, TWISTY, TWOCOLUMNS, U, URLPARAM, USERINFO, USERNAME, USERREPORT, USERSIG, USERSWEB, VAR, VBAR, WEB, WEBLIST, WEBPREFSTOPIC, WHITE, WIKIHOMEURL, WIKILOGOALT, WIKILOGOIMG, WIKILOGOURL, WIKINAME, WIKIPREFSTOPIC, WIKITOOLNAME, WIKIUSERNAME, WIKIUSERSTOPIC, WIKIVERSION, WIKIWEBMASTER, WIKIWEBMASTERNAME, WIP, X, Y, YELLOW, total 190 variables
Notes:
Extra fields that are added if an attachment is moved:
For details, see VarFORMFIELD. Current support covers:
Note: SEARCH can also be used to render meta data, see examples in FormattedSearch and SearchPatternCookbook.
Related Topics: DeveloperDocumentationCategory, UserDocumentationCategory
Tip: The blog How to Create a TWiki Application on TWiki.org is a good tutorial to get started with TWiki forms based applications.
The
Many types of form fields are available. Some are TWiki internal, some are provided by extensions. Find more TWiki form field extensions on TWiki.org. The
Note on Attributes:
.
web.
TWiki plugins are developed and contributed by interested members of the community. Plugins are provided on an 'as is' basis; they are not a part of TWiki, but are independently developed and maintained.
Relevant links on TWiki.org: web on TWiki.org is the repository for TWiki plugins. Each plugin such as the TWiki:Plugins.ChartPlugin has a topic with user guide, step-by-step installation instructions, a detailed description of any special requirements, version details, and a working example for testing. There's usually a number of other related topics, such as a developers page, and an appraisal page.
Most TWiki plugins are packaged so that they can be installed and upgraded using the configure script. To install a plugin, open up the Extensions tab, follow the "Find More Extensions" link, and follow the instructions. A plugin needs to be enabled after installation.
Plugins can also be installed manually: Download the zip or tgz package of a TWiki plugin from the TWiki.org repository, upload it to the TWiki server, unpack it, and follow the installation instructions found in the plugin topic on TWiki.org.
Special Requirements: Some plugins need certain Perl modules to be pre-installed on the host system. Plugins may also use other resources, like graphics, other modules, applications, and templates. You should be able to find detailed instructions in the plugin's documentation. Use the package manager of the server OS (.
they invoke. Any failures are shown in the Errors section. The , or test manually with the Apache
If you need to install an "expensive" plugin, but you only need its functionality only in a subset of your data, you can disable it elsewhere by defining the %DISABLEDPLUGINS% TWiki variable.
Define , add this bullet in Main.TWikiPreferences
documentation and Perl plugin code as a reference.
2. Use configure settings:
The administrator can set plugin settings in the configure interface. Recommended if only site administrators should be able to change settings. Chose this option to set sensitive or dangerous system settings, such as passwords or path to executables. To define plugin-specific configure settings,
documentation and Perl plugin code as a reference.
In either case, define a SHORTDESCRIPTION setting in two places:
On this TWiki site, the enabled plugins are: SpreadSheetPlugin, BackupRestorePlugin, ColorPickerPlugin, CommentPlugin, DBIQueryPlugin, DatePickerPlugin, EditTablePlugin, HeadlinesPlugin, InterwikiPlugin, JQueryPlugin, PreferencesPlugin, SetGetPlugin, SlideShowPlugin, SmiliesPlugin, TWikiSheetPlugin, TablePlugin, TagMePlugin, TinyMCEPlugin, TwistyPlugin, WatchlistPlugin, WysiwygPlugin.
21 plugins
Note: If you use other core functions not described in helps you decide which rendering handler to use.
module provides a lot of support for plugins development, including a plugin creator, automatic publishing support, and automatic installation script writer. If you plan on writing more than one plugin, you probably need it.
is a powerful build environment that is used by the TWiki project to build TWiki itself, as well as many of the plugins. You don't have to use it, but it is highly recommended!
If you don't want (or can't) use the BuildContrib, then a minimum plugin release consists of a Perl module with a WikiName that ends in to measure your TWiki:Plugins.PluginBenchmarks. The data is needed as part of the Documentation Topic.
See also Hints on Writing Fast Plugins.
web. All plugins submitted to TWiki.org are available for download and further development in TWiki:Plugins/PluginPackage.
Publish your plugin by following these steps:  Once you have done the above steps once, you can use the BuildContrib to upload updates to your plugin.
Thank you very much for sharing your plugin with the TWiki community
Once you have done the above steps once, you can use the BuildContrib to upload updates to your plugin.
Thank you very much for sharing your plugin with the TWiki community 
Integrating with
Some TWiki extensions have setup requirements that are best integrated into Structure of a
The
All types can be followed by a comma-separated list of attributes.
See has supplemental documentation on configure settings.
Tip: Plugins can be written to be compatible with older and newer TWiki releases. This can be done also for plugins using unofficial TWiki internal functions of an earlier release that no longer work on the latest TWiki codebase.
Here is an example; the TWiki:TWiki.TWikiPluginsSupplement#MaintainPlugins has more details.
Warning: Can't find topic TWiki.MonitoringSiteActivity
Tip: The URL of a web's homepage ends in Note: You might not need hierarchical webs. TWiki topics already have a parent/child relationship within a web, which is shown in the breadcrumb. Try to keep the number of webs to a minimum in order to keep search and cross-referencing simple. TWiki runs faster if hierarchical webs are disabled.
You can create hierarchical webs via the Adding a New Web form above, by using a slash- or dot-separated path name which is based on an existing web name in the Name of new web: field.
Example:
To create a sub-web named Suggestion: Create a web that is the entry point for your TWiki, and change the link of the upper left site logo to that web. Do that with a WIKILOGOURL setting in Main.TWikiPreferences.
If you want to rename the TWiki or Main webs anyway: , TWiki:Main/PeterThoeny, TWiki:Main/GrantBow
Warning: Can't find topic TWiki.AppendixFileSystem
Doubleclick anywhere to return to the top of the page.
On this page:
Note: Read the most up to date version of this document at http://TWiki.org/cgi-bin/view/TWiki/TWikiDocumentation- TWiki Installation Guide
- Preparing to install TWiki
- Basic Installation
- Important Server Security Settings
- Next Steps
- Enable Authentication of Users
- Define the Administrator User(s)
- Set TWiki Preferences
- Enable Email Notification
- Enable Signed Email Notification
- Enable WebStatistics
- Automate removal of expired sessions and lease files
- Enable Localization
- Tailor New User Profile Topic
- Custom Start Web and Homepage
- Customize the Site Logo
- Customize the Look of Your TWiki!
- Customize Special Pages
- Install Plugins
- WYSIWYG And Raw Edit
- Copyright, License and Classification Statements
- Troubleshooting
- Appendices
- TWiki System Requirements
- Notes on Installing TWiki on Non-Root Account
- Installing Manually Without Configure
- TWiki Upgrade Guide
- Overview
- Upgrade Requirements
- Major Changes Compared to Earlier TWiki Releases
- New Upgrade Option with BackupRestorePlugin
- Upgrade Procedure
- Customization of Special Pages
- Upgrading from Cairo to TWiki-4 (additional advice)
- Important Changes since TWiki-4.0.5
- Important Changes since TWiki-4.1.0
- Important Changes since TWiki-4.1.2
- Important Changes since TWiki-5.0.0
- Important Changes since TWiki-5.1.0
- Important Changes since TWiki-6.0.0
- Important Changes since TWiki-6.1.0
- TWiki User Authentication
- TWiki Access Control
- An Important Control Consideration
- Permissions settings of the webs on this TWiki site
- Authentication vs. Access Control
- Users and Groups
- Restricting Access
- Controlling access to a Web
- Controlling access to a Topic
- Allowing public access to specific topics in a restricted web
- Empty values in access control variables
- Securing File Attachments
- Controlling who can manage top-level webs
- How TWiki evaluates ALLOW/DENY settings
- Allowing web creation/deletion/rename by user mapping manager
- Forbid certain users to do certain actions by configuration
- User masquerading
- Dynamic access control
- Access control and INCLUDE
- Customizing "access denied" message
- Custom user/group notations
- Access Control quick recipes
- Configuring access control for topics of a certain name in all webs
- TWiki Templates
- TWiki Skins
- TWiki Variables
- TWiki Meta Data
- TWiki Forms - Foundation of TWiki Applications
- TWiki Plugins
- Managing Topics
- Managing Webs
Warning: Can't find topic TWiki.TWikiImplementationNotes
TWiki Installation Guide
The following is installation instructions for the TWiki-6.1 production release on an Apache web server on Linux. Visit TWiki:TWiki.InstallingTWikiPreparing to install TWiki
Before attempting to install TWiki, you are encouraged to review the AdminSkillsAssumptions. This guide assumes you have, at a minimum, basic knowledge of server administration on the system on which TWiki is to be installed. While it is possible to install TWiki with FTP access alone (for example, on a hosted site), it is tricky and may require additional support from your hosting service (for example, in setting file ownership and installing missing Perl CPAN libraries). To help setup a correct Apache configuration, you are very much encouraged to use the automatic tool TWiki:TWiki.ApacheConfigGeneratorBasic Installation
- Download the TWiki distribution from http://TWiki.org/. (Example - download
TWiki-6.1.0.tgzfor Linux) - Copy the downloaded package into the directory where you want to install TWiki (Example:
/var/www). Unpack the distribution in it (Example:tar xvfz TWiki-6.1.0.tgz). The unpack will create a directory calledtwikiwhich contains the TWiki package. In the rest of this document we assume this directory is calledtwiki.- Note: TWiki does not allow spaces in directory names. Especially on Windows make sure to use a directory path without spaces.
- Setup access file and directory rights to enable the webserver user (the user Apache runs the CGI scripts as) to read and write inside the twiki directory.
- Warning: Do not just run a
chmod -R 770 twiki. The access rules have different meaning for files and directories. This is the most common mistake installers make. - The distribution tgz has the file and directory access rights setup to work with a reasonable security level that will work for all types of installations including shared hosting.
- The ownership of the twiki directory tree is normally set to the user that unpacked the tgz and will have to be changed to the webserver user using the command
chown -R user:group /path/to/twiki. The webserver username varies from Distributions. Examples for some major distributions:- RedHat, Fedora, CentOS, Gentoo, Mandriva :
chown -R apache:apache /path/to/twiki - debian/Ubuntu/Kubunto :
chown -R www-data:www-data /path/to/twiki - Suse :
chown -R wwwrun:www /path/to/twiki
- RedHat, Fedora, CentOS, Gentoo, Mandriva :
- If you mistakenly change the access rights in a way that makes TWiki stop working, simply run the script found at TWiki:TWiki.SettingFileAccessRightsLinuxUnix to set the access rights of the entire TWiki tree back to the defaults in the distribution.
- It is possible to define tighter access rules than the ones given by default after the installation is complete. But how tight they should be depends on your distribution and local needs. Typically you may want to limit all access from world if the webserver machine has login access for other users than root and the web server administrator. For a dedicated web server made just for running TWiki with limited login access the default access rights are reasonable.
- Warning: Do not just run a
- Check the Perl installation and CPAN dependencies. Ensure that Perl 5 is installed on your system.
- The default location of Perl is
/usr/bin/perl. If it's somewhere else, change the path to Perl in the first line of each script in thetwiki/bindirectory. - Check if required modules listed in TWikiSystemRequirements are present; install modules as needed. If needed, learn how to install CPAN modules.
- Some systems require a special extension on perl scripts (e.g.
.cgior.pl). This is normally only needed under Windows and only where perl scripts are only recognized by file extension. Linux and Unix users should normally never need to do this. If necessary, rename all files intwiki/bin(i.e. renameviewtoview.pletc). If you do this, make sure you set theScriptSuffixoption inconfigure(Step 6).
- The default location of Perl is
- Create the file LocalLib.cfg located as
twiki/bin/LocalLib.cfg- There is a template for this file in
twiki/bin/LocalLib.cfg.txt. Simply copy LocalLib.cfg.txt to LocalLib.cfg. Make sure the ownership and access rights of the copy are the same as LocalLib.cfg.txt - The file
twiki/bin/LocalLib.cfgmust contain a setting for$twikiLibPath, which must point to the absolute directory path of yourtwiki/libe.g./var/www/twiki/lib. - If you need to install additional CPAN modules, but can't update the main Perl installation files on the server, you can set
$CPANBASEto point to your personal CPAN install. Don't forget that the webserver user has to be able to read those files as well.
- There is a template for this file in
- Choose best configuration method for your webserver. There are two ways to configure Apache: config file included from httpd.conf or .htaccess files.
- Apache config file: The recommended method is using a config file. With a config file you can put the entire TWiki configuration in ONE file (typically named
twiki.conf). Performance is much better with a config file, and makes setting up a correct and safe installation easier. However using a config file requires that you can restart Apache which again means that you need root or sudo access to stop and start Apache. The TWiki apache config file is included from the main Apache config file httpd.conf. Most distributions have a directory from which any file that ends with.confgets included when you restart Apache (Example RedHat/Fedora/Centos:/etc/httpd/conf.d). If you use a virtual host setup in Apache you should include the twiki.conf file from inside the desired virtual host config in your Apache configuration. - .htaccess files: This option should only be used when you cannot use a config file. Performance is slowed down because Apache has to look through all directories in search of possible .htaccess files each time someone views a page in TWiki. Normally this is the only way to control Apache in a shared host environment where you have no root or sudo privileges.
- Apache config file: The recommended method is using a config file. With a config file you can put the entire TWiki configuration in ONE file (typically named
- Configure the webserver * Make sure that Apache is configured to run CGI scripts. On Debian and Ubuntu, enter (with root privileges)
a2enmod cgi. If the system may suggestcgidinstead ofcgi, either one is fine.- Unless you are an Apache expert setting up the webserver can be quite difficult. But TWiki has three resources that make setting up Apache easier.
- The best and easiest way is to use webpage TWiki:TWiki.ApacheConfigGenerator which contains a tool that can generate a safe and working config file for TWiki on Apache.
- In the twiki installation you find an example config file
misc/twiki_httpd_conf.txt(nevertheless, it is better to use the generator).
- The best and easiest way is to use webpage TWiki:TWiki.ApacheConfigGenerator
- In case you do not have root privileges on the server:
- In the root of the twiki installation and in the
twiki/bindirectory you find example.htaccessfiles you can copy and modify. The files contains help text explaining how to set them up. Intwiki/binyou find.htaccess.txtwhich can be copied to.htaccessand defined access to the CGI scripts. - In the TWiki
miscdirectory you findpub-htaccess.txtwhich you can copy topub/.htaccess,subdir-htaccess.txtwhich you can copy to all directories as.htaccessexcept bin and pub, and you findroot-htaccess.txtwhich you can copy to.htaccessin the twiki root directory. But again only use .htaccess files if you do not have root privileges.
- In the root of the twiki installation and in the
- If you are unsure about how to do this on your system, see TWiki:TWiki.InstallingTWiki#OtherPlatforms for links to information about various server setups.
- Note: When you use config files you need to restart Apache each time you change a setting to make the new setting active.
- Unless you are an Apache expert setting up the webserver can be quite difficult. But TWiki has three resources that make setting up Apache easier.
- Run the
configurescript from your browser (enterhttp://yourdomain/do/configureinto your browser address bar)- Specify and reenter a password. This is your configure password, as well as the
adminuser password once TWiki is running.- Note: In case you forgot the password, you can reset it by deleting
$TWiki::cfg{Password}fromLocalSite.cfgfile from{TWIKI_ROOT}/libdirectory.
- Note: In case you forgot the password, you can reset it by deleting
- When you run
configurefor the first time, you can only edit theGeneral Path Settingssection. Save these settings, and then return toconfigureto continue configuration. - Resolve any errors or warnings it tells you about.
- If your webserver can be accessed by more than one domain name make sure to add the additional alternative URLs to
{PermittedRedirectHostUrls} - When you return to configure you now need to setup Mail and Proxies. Especially the
{WebMasterEmail}, and{SMTP}{MAILHOST}must be defined to enable TWiki to send administrative emails, such as for registration and notification of topic changes. Many ISPs have introduced authentication when sending emails to fight spam so you may also have to set{SMTP}{Username}and{SMTP}{Password}. If you do not want to enable mailing or want to enable it later you can uncheck{EnableEmail}. - If you want administrative e-mails to be signed, see S/MIME setup instructions below.
- Specify and reenter a password. This is your configure password, as well as the
http://yourdomain.com/do/view and start TWiki-ing away!
Important Server Security Settings
Before you continue any further there are some basic and very important security settings you have to make sure are set correctly.- You absolutely must turn off any kind of PHP, Perl, Python, Server Side Includes etc in the
pubdirectory. TWiki has some built-in protection which renames files with dangerous file names by appending .txt to the file name. But this is a secondary security measure. The essential action that you must take is to turn off any possible execution of any of the attached files.
Most Linux distributions have a default Apache installation which has PHP and server side include (SSI) enabled. - Don't put the whole twiki distribution into an HTML document enabled directory. Apache needs to be aware of only two directories: The
bindirectory should be script enabled, and thepubdirectory should be HTML document enabled.
For those who do not have access to the Apache config files, a samplemisc/subdir-htaccess.txtfile can be copied as.htaccessto the data, lib, locale, templates, tools and working directories. - Attachments are not secured by default to the access control setting of the topic. In other words, anyone can read them if they know the direct URL of the attachment, which includes name of the web, topic and attachment. You can configure TWiki to secure attachments.
misc/twiki_httpd_conf.txt and example misc/htaccess.txt files include the needed settings that protect against all 3 security elements.
Next Steps
Once you have TWiki installed and running, you might consider the following optional steps for setting up and customizing your TWiki site. Many of the references below refer to topics within your TWiki installation. For example,TWiki.TWikiSkins refers to the TWikiSkins topic in your TWiki web. Easy way to jump directly to view the pages is to open your own TWiki in your browser and write TWiki.TWikiSkins in the Jump test box to the right in the top bar and hit Enter. You can find these topics in the on-line reference copy at the official TWiki website: TWiki-6.1 ReleaseEnable Authentication of Users
This step provides for site access control and user activity tracking on your TWiki site. This is particularly important for sites that are publicly accessible on the web. This guide describes only the most common of several possible authentication setups for TWiki and is suitable for public web sites. For information about other setups, see TWikiUserAuthentication, and TWiki:TWiki.TWikiUserAuthenticationSupplement- Under the
Security Settingspane ofconfigure:- Select
TWiki::LoginManager::TemplateLoginfor{LoginManager}. - Select
TWiki::Users::HtPasswdUserfor{PasswordManager}. - Save your
configuresettings. - Register yourself using the TWikiRegistration topic.
Check that the password manager recognizes the new user. Check that a new line with the username and encrypted password is added to the data/.htpasswdfile. If not, you probably got a path wrong, or the permissions may not allow the webserver user to write to that file.
- Select
- Edit a topic (by clicking on the
Editlink at beginning or end of topic) to check if authentication works.
LoginManager option TWiki::LoginManager::ApacheLogin uses a basic Apache type authentication where the browser itself prompts you for username and password. Most will find the TemplateLogin looking nicer. But ApacheLogin is required when you use Apache authentication methods like mod_ldap where all authentication is handled by an Apache module and not by the TWiki perl code. When you use ApacheLogin the apache configuration must be set up to require authentication of the some but not all the scripts in the bin directory. This section in the Apache config (or .htaccess) controls this
<FilesMatch "(attach|edit|manage|rename|save|upload|mail|logon|rest|.*auth).*">
   require valid-user
</FilesMatch>
The TWiki:TWiki.ApacheConfigGenerator
misc/twiki_httpd_conf.txt and bin/.htaccess.txt files this section is commented out with #. Uncomment the section when you use ApacheLogin. It is important that this section is commented out or removed when you use TemplateLogin.
Define the Administrator User(s)
Administrators have read and write access to any topic in TWiki, regardless of TWiki access controls. When you install TWiki one of the first things you will want to do is define yourself as an administrator. You become an administrator simply by adding yourself to the TWikiAdminGroup. It is the WikiName and not the login name you add to the group. Editing the Main.TWikiAdminGroup topic requires that you are an administrator. So to add the first administrator you need to login using the internal TWiki admin user login and the password you defined in configure.- Navigate to the Main.TWikiAdminGroup topic
- Follow carefully the steps TWikiAdminGroup of how to become an admin
- Note that if you use ApacheLogin you have to be registered and logged in before you use the internal admin login
Set TWiki Preferences
Preferences for customizing many aspects of TWiki are set simply by editing a special topic with TWiki.- TWikiPreferences. Read through it and identify any additional settings or changes you think you might need. You can edit the settings in TWiki.TWikiPreferences but these will be overwritten when you later upgrade to a newer TWiki version. Instead copy any settings or variables that you want to customize from TWiki.TWikiPreferences and paste them into Main.TWikiPreferences. When you later upgrade TWiki simply avoid overwriting the
data/Main/TWikiPreferences.txtfile and all your settings will be kept. Settings in Main.TWikiPreferences overrides settings in both TWiki.TWikiPreferences and any settings defined in plugin topics. See notes at the top of TWiki.TWikiPreferences for more information.
Enable Email Notification
Each TWiki web has an automatic email notification service that sends you an email with links to all of the topics modified since the last alert. To enable this service:- Confirm the Mail and Proxies settings in the Configure interface.
- Setup a cron job (or equivalent) to call the
tools/mailnotifyscript as described in the MailerContrib topic.
Enable Signed Email Notification
TWiki administrative e-mails are an attractive target for SPAM generators and phishing attacks. One good way to protect against this possibility to enable S/MIME signatures on all administrative e-mails. To do this, you need an an X.509 certificate and private key for the the{WebMasterEmail} email account. Obtain these as you would for any other S/MIME e-mail user.
To enable TWiki to sign administrative e-mails: - Enable e-mail as described above
- If necessary, convert your certificate and key files to PEM format ( openssl has all the necessary utilities)
- Place the certificate anyplace convenient that the webserver can read. It should be protected against write. The conventional place under linux is
/etc/pki/tls/certs - Place the key file in a secure location that only the webserver can read. It must not be readable by anyone else, and must not be served by the webserver.
- Using the
configurescript, change the following settings under Mail and Proxies:- Follow the directions under
{MailProgram}to enable an external mail program such as sendmail. Net::SMTP is not supported. - Enter the full path to the certificate file in the
{SmimeCertificateFile}configuration variable - Enter the full path to the private key file in the
{SmimeKeyFile}configuration variable - Save the configuration
- Follow the directions under
- Re-run the
configurescript an resolve any errors that it identifies
Enable WebStatistics
You can generate a listing manually, or on an automated schedule, of visits to individual pages on a per web basis. For information on setting up this feature, see the TWikiSiteTools topic.Automate removal of expired sessions and lease files
Per default TWiki cleans out expired session and lease files each time any topic is viewed. This however comes at a cost of lower performance. It is an advantage to define a negative value inconfigure for {Sessions}{ExpireAfter} (turn on expert mode to see it), and install a cronjob to run the tools/tick_twiki.pl script. Read The topic TWikiScripts#tick_twiki_pl for details how to do this.
Enable Localization
TWiki now supports displaying of national (non-ascii) characters and presentation of basic interface elements in different languages. To enable these features, see theLocalization section of configure. For more information about these features, see TWiki:TWiki.InternationalizationSupplementTailor New User Profile Topic
When a new users registers on your TWiki, a user profile topic is created for them based on the NewUserTemplate topic (and its UserForm). It contains additional resources you can use to:- Localize the user topic.
- Add and remove fields defined in the UserForm
Custom Start Web and Homepage
By default the TWiki home is Main.WebHome. Users tend to create content starting from the homepage. In most cases it is better to create a new web (workspace) for default content. That way the Main web can be kept clean and used just for users and TWiki groups. For example, you could create an "Intranet" web if TWiki is primarily used as an intranet, or a "KB" web if used as a knowledge base, etc. If you have a dedicated web as a starting point you obviously want users start at the home of that web. This can be configured in two places: 1. Redirect from site home to web home, and 2. Set the wiki logo URL. 1. Redirect from site home to web home When a user enters the domain name of your TWiki she expects to see the homepage. You can do that either with an Apache rewrite rule or an HTML meta redirect to redirect from/ to /twiki/bin/view/Intranet/WebHome. Here is an example index.html containing an HTML meta redirect you can use: Customize it and put it in your HTML document root on your TWiki sever:
<html>
<head>
<meta http-equiv="refresh" content="0;/do/view/Intranet/WebHome" />
</head>
<body>
Redirecting to <a href="/do/view/Intranet/WebHome">Intranet home</a>...
</body>
</html>
2. Set the wiki logo URL When a user clicks on the logo in the upper left or on the "Home" link in the top-bar she expects to navigate to the new homepage. You can do that by defining and customizing the following setting in Main.TWikiPreferences as described in the Set TWiki Preferences section:
   * URL of the logo:
      * Set WIKILOGOURL = %SCRIPTURLPATH{view}%/Intranet/WebHome
Customize the Site Logo
Create a logo with a transparent background and a maximum height of 55 pixels. Attach it to Main.TWikiPreferences, raw-edit that topic, and set the following bullet, assuming the name of the logo ismy-logo-100x50.png:
   * Logo of this TWiki installation:
      * Set WIKILOGOIMG = %PUBURLPATH%/%USERSWEB%/TWikiPreferences/my-logo-100x50.png
Customize the Look of Your TWiki!
The real power of TWiki lies in its flexibility to be customized to meet your needs. You can easily change the look of the default skins (called TopMenuSkin and PatternSkin) by reading the PatternSkinCustomization. At the official TWiki website you can find more resources. A good place to start exploring what's possible is TWiki:TWiki.TWikiAdminCookBookCustomize Special Pages
Some pages are meant to be customized after choice of authentication. If you do not use the internal TWiki password manager the topics that contains the features for changing and resetting passwords and changing the email address should be changed to a note describing how to perform these tasks in your organization. The topics are:Install Plugins
TWiki:Plugins.WebHomeconfigure. In this section you also find a Find More Extensions button which opens an application which can install additional plugins from the TWiki.org website. If you are behind a firewall or your server has no access to the Internet it is also possible to install plugins manually. Manual installation instructions for the plugins can be found in the plugin topics on TWiki.org. Additional documentation on TWiki plugins can be found at TWiki:TWiki.TWikiPluginsSupplementconfigure. You fill find these under the Extensions section of configure.
WYSIWYG And Raw Edit
From TWiki release 4.2.0 on the WYSIWYG editor has been replaced by a much better and more powerful editor and it was decided that WYSIWYG would be the default edit mode. An Edit Raw link is available for those that have a need or preference for this mode. However you may prefer to have the same user interface as in TWiki 4.1 where Edit was the raw text editor and you had a WYSIWYG button. This is possible by adding the following setting in the Main.TWikiPreferences, WebPreferences or user hompages:- Set EDITMETHOD = raw
Copyright, License and Classification Statements
At the bottom of each topic you will find a default copyright message saying "Copyright © by the contributing authors. All material on this collaboration platform is the property of the contributing authors." The WEBCOPYRIGHT setting defines this. This is often not adequate.- If your TWiki is used in a commercial application without public access you should replace this by your normal copyright notice. You should also consider adding classifications (e.g. For Internal Use Only) so people do not have to add this manually to every new topic.
- If your TWiki is public with public access you need to decide which copyright and license the contributions should be covered by. For open source type applications licenses such as the GNU Free Documentation License, FreeBSD Documentation License, and Creative Commons license are possible licenses to consider. Remember that once people have started contributing it is difficult and not correct to change or impose licenses on existing contributions.
- Copy the setting WEBCOPYRIGHT from TWiki.TWikiPreferences to Main.TWikiPreferences and alter the copied text to your need.
- You can create a unique message for each web by adding the WEBCOPYRIGHT setting to WebPreferences in each web. E.g. adding a confidencial classification to a very restricted web.
- The WEBCOPYRIGHT in TWiki.WebPreferences covers the documentation that comes with TWiki and is covered by the original TWiki Copyright and GPL License. You will normally leave this unchanged.
Troubleshooting
The first step is to re-run theconfigure script and make sure you have resolved all errors, and are satisfied that you understand any warnings.
If, by any chance, you forget the "admin" password, the same used in "configure" script, then please login to the server. Delete $TWiki::cfg{Password}= ' ...';. Set the new password using "configure" script.
Failing that, please check TWiki:TWiki.InstallingTWiki- For Unix or Linux, check TWiki:Codev.TWikiOnUnix and TWiki:Codev.TWikiOnLinux.
- For Windows, check the TWiki:Codev.WindowsInstallCookbook.
- For MacOS X, check TWiki:Codev.TWikiOnMacOSX.
Appendices
TWiki System Requirements
Low client and server base requirements are core features that keep TWiki widely deployable, particularly across a range of browser platforms and versions. Many PluginsServer Requirements
TWiki is written in Perl 5, uses a number of shell commands, and requires RCS (Revision Control System)| Resource | Required Server Environment * |
|---|---|
| Perl | 5.10.1 or higher |
| RCS | 5.7 or higher (including GNU diff) Optional, TWiki includes a pure Perl implementation of RCS that can be used instead (although it's slower) |
GNU diff |
GNU diff 2.7 or higher is required when not using the all-Perl RcsLite. Install on PATH if not included with RCS (check version with diff -v) Must be the version used by RCS, to avoid problems with binary attachments - RCS may have hard-coded path to diff |
GNU df |
Used by the site statistics to record disk usage statistics, optional. The df command is pre-installed on Linux and OS-X. On Windows install the CoreUtils for Windows |
GNU patch |
For upgrades only: GNU patch is required when using the TWiki:Codev.UpgradeTWiki |
GNU fgrep, egrep |
Modify command line parameters in configure if you use non-GNU grep programs |
zip |
Zip archive command line utility. Used by the BackupRestorePlugin to create and restore from backups. |
| Cron/scheduler | • Unix: cron • Windows: cron equivalents |
| Web server | Apache is well supported; see TWiki:TWiki.InstallingTWiki#OtherWebServers |
Required CPAN Modules
Most of the CPAN libraries listesd below are part of a standard Perl installation so you most likely have them all! See TWiki:TWiki.HowToInstallCpanModules| Module | Preferred version | Comment |
|---|---|---|
Algorithm::Diff |
Included in TWiki distribution | |
CGI |
>=3.18 & <=4.03 | A suitable version ships with TWiki since TWiki-6.0.2 using CgiContrib, e.g. it is no longer necessary to install or downgrade this module. Versions 2.89 and 3.37, as well as version > 4.13 must be avoided. |
CGI::Carp |
>=1.26 | |
Config |
>=0 | |
Cwd |
>=3.05 | |
Data::Dumper |
>=2.121 | |
Encode |
>=2.1 | |
Error |
Included in TWiki distribution | |
File::Copy |
>=2.06 | |
File::Find |
>=1.05 | |
File::Spec |
>=3.05 | |
File::Temp |
>=0.18 | This version included in Perl 5.9.5. File::Temp needs to be updated on RedHat 5 and CentOS 5. |
FileHandle |
>=2.01 | |
HTML::Parser |
>=3.28 | Needed by the WysiwygPlugin for WYSIWYG editing |
HTML::Entities |
>=1.25 | Needed by the WysiwygPlugin for WYSIWYG editing; part of the HTML::Parser package. |
IO::File |
>=1.10 | |
LWP |
Needed to install extensions in TWiki configure | |
Net::SMTP |
>=2.29 | Used for sending mail |
Text::Diff |
Included in TWiki distribution | |
Time::Local |
>=1.11 |
Optional CPAN Modules
The following Perl modules may be used by TWiki: See TWiki:TWiki.HowToInstallCpanModules| Module | Preferred version | Description |
|---|---|---|
Archive::Tar |
May be required by the Extensions Installer in configure if command line tar or unzip is not available | |
Authen::SASL |
Used for SMTP Authentication | |
CGI::Cookie |
>=1.24 | Used for session support |
CGI::Session |
>=3.95 | Used for session support |
Crypt::SMIME |
>=0.09 | Required if S/MIME-signed administrative e-mail is enabled. |
Digest::base |
||
Digest::SHA1 |
||
JSON |
>=2.0 | Required if TWikiSheetPlugin is used, or if JSON objects are stored and retrieved in SetGetPlugin |
Locale::Maketext::Lexicon |
>=0 | Used for I18N support |
Net::SMTP |
>=2.29 | Used for sending mail |
URI |
Used for configure |
configure script, or if you're still trying to get to that point, check from the command line like this:
perl -e 'use FileHandle; print $FileHandle::VERSION."\n"'
Client Requirements
The TWiki standard installation has relatively low browser requirements:- HTML 3.2 compliant
- Cookies, if persistent sessions are required
Important note about TWiki Plugins
- Plugins can require just about anything - browser-specific functions, stylesheets (CSS), Java applets, cookies, specific Perl modules,... - check the individual Plugin specs.
Notes on Installing TWiki on Non-Root Account
The following supplemental notes to the Basic Installation instructions apply to installing TWiki on a system where you don't have Unix/Linux root (administrator) privileges, for example, on a hosted Web account or an intranet server administered by someone else. Referring to the Basic Installation steps presented above:- Step 2: If you cannot unpack the TWiki distribution directly in your installation directory, you can unpack the distribution on your local PC and then manually create the directory structure on your host server and upload the files as follows:
- Using the table below, create a directory structure on your host server
- Upload the TWiki files by FTP (transfer as text except for the image files in
pubdirectory.) - Note: Don't worry if you are not able to put the twiki/lib directory at the same level as the
twiki/bindirectory (e.g. because CGI bin directories can't be under your home directory and you don't have root access). You can create this directory elsewhere and configure thetwiki/bin/LocalLib.cfgfile (done in Step 2).TWiki dir: What it is: Where to copy: Example: twiki/TWiki package TWiki root directory, should be secure from public access /home/smith/twiki/twiki/bin/CGI bin move to script-enabled dirctory /home/smith/cgi/twiki/twiki/lib/library files leave in TWiki root /home/smith/twiki/lib/twiki/locale/language files leave in TWiki root /home/smith/twiki/locale/twiki/pub/public files move to HTML document enabled directory /home/smith/html/twiki-pub/twiki/data/topic data leave in TWiki root /home/smith/twiki/data/twiki/templates/web templates leave in TWiki root /home/smith/twiki/templates/twiki/tools/TWiki utlilities leave in TWiki root /home/smith/twiki/tools/twiki/working/Temporary and internal files leave in TWiki root /home/smith/twiki/working/
- Step 3: Files in the pub directory must be readable as a url. This means that directory permissions should be set to
755(or775) and file permissions should be set to644(or664). If you can run achmodcommand, you can accomplish this in two quick steps by running these commands from the root direct:-
chmod -R 755 pub -
chmod 644 `find pub -type f -print` - In addition, you should create a
.htaccessfile in the pub directory, using the template included in the distribution entitledmisc/pub-htaccess.txt. - Note: This setup does not provide for absolute security for TWiki attachments. For more information, see TWiki:Codev.SecuringYourTWiki.
-
- Step 6: In order to run the configure script, create a file called
.htaccessin the bin directory that includes the following single line:SetHandler cgi-script. This informs the server to treat all the perl scripts in the bin directory as scripts.
Installing Manually Without Configure
It is highly recommended to use run configure from the browser when setting up TWiki. Configure does a lot of the hard work for you. But there may be instances where you do not want to use configure or where configure simply won't run because of a missing dependency. The manual steps you have to take are:- Copy the file
lib/TWiki.spectolib/LocalSite.cfg - Remove the comment # in front of
$TWiki::cfg{DefaultUrlHost},$TWiki::cfg{ScriptUrlPath},$TWiki::cfg{PubUrlPath},$TWiki::cfg{PubDir},$TWiki::cfg{TemplateDir},$TWiki::cfg{DataDir},$TWiki::cfg{LocalesDir}, and$TWiki::cfg{OS}and make sure these settings have the correct values. - Make sure to define at least these settings:
$TWiki::cfg{LoginManager},$TWiki::cfg{WebMasterEmail},$TWiki::cfg{SMTP}{MAILHOST},$TWiki::cfg{SMTP}{SENDERHOST}.
TWiki Upgrade Guide
This guide covers upgrading from a previous version of TWiki (such as TWiki-5.1) to TWiki-6.1Overview
TWiki-6.1.0 is a minor release that brings many usability enhancements, strengthens TWiki as an application platform, and has enhanced security. Use this guide to upgrade a previous TWiki release to TWiki-6.1. Use the TWikiInstallationGuide if you do not have data to carry forward.Upgrade Requirements
- Please review the AdminSkillsAssumptions before you upgrade TWiki
- Review supplemental document TWiki:TWiki.TWikiUpgradeTo06x01 for latest information and experience notes.
- To upgrade from a release prior to TWiki Release 01-Sep-2004, start with TWiki:TWiki.UpgradingTWiki on TWiki.org
- To upgrade from a standard TWiki Release 01-Sep-2004 to the latest TWiki-6.1 Production Release, follow the instructions below
- Once the upgrade has been applied, an existing earlier installation will still be able to read all the topics, but should not be used to write. Make sure you take a backup!
Major Changes Compared to Earlier TWiki Releases
See TWikiReleaseNotes04x00, TWikiReleaseNotes04x01, TWikiReleaseNotes04x02, TWikiReleaseNotes04x03, TWikiReleaseNotes05x00, TWikiReleaseNotes05x01, TWikiReleaseNotes06x00, TWikiReleaseNotes06x01New Upgrade Option with BackupRestorePlugin
TWiki now has a new solution to backup, restore and upgrade TWiki sites. It can be used via browser and on the command line. The BackupRestorePlugin is pre-installed in TWiki-5.1 and later releases; it can be installed in older TWiki releases as low as TWiki-2001-09-01 (Athens Release) to easily create a backup that can be restored on a new TWiki release. This offers an easy upgrade path for TWiki. Check TWiki:Plugins.BackupRestorePluginUpgrade Procedure
The following steps are a rough guide to upgrading only. It is impossible to give detailed instructions, as what you have to do may depend on whether you can configure the webserver or not, and how much you have changed distributed files in your current TWiki release. The main steps are:- Install the new TWiki version, configure it, and get it to work similar to the old version
- Install additional extensions (plugins) -- make sure to use the latest versions
- Copy all the non-default webs from the old installation to the new
- Copy the users from old installation to the new including all their topics from Main
- Apply customizations to your skin (logos, menu bars etc)
- Apply preferences from old installation
- Switch-over
Installation
- Follow the installation instructions at TWiki:TWiki.TWikiInstallationGuide. Install the new release in a new directory. Do not install on top of the old release.
- Use the configure script to configure TWiki.
- If you are upgrading from a 4.x.x release, you can carry over the configure settings from the old release.
- You need to run configure and save the configuration once when you upgrade as this will update the altered and added settings.
- You can also choose to start with a fresh configuration and walk through all the settings using your old
twiki/lib/LocalSite.cfgas a reference. This way you will not have old obsolete settings in the newLocalSite.cfg. - If at any time during the installation you want to start over from fresh, delete the
LocalSite.cfgfile and re-run configure.
- Additional resources
- TWiki:TWiki.InstallingTWiki#OtherPlatforms
- TWiki:TWiki.ApacheConfigGenerator
- TWiki:TWiki.SettingFileAccessRightsLinuxUnix
- If you upgrade from an older TWiki your
lib/TWiki.cfgfrom the old TWiki installation is a good resource for some of the settings you will need but you cannot reuse the old TWiki.cfg.
- TWiki:TWiki.InstallingTWiki#OtherPlatforms
- Make sure you have a working basic TWiki before you continue
Install Extensions
- From TWiki-4.1.0 and on, the configure script which you ran during installation supports installation of additional plugins.
- Manual installation is possible. Follow the instruction on the plugin page at twiki.org.
- Check the plugin topics from your old TWiki installation. There may be plugin settings that you want to transfer to the new TWiki installation.
Hint: For an easier upgrade later on, set the plugin preferences settings in the Main.TWikiPreferences topic, not in the plugin topic. To identify the plugin, prefix the name of the setting with the capitalized name of the plugin. For example, to change the DEFAULT_TYPEsetting of the CommentPlugin, create aCOMMENTPLUGIN_DEFAULT_TYPEsetting in Main.TWikiPreferences. - Typical plugin settings you may have altered.
- CommentPlugin - Set DEFAULT_TYPE
- EditTablePlugin - Set CHANGEROWS, Set QUIETSAVE, and Set EDITBUTTON
- InterwikiPlugin - Set RULESTOPIC
- InterWikis - If you added your own rules you should save this topic and not overwrite it.
- SlideShowPlugin - Make sure you did not change the embedded 'Default Slide Template' If you did you should save it. It is a bad idea to do. It is better to define your own slide show templates as separate topics that do not get overwritten when you upgrade.
- SmiliesPlugin - Did you add your own smileys?
- TablePlugin - Set TABLEATTRIBUTES.
- Remember that a plugin must be activated in configure.
- To avoid having to re-apply plugin settings each time you upgrade a plugin or TWiki itself, define the altered plugin settings in Main.TWikiPreferences instead.
Copy your old webs to new TWiki
- Webs come in pairs, such as
twiki/data/Engineering(for page content) andtwiki/pub/Engineering(for attachments). - When upgrading from Cairo or earlier it may be necessary to unlock the rcs files in data and pub directories from the old installation using the following shell commands:
-
find data -name '*,v' -exec rcs -u -M '{}' \; -
find pub -name '*,v' -exec rcs -u -M '{}' \;
-
- Copy your local webs over to the data and pub directories of the new install. Do not copy the default webs: TWiki, Main, Trash, Sandbox, _default, and _empty.
- Make sure all data and pub files and directories are owned by the webserver user.
- Note: TWiki's WebChanges topics depend on the file timestamp. If you touch the .txt files make sure to preserve the timestamp, or to change them in the sequence of old file timestamps.
Copy Users And Their Topics From Main Web
- Copy all the topics from the Main web and corresponding pub/Main directories from the old TWiki to the new TWiki but do not overwrite any of the new topics already inside the new Main directory!
- Manually merge all the users from the old
Main.TWikiUserstopic to the new TWiki. If you upgrade from Cairo you can simply use the old file and add the missing new system users to the list of users. If you upgrade from TWiki-4.0.x simply use the old topic. Starting from 4.2.0 TWiki no longer ships with aMain.TWikiUserstopic. When you register the first user TWiki now checks for an existingMain.TWikiUsersand if it does not exist it gets created.- If you want users to be able to use a login ID other than their WikiName, such as when using LDAP or SSO authentication, set the configure setting
{Register}{AllowLoginName}to1.
- If you want users to be able to use a login ID other than their WikiName, such as when using LDAP or SSO authentication, set the configure setting
- If you use
data/.htpasswdfor authentication copy this file from the old TWiki to the new.- If you upgrade from Cairo and you are using the Htpasswd login manager, then note that email addresses for users have moved out of user topics and into the password file. There is a script that performs this extra upgrade step for you - see
tools/upgrade_emails.pl.
- If you upgrade from Cairo and you are using the Htpasswd login manager, then note that email addresses for users have moved out of user topics and into the password file. There is a script that performs this extra upgrade step for you - see
- The old Sandbox web may have a lot of useful topic and users may use it actively for drafts. Manually select the topics (remember the corresponding pub directories) from the old Sandbox web and copy them to the one of the new TWiki. Decide if you want to overwrite the sandbox homepage and left menu bar or keep the new.
- If you added or removed fields from the user topic form you may also have tailored
TWiki.TWikiRegistration. Make sure you either reuse the registration topic from the old installation or apply the same field changes to the newTWiki.TWikiRegistrationtopic. - Starting from 4.2.0 TWiki ships with
NewUserTemplateandUserFormin the TWiki web. If you choose to tailor anything you are strongly advised to copyNewUserTemplateandUserFormto the Main web and tailor the Main web copies. TWiki will look for theNewUserTemplatein the Main web first and if it does not exist it uses the default from the TWiki web. By creating aMain.NewUserTemplateand itsMain.UserFormyou will not loose your tailorings next time you upgrade TWiki. - Make sure all data and pub files and directories are owned by the webserver user.
Apply Customizations To The Skin
- Add Logos, update top bar and left bar as required.
- Apply any desired changes to style sheets and templates. The default TopMenuSkin is based on the PatternSkin.
- Additional resources:
Apply Preferences From Old Installation
- Transfer any customized and local settings from TWiki.TWikiPreferences to the topic pointed at by {LocalSitePreferences} (Main.TWikiPreferences). Per default this is
Main.TWikiPreferences. This avoids having to write over files in the distribution on a later upgrade. - If you changed any of the topics in the original TWiki distribution, you will have to transfer your changes to the new install manually. There is no simple way to do this, though a suggestion is to use 'diff' to find changed files in the
data/TWikiof the old and new TWiki installation, and transfer the changes into the new TWiki install. If you can run a GUI on your server, you may find that using a visual diff tool like WinMerge, meld, kdiff3, xxdiff, etc. is helpful. - Compare the
WebPreferencestopics in the old TWiki Installation with the default from the new TWiki installation and add any new Preferences that may be relevant. - Compare the
WebLeftBartopics in the old TWiki Installation with the default from the new TWiki installation and add any new feature that you desire.
Switch-Over
Once you have tested the new TWiki you can switch over to the new site. If the same domain and URL is used:- Update the DNS settings of the TWiki domain with the IP address of the new TWiki server.
- Keep in mind that the updated DNS is not seen immediately by all users at the same time. The DNS propagation can take several hours and depends on the time to live (TTL) setting. Because of this it is recommended to disable content update on the old server. You could simply rename or move all scripts in
twiki/binthat allow content update, such asattach,edit,manage,rename,save,upload,rest. Alternatively, if you have a recent TWiki version on the old server you can set aREADONLYSKINMODE = 1setting inMain.TWikiPreferencesto turn the skin into read-only mode.
- Add a DNS setting for the new TWiki domain if needed.
- Redirect users visiting the old TWiki to the new TWiki. The TWiki:Plugins.MovedSkin has been designed for that task. Install it on your old TWiki, and configure it with the proper URL of the new TWiki. After that, users on the old TWiki will see a yellow box informing them of the move, with a link to the new URL of the page visited.
Customization of Special Pages
Some pages in the TWiki web are meant to be customized after choice of authentication. If you do not use the internal TWiki password manager the topics that contains the features for changing and resetting passwords and changing the email address should be changed to a note describing how to perform these tasks in your organization. If you have made such customizations remember to replace these topics in the TWiki web with the tailored versions from your old installation. The topics are:-
TWiki.ChangePassword -
TWiki.ResetPassword -
TWiki.ChangeEmailAddress
Upgrading from Cairo to TWiki-4 (additional advice)
Favicon
TWiki-4's PatternSkin introduces the use of the favicon feature which most browsers use to show a small icon in front of the URL and for bookmarks. In TWiki-4 it is assumed that each web has a favicon.ico file attached to the WebPreferences topic. When you upgrade from Cairo to TWiki-4 you do not have this file and you will get flooded with errors the error log of your web server. There are two solutions to this.- Attach a favicon.ico file to WebPreferences in each web.
- Preferred: Change the setting of the location of favicon.ico in TWikiPreferences so all webs use the favicon.ico from the TWiki web. This is the fastest and easiest solution.
* Set FAVICON = %PUBURLPATH%/%SYSTEMWEB%/%WEBPREFSTOPIC%/favicon.ico
TWikiUsers topic in Main web
Your old Main.TWikiUsers topic will work in the new TWiki but you will need to ensure that the following four users from the TWikiUsersTemplate topic are copied to the existing TWikiUsers topic in proper alphabetical order:* TWikiContributor - 2005-01-01 * TWikiGuest - guest - 1999-02-10 * TWikiRegistrationAgent - 2005-01-01 * UnknownUser - 2005-01-01What these users are:
- TWikiContributor - placeholder for a TWiki developer, and is used in TWiki documentation
- TWikiGuest - guest user, used as a fallback if the user can't be identified
- TWikiRegistrationAgent - special user used during the new user registration process
- UnknownUser - used where the author of a previously stored piece of data can't be determined
Set ALLOWTOPICCHANGE = TWikiAdminGroup, TWikiRegistrationAgent access control setting. Otherwise people will not be able to register.
Important Changes since TWiki-4.0.5
Supported Perl version
TWiki 4.0.5 worked on Perl version 5.6.X. Reports from users has shown that unfortunately TWiki 4.1.0 does not support Perl versions older then 5.8.0. It is the goal that TWiki should work on at least Perl version 5.6.X but none of the developers have had access to Perl installations older than 5.8.0. Since TWiki 4.1.0 has some urgent bugs the development team decided to release TWiki 4.1.1 without resolving the issue with Perl 5.6.X. We will however address this and try and resolve it for a planned 4.1.2 release. The TWiki community is very interested in contributions from users that have fixes for the code which will enable TWiki to run on older versions of Perl. See the WhatVersionsOfPerlAreSupportedTemplate spec changed
Until TWiki 4.0.5 TWikiTemplates the text inside template definition blocks (anything between%TMPL:DEF{"block"}% and %TMPL:END% was stripped of leading and trailing white space incl new lines.
This caused a lot of problems for skin developers when you wanted a newline before or after the block text.
From TWiki 4.1.0 this has changed so that white space is no longer stripped. Skins like PatternSkin and NatSkin have been updated so that they work with the new behavior. But if you use an older skin or have written your own you will most likely need to make some adjustments.
It is not difficult. The general rule is - if you get mysterious blank lines in your skin, the newline after the %TMPL:DEF{"block"}% needs to be removed. Ie. the content of the block must follow on the same line as the TMPL:DEF.
The spec change have the same impact on CommentPlugin templates where you may have to remove the first line break after the TMPL:DEF. See the CommentPluginTemplate for examples of how comment template definitions should look like in TWiki-4.1.X
An example: A CommentPlugin template that adds a comment as appending a row to a table. Before the spec change this would work.
<verbatim>
%TMPL:DEF{OUTPUT:tabletest}%%POS:BEFORE%
|%URLPARAM{"comment"}%| -- %WIKIUSERNAME% - %DATE% |
%TMPL:END%
</verbatim>
From Twiki 4.1.0 the old template definition will add an empty line before the new table row. To fix it simply remove the new line before the table.
<verbatim>
%TMPL:DEF{OUTPUT:tabletest}%%POS:BEFORE%|%URLPARAM{"comment"}%| -- %WIKIUSERNAME% - %DATE% |
%TMPL:END%
</verbatim>
The advantage of the spec change is that now you can add leading and trailing white space including new lines. This was not possible before.
Important Changes since TWiki-4.1.0
New location for session and other temporary files
An upgrader upgrading to 4.1.1 should note the following important change The directory for passthrough files and session files have been replaced by a common directory for temporary files used by TWiki. Previously the two configure settings{PassthroughDir} and {Sessions}{Dir} were by default set to /tmp. These config settings have been replaced by {TempfileDir} with the default setting value /tmp/twiki. If the twiki directory does not exist twiki will create it first time it needs it.
It is highly recommended no longer to use the tmp directory common to other web applications and the new default will work fine for most. You may want to delete all the old session files in /tmp after the upgrade to 4.1.1. They all start with cgisess_. It is additionally highly recommended to limit write access to the {TempfileDir} for security reasons if you have non-admin users with login access to the webserver just like you would do with the other webserver directories.
Important Changes since TWiki-4.1.2
New WYSIWYG Editor
TWiki now ships with a new WYSIWYG editor based on TinyMCE which replaces the Kupu based editor. TinyMCE is not a perfect Wysiwyg editor but it is magnitudes better than the previously used Kupu editor. The WysiwygPlugin that drives the engine behind both TinyMCE has additionally been heavily improved so that fewer TWiki Applications are negatively affected by editing in WYSIWYG mode. When TinyMCEPlugin is enabled, the Edit button by default becomes WYSIWYG editing mode. A new Raw Edit link has been added to enable application developers to edit the good old way. The WYSIWYG button has been removed.NEWTOPICLINKSYMBOL removed
The NEWTOPICLINKSYMBOL preference which was deprecated in 4.1 has now been removed from the code. If you want to control the appearance of new links, you can use NEWLINKFORMAT.UserForm and NewUserTemplate Customization
When a new user registers on TWiki his user topic is created based on theNewUserTemplate and UserForm.
The NewUserTemplate was located in the TWiki web and the UserForm in the Main web. When upgrading TWiki these were some of the topics you had to take care not to overwrite.
From 4.2.0 the UserForm and NewUserTemplate are distributed in the TWiki web. If you create the two in the Main web the Main web version will be used instead. So if you tailor the user topic format or the form then you should always copy the two files to the Main web and modify the ones in the Main web. When you later upgrade TWiki your tailored template and form will not be overwritten.
TWikiUsers no longer distributed
TheMain.TWikiUsers topic contains all the registered users. It is a topic you do not want to overwrite when you upgrade TWiki.
From 4.2.0 this file is no longer included in the TWiki distribution. When you register the first time TWiki creates the Main.TWikiUsers topic in the Main web if it does not exist already. This means that you can now upgrade TWiki without risk of overwriting the important TWikiUsers topic.
- For new installers this makes no difference at all
- For upgraders this is one less problem to worry about as your important Main.TWikiUsers topic now no longer gets overwritten when upgrading.
New working directory
A new working directory which by default is located in the twiki root, has been introduced which contains:
- registration_approvals - with 4.2.0 it is moved to here from the data directory.
- tmp - so we now avoid having to fight with special access rights and /tmp directory that gets cleaned out when booting.
- work_areas - with 4.2.0 it is moved to here from the pub directory. Configure automatically moved the directory when you upgrade.
{WorkingDir} defines the container directory for temporary files, extensions' work areas, and intermediate registration data. The default is working under your installation root.
Take care for that change if you run your own routine to delete obsolete session files, which will now be found under working/tmp/cgisess*.
New Internal Admin Login
TWiki 4.2 introduces a new Internal Admin Login feature which uses "admin" (configurable) as username and the password used for configure to become temporary administrator. When you do a new installation you need to use this feature as Main.TWikiAdminGroup is now access restricted by default to avoid security attacks during the hours an installation may take. From configure there is a link to the TWikiAdminGroup topic and on TWikiAdminGroup the step by step instructions are written in a yellow box. Our advice is not to remove this help text in case you need it later.Important Changes since TWiki-5.0.0
New TopMenuSkin
The TopMenuSkin adds pulldown menus for better usability and corporate/modern look&feel. This skin is based on the PatternSkin, which used the WebLeftBar in each web for navigation. The TopMenuSkin has a new WebTopBar that defines the menu structure in each web. A default menu is shown in case WebTopBar is missing in a web, so you do not need to add a WebTopBar topic to all your existing webs. See TopMenuSkin#WebSpecific instructions in case you need a customized menu structure in a specific web.Important Changes since TWiki-5.1.0
New Page Bookmarks Feature
A new bookmark feature has been introduced that replaces the personal left-bar links. Bookmarking a page is now a simple point and click operation: In the Account pulldown menu, select "Bookmark this page...". Existing bookmarks can be managed with an edit table in Main.<wikiname>Bookmarks topic, accessible via the "----- Bookmarks -----" pulldown menu of the Account pulldown. The personal left-bar topics such as JohnSmithLeftBar are no longer used. Ask users to select the "----- Bookmarks -----" pulldown menu of the Account pulldown to initially create the bookmarks topic, then to either bookmark pages, or to manually copy & paste old left-bar links to the bookmarks topic.User Profile Pages Tailored for Workplace
Previous user profile pages had a bare bones look and the form fields were more tailored for public TWiki sites. TWiki-5.1 brings a more visual/modern page layout with profile picture selector, as well as default form fields tailored for the workplace. Changes to the TWiki.UserForm: Renamed:-
FirstNametoFirst Name(no change in%META:FIELD name) -
LastNametoLast Name(no change in%META:FIELD name) -
OrganisationNametoOrganization -
OrganisationURLtoURL -
ProfessiontoTitles -
VoIPtoSkype ID -
StatetoRegion
-
Address -
InstantMessaging (IM) -
HomePage -
Comment
-
Department -
Status Update
Important Changes since TWiki-6.0.0
Spec Change for Empty DENYTOPICVIEW
From TWiki 4.0 and prior to 6.0, the syntax* Set DENYTOPICVIEW = (nothing) in a topic means deny nobody the topic view. The reason for this behavior is that it allows public access to a topic in a restricted web, e.g. having * Set ALLOWWEBVIEW = Main.VipGroup in WebPreferences. This is not symmetric with the fact that an empty DENYWEBVIEW is the same as an undefined DENYWEBVIEW, hence confusing.
From TWiki 6.0 on, an empty DENYTOPICVIEW means the same as not defined. To open up a topic in a restricted web, you need to use * Set ALLOWTOPICVIEW = Main.AllUsersGroup. The Main.AllUsersGroup is new. It is a pseudo group containing all authenticated and unauthenticated users. You can use Main.AllAuthUsersGroup if you want to specify all authenticated users.
To keep publicly accessible topics in restricted webs publicly accessible, the tools/eliminate_emptydenytopic script is provided, which replaces * Set DENYTOPIC<action> = with * Set ALLOWTOPIC<action> = Main.AllUsersGroup in all topics in all webs.
Note: See more changes since TWiki-6.0.0 in TWikiReleaseNotes06x00.
Important Changes since TWiki-6.1.0
There are no significant changes affecting an upgrade from TWiki-6.0.x to TWiki-6.1.0. Note: See changes since TWiki-6.1.0 in TWikiReleaseNotes06x01.TWiki User Authentication
TWiki site access control and user activity tracking optionsOverview
Authentication, or "logging in", is the process by which a user lets TWiki know who they are. Authentication isn't just about access control. TWiki uses authentication to identify users so it can keep track of who made changes, and manage a wide range of personal settings. With authentication enabled, users can personalise TWiki and contribute as recognised individuals, instead of ghosts. TWiki authentication is very flexible, and can either stand alone or integrate with existing authentication schemes. You can set up TWiki to require authentication for every access or only for changes. Authentication is also essential for access control. Quick Authentication Test - Use the %USERINFO% variable to return your current identity:- You are guest, TWikiGuest,
Password Management
As shipped, TWiki supports the Apache 'htpasswd' password manager. This manager supports the use of.htpasswd files on the server. These files can be unique to TWiki, or can be shared with other applications (such as an Apache webserver). A variety of password encodings are supported for flexibility when re-using existing files. See the descriptive comments in the Security Settings section of the configure interface for more details.
You can easily plug in alternate password management modules to support interfaces to other third-party authentication databases.
User Mapping
Often, when you are using an external authentication method, you want to map from an unfriendly "login name" to a more friendly WikiName. Also, an external authentication database may well have user information you want to import into TWiki, such as user groups. By default, TWiki supports mapping of usernames to wikinames, and supports TWiki groups internal to TWiki. If you want, you can plug in an alternate user mapping module to support importing groups and other entities.User Registration
New user registration uses the password manager to set and change passwords, and to store email addresses. It is also responsible for the new user verification process. The registration process supports single user registration via the TWikiRegistration page, and bulk user registration via the BulkRegistration page (for admins only). The registration process is also responsible for creating user topics and setting up the mapping information used by the User Mapping support.Main/WebPreferences. By doing so, new users are able to register without any errors.
Login Management
Login management controls how users log in. There are three basic options: No login, login via a TWiki login page, and login using webserver authentication support. No Login (select none in configure)
No Login does exactly what it says. Forget about authentication to make your site completely public - anyone can browse and edit freely, in classic Wiki style. All visitors are given the TWikiGuest default identity so you can't track individual user activity.
Template Login (select =TWiki::LoginManager::TemplateLogin in configure)
Template Login asks for a username and password in a web page, and processes them using whatever Password Manager you choose. Users can log in and log out. Client Sessions are used to remember users. Users can choose to have their session remembered so they will automatically be logged in the next time they start their browser.Enabling Template Login
- Use the configure interface to
- select the
TWiki::LoginManager::TemplateLoginlogin manager (on the Security Settings pane). - select the appropriate password manager for your system, or provide your own.
- there is also an EXPERT configure setting
{TemplateLogin}{PreventBrowserRememberingPassword}that you can set to prevent browsers from remembering usernames and passwords if you are concerned about public terminal usage.
- select the
- Register yourself in the TWikiRegistration topic.
Check that the password manager recognises the new user. If you are using .htpasswdfiles, check that a new line with the username and encrypted password is added to the.htpasswdfile. If not, you probably got a path wrong, or the permissions may not allow the webserver user to write to that file. - Create a new topic to check if authentication works.
- Edit the TWikiAdminGroup topic in the Main web to include users with system administrator status.
This is a very important step, as users in this group can access all topics, independent of TWiki access controls.
pub area, unless they are only accessed through the viewfile script. If your pub directory is set up in the webserver to allow open access you may want to add .htaccess files in there to restrict access.
name="" parameter of the input tags must start with: "Twk0..." (if this is an optional entry), or "Twk1..." (if this is a required entry). This ensures that the fields are carried over into the user profile page correctly. Do not modify the version of TWikiRegistration shipped with TWiki, as your changes will be overwritten next time you upgrade.
Apache Login (select =TWiki::LoginManager::ApacheLogin in configure)
Using this method TWiki does not authenticate users internally. Instead it depends on theREMOTE_USER environment variable, which the webserver passes to TWiki when you enable authentication in the webserver (as described in RFC 3875 - "The Common Gateway Interface v1.1"mod_authnz_ldap or mod_authn_dbd, you can just plug in directly to them.
The disadvantage is that because the user identity is cached in the browser, you can log in, but you can't log out again unless you restart the browser.
TWiki maps the REMOTE_USER that was used to log in to the webserver to a WikiName using the table in TWikiUsers. This table is updated whenever a user registers, so users can choose not to register (in which case their webserver login name is used for their signature) or register (in which case that login name is mapped to their WikiName).
The same private .htpasswd file used in TWiki Template Login can be used to authenticate Apache users, using the Apache Basic Authentication support.
Warning: Do not use the Apache htpasswd program with .htpasswd files generated by TWiki! htpasswd wipes out email addresses that TWiki plants in the info fields of this file.
Enabling Apache Login using =mod_auth
You can use any other Apache authentication module that sets REMOTE_USER.- Use configure to select the
TWiki::LoginManager::ApacheLoginlogin manager. - Use configure to set up TWiki to create the right kind of
.htpasswdentries. - Create a
.htaccessfile in thetwiki/bindirectory. There is an template for this file in twiki/bin/.htaccess.txtthat you can copy and change. The comments in the file explain what needs to be done. If you got it right, the browser should now ask for a login name and password when you click on Edit. If .htaccessdoes not have the desired effect, you may need to "AllowOverride All" for the directory inhttpd.conf(if you have root access; otherwise, e-mail web server support)
At this time TWikiAccessControls do not control access to files in the pubarea, unless they are only accessed through theviewfilescript. If yourpubdirectory is set up to allow open access you may want to add.htaccessfiles in there as well to restrict access - You can create a custom version of the TWikiRegistration form by copying the default topic, and then deleting or adding input tags in your copy. The
name=""parameter of the input tags must start with:"Twk0..."(if this is an optional entry), or"Twk1..."(if this is a required entry). This ensures that the fields are carried over into the user profile page correctly. Do not modify the version of TWikiRegistration shipped with TWiki, as your changes will be overwritten next time you upgrade.
The default new user template page is in TWiki.NewUserTemplate. The same variables get expanded as in the template topics. You can create a custom new user profile page by creating the Main.NewUserTemplate topic, which will then override the default. - Register yourself in the TWikiRegistration topic.
Check that a new line with the username and encrypted password is added to the .htpasswdfile. If not, you may have got a path wrong, or the permissions may not allow the webserver user to write to that file. - Create a new topic to check if authentication works.
- Edit the TWikiAdminGroup topic in the Main web to include users with system administrator status.
This is a very important step, as users in this group can access all topics, independent of TWiki access controls.
Logons via bin/logon
Any time a user requests a page that needs authentication, they will be forced to log on. It may be convenient to have a "login" link as well, to give the system a chance to identify the user and retrieve their personal settings. It may be convenient to force them to log in. Thebin/logon script enables this. If you are using Apache Login, the bin/logon script must be setup in the bin/.htaccess file to be a script which requires a valid user. Once authenticated, it will redirect the user to the view URL for the page from which the logon script was linked.
Sessions
TWiki uses the CPAN:CGI::SessionGetting, Setting, and Clearing Session Variables
You can get, set, and clear session variables from within TWiki web pages or by using script parameters. This allows you to use the session as a personal "persistent memory space" that is not lost until the web browser is closed. Also note that if a session variable has the same name as a TWiki preference, the session variables value takes precedence over the TWiki preference. This allows for per-session preferences. To make use of these features, use the variables: %SESSION_VARIABLE{ "varName" }% |
Read a session variable |
%SESSION_VARIABLE{ "varName" set="varValue" }% |
Set a session variable |
%SESSION_VARIABLE{ "varName" clear="" }% |
Clear a session variable |
-
%SESSION_VARIABLE{"AUTHUSER"}%- user ID, current value: -
%SESSION_VARIABLE{"SESSION_REQUEST_NUMBER"}%- number of pages accessed by current user since login, current value:
- You cannot override access controls preferences this way.
- You can use the SetGetPlugin to set and get variables that are not user specific. This plugin can store variables persistently if needed.
Cookies and Transparent Session IDs
TWiki normally uses cookies to store session information on a client computer. Cookies are a common way to pass session information from client to server. TWiki cookies simply hold a unique session identifier that is used to look up a database of session information on the TWiki server. For a number of reasons, it may not be possible to use cookies. In this case, TWiki has a fallback mechanism; it will automatically rewrite every internal URL it sees on pages being generated to one that also passes session information.TWiki Username vs. Login Username
This section applies only if you are using authentication with existing login names (i.e. mapping from login names to WikiNames). TWiki internally manages two usernames: Login Username and TWiki Username.- Login Username: When you login to the intranet, you use your existing login username, ex:
pthoeny. This name is normally passed to TWiki by theREMOTE_USERenvironment variable, and used internally. Login Usernames are maintained by your system administrator.
- TWiki Username: Your name in WikiNotation, ex:
PeterThoeny, is recorded when you register using TWikiRegistration; doing so also generates a user profile page in the Main web.
NOTE: To correctly enter a WikiName - your own or someone else's - be sure to include the Main web name in front of the Wiki username, followed by a period, and no spaces, for exampleMain.WikiUsernameor%USERSWEB%.WikiUsername. This pointsWikiUsernameto the Main web, where user profile pages are located, no matter which web it's entered in. Without the web prefix, the name appears as a NewTopic everywhere but in the Main web.
Changing Passwords
If your {PasswordManager} supports password changing, you can change and reset passwords using forms on regular pages.- The ChangePassword form (
TWiki/ChangePassword) - The ResetPassword form (
TWiki/ResetPassword)
Changing E-mail Addresses
If the active {PasswordManager} supports storage and retrieval of user e-mail addresses, you can change your e-mail using a regular page. As shipped, this is true only for the Apache 'htpasswd' password manager.- The ChangeEmailAddress form (
TWiki/ChangeEmailAddress)
Controlling access to individual scripts
You may want to add or remove scripts from the list of scripts that require authentication. The method for doing this is different for Template Login and Apache Login.- For Template Login, update the {AuthScripts} list using configure
- For Apache Login, add/remove the script from
.htaccess
How to choose an authentication method
One of the key features of TWiki is that it is possible to add HTML to topics. No authentication method is 100% secure on a website where end users can add HTML, as there is always a risk that a malicious user can add code to a topic that gathers user information, such as session IDs. TWiki developers have been forced to make certain tradeoffs, in the pursuit of efficiency, that may be exploited by a hacker. This section discusses some of the known risks. You can be sure that any potential hackers have read this section as well! At one extreme, the most secure method is to use TWiki via SSL (Secure Sockets Layer), with a login manager installed and Client Sessions turned off. Using TWiki with sessions turned off is a pain, though, as with all the login managers there are occasions where TWiki will forget who you are. The best user experience is achieved with sessions turned on. As soon as you allow the server to maintain information about a logged-in user, you open a door to potential attacks. There are a variety of ways a malicious user can pervert TWiki to obtain another users session ID, the most common of which is known as a cross-site scriptingTWiki Access Control
Restricting read and write access to topics and webs, by Users and groups TWiki Access Control allows you restrict access to single topics and entire webs, by individual user and by user Groups. Access control, combined with TWikiUserAuthentication, lets you easily create and manage an extremely flexible, fine-grained privilege system.An Important Control Consideration
Your organization will learn that, while fostering an open collaborative environment, soft security (peer review), together with version control (complete audit trail) will take care of any security concern you might have. Open, free-form editing is the essence of WikiCulture - what makes TWiki different and often more effective than other collaborative environments. For that reason, it is strongly recommended that decisions to restrict read or write access to a web or a topic are made with great care - the more restrictions, the less wiki in the mix. Experience shows that unrestricted write access works very well because:- Peer influence is enough to ensure that only relevant content is posted.
- Peer editing - the ability for anyone to rearrange all content on a page - keeps topics focused.
- In TWiki, content is transparently preserved under revision control:
- Edits can easily be rolled back to a previous revision if needed.
- Users are encouraged to edit and refactor (condense a long topic), since there's a safety net.
- Create broad-based Groups (for more and varied input), and...
- Avoid creating view-only topics (if you can read it, you should be able to contribute to it).
Permissions settings of the webs on this TWiki site
| Web | Sitemap | VIEW | CHANGE | RENAME | |||
|---|---|---|---|---|---|---|---|
| Listed | DENY | ALLOW | DENY | ALLOW | DENY | ALLOW | |
| |
on | TWikiAdminGroup | TWikiAdminGroup | ||||
- A blank in the the above table may mean either the corresponding control is absent or commented out or that it has been set to a null value. The two conditions have dramatically different and possibly opposed semantics.
- TWikiGuest is the guest account - used by unauthenticated users.
- The TWiki web must not deny view to TWikiGuest; otherwise, people will not be able to register.
Authentication vs. Access Control
Authentication: Identifies who a user is based on a login procedure. See TWikiUserAuthentication. Access control: Restrict access to content based on users and groups once a user is identified.Users and Groups
Access control is based on the familiar concept of Users and Groups. Users are defined by their WikiNames. They can then be organized in unlimited combinations by inclusion in one or more user Groups. For convenience, Groups can also be included in other Groups.Managing Users
A user can create an account in TWikiRegistration. The following actions are performed:- WikiName and encrypted password are recorded using the password manager if authentication is enabled.
- A confirmation e-mail is sent to the user.
- A user profile page with the WikiName of the user is created in the Main web.
- The user is added to the TWikiUsers topic.
Managing Groups
The following describes the standard TWiki support for groups. Your local TWiki may have an alternate group mapping manager installed. Check with your TWiki administrator if you are in doubt. Groups are defined by group topics located in theMain web. To create a new group, visit TWikiGroups and enter the name of the new group ending in Group into the "new group" form field. This will create a new group topic with two important settings: -
Set GROUP = < list of Users and/or Groups > -
Set ALLOWTOPICCHANGE = < list of Users and/or Groups >
-
Set GROUP = SomeUser, OtherUser, SomeGroup
-
Set ALLOWTOPICCHANGE = MarketingGroup
The Super Admin Group
A number of TWiki functions (for example, renaming webs) are only available to administrators. Administrators are simply users who belong to the SuperAdminGroup. This is a standard user group, the name of which is defined by {SuperAdminGroup} setting in configure. The default name of this group is theTWikiAdminGroup. The system administrator may have chosen a different name for this group if your local TWiki uses an alternate group mapping manager but for simplicity we will use the default name TWikiAdminGroup in the rest of this topic.
You can create new administrators simply by adding them to the TWikiAdminGroup topic. For example, -
Set GROUP = RobertCailliau, TimBernersLee
Restricting Access
You can define who is allowed to read or write to a web or a topic. Note that some plugins may not respect access permissions.- Restricting VIEW blocks viewing and searching of content. When you restric VIEW to a topic or web, this also restricts INCLUDE and Formatted SEARCH from showing the content of the topics.
- Restricting CHANGE blocks creating new topics, changing topics or attaching files.
- Restricting RENAME prevents renaming of topics within a web.
Controlling access to a Web
You can define restrictions on who is allowed to view a TWiki web. You can restrict access to certain webs to selected Users and Groups, by:- authenticating all webs and restricting selected webs: Topic access in all webs is authenticated, and selected webs have restricted access.
- authenticating and restricting selected webs only: Provide unrestricted viewing access to open webs, with authentication and restriction only on selected webs.
- You can define these settings in the WebPreferences topic, preferable towards the end of the topic:
-
Set DENYWEBVIEW = < comma-delimited list of Users and Groups > -
Set ALLOWWEBVIEW = < comma-delimited list of Users and Groups > -
Set DENYWEBCHANGE = < comma-delimited list of Users and Groups > -
Set ALLOWWEBCHANGE = < comma-delimited list of Users and Groups > -
Set DENYWEBRENAME = < comma-delimited list of Users and Groups > -
Set ALLOWWEBRENAME = < comma-delimited list of Users and Groups >
-
-
Set ALLOWWEBVIEW = Main.MarketingGroup
ALLOWWEBVIEW set, this will also apply to the subweb. Also note that you will need to ensure that the parent web's FINALPREFERENCES does not include the access control settings listed above. Otherwise you will not be able override the parent web's access control settings in sub-webs.
Creation and renaming of sub-webs is controlled by the WEBCHANGE setting on the parent web (or ROOTCHANGE for root webs). Renaming is additionally restricted by the setting of WEBRENAME in the web itself.
Note: If you restrict access to the Main, make sure to add the TWikiRegistrationAgent so that users can register. Example: -
Set ALLOWWEBCHANGE = TWikiAdminGroup, TWikiRegistrationAgent
Controlling access to a Topic
- You can define these settings in any topic, preferable towards the end of the topic:
-
Set DENYTOPICVIEW = < comma-delimited list of Users and Groups > -
Set ALLOWTOPICVIEW = < comma-delimited list of Users and Groups > -
Set DENYTOPICCHANGE = < comma-delimited list of Users and Groups > -
Set ALLOWTOPICCHANGE = < comma-delimited list of Users and Groups > -
Set DENYTOPICRENAME = < comma-delimited list of Users and Groups > -
Set ALLOWTOPICRENAME = < comma-delimited list of Users and Groups >
-
-
Set ALLOWTOPICVIEW = Main.MarketingExecGroup
-
Set ALLOWTOPICVIEW = + Main.MarketingExecGroup
Allowing public access to specific topics in a restricted web
You may want to completely open up access to a specific topic within a restricted web - allowing access by anybody. There is a special group for that - Main.AllUsersGroup. The following setting allows view access to the topic by anybody even if they are not authenticated.-
Set ALLOWTOPICVIEW = Main.AllUsersGroup
-
Set ALLOWTOPICVIEW = Main.AllAuthUsersGroup
-
Set ALLOWTOPICOPERATION = Main.AllUsersGroup
tools/eliminate_emptydenytopic is provided.
After upgrading from pre 6.0 to post 6.0, you need to run it.
Empty values in access control variables
Setting an empty value to an access control variable is the same as not setting at all:-
Set ALLOWTOPICVIEW =
Securing File Attachments
By default, TWiki does not secure file attachments. Without making the following changes to the twiki.conf file, it is possible for anyone who has access to the server to gain access to an attachment if they know the attachment's fully qualified path, even though access to the topic associated with the attachment is secured. This is because attachments are referred to directly by Apache, and are not by default delivered via TWiki scripts. This means that the above instructions for controlling to topics do not apply to attachments unless you make the changes as described below. An effective way to secure attachments is to apply the same access control settings to attachments as those applied to topics. This security enhancement can be accomplished by instructing the webserver to redirect accesses to attachments via the TWikiviewfile script, which honors the TWiki access controls settings to topics. See the notes below for implications.
The preferred method to secure attachments is by editing the twiki.conf file to include:
    ScriptAlias /do          /filesystem/path/to/twiki/bin
    Alias       /pub/TWiki   /filesystem/path/to/twiki/pub/TWiki
    Alias       /pub/Sandbox /filesystem/path/to/twiki/pub/Sandbox
    ScriptAlias /pub         /filesystem/path/to/twiki/bin/viewfile
Notes: - It is recommended to use TWiki:TWiki/ApacheConfigGenerator to generate the Apache config file for your TWiki.
- You will need to restart your Apache server after this change.
- Images embedded in topics will load slower since attached images will also be delivered by the
viewfilescript. The TWiki web and Sandbox web are excluded for performance reasons. - The
viewfilescript sets the mime type based upon file name suffix. Unknown types are served as text/plain which can result in corrupt files.
Controlling who can manage top-level webs
Top level webs are a special case, because they don't have a parent web with a WebPreferences. So there has to be a special control just for the root level.- You can define these settings in the Main.TWikiPreferences topic, preferable towards the end of the topic:
-
Set DENYROOTCHANGE = < comma-delimited list of Users and Groups > -
Set ALLOWROOTCHANGE = < comma-delimited list of Users and Groups >
-
ROOTCHANGE access to rename an existing top-level web. You just need WEBCHANGE in the web itself.
How TWiki evaluates ALLOW/DENY settings
When deciding whether to grant access, TWiki evaluates the following rules in order (read from the top of the list; if the logic arrives at PERMITTED or DENIED that applies immediately and no more rules are applied). You need to read the rules bearing in mind that VIEW, CHANGE and RENAME access may be granted/denied separately.- If the user is an administrator
- access is PERMITTED.
- If DENYTOPIC is set to a list of wikinames
- people in the list will be DENIED.
- If DENYTOPIC is set to empty ( i.e.
Set DENYTOPIC =)- the access control setting is ignored.
Attention: The spec changed in TWiki-6.0; access was permitted in earlier TWiki releases.
- the access control setting is ignored.
- If ALLOWTOPIC is set
- people in the list are PERMITTED
- everyone else is DENIED
- If DENYWEB is set to a list of wikinames
- people in the list are DENIED access
- If ALLOWWEB is set to a list of wikinames
- people in the list will be PERMITTED
- everyone else will be DENIED
- If you got this far, access is PERMITTED
Allowing web creation/deletion/rename by user mapping manager
There are cases where DENYROOTCHANGE, ALLOWROOTCHANGE, DENYWEBCHANGE, and ALLOWWEBCHANGE, and DENYWEBCHANGE are not capable enough to implement web creation and rename permissions you want. To cope with such cases, when a new web is created, thecanCreateWeb($cUID, $web) method of the user mapping manager is called if it exists.
If it returns true, TWiki goes ahead and create the web without checking access control variables.
Similarly, when a web is renamed (deletion is a form of rename), the canRenameWeb($cUID, $oldWeb, $newWeb) method of the user mapping manager is called if it exists.
Please read AllowWebCreateByUserMappingManager for more details.
Forbid certain users to do certain actions by configuration
You may have an unruly registered users (e.g. a crawler program) who don't follow the rules while you don't have control over such users. And the web application container in which TWiki is installed may be managed by somebody else and you don't have tight and quick control. To cope with such situations, certain users can be forbidden certain scripts by setting{ForbidUserAction}.
A good example is worth more than a lengthy explanation, so here it is:
$TWiki::cfg{ForbidUserAction} = '
    AggresiveCrawler: edit, oops, search;
    ReadOnlyUser:     !view, viewfile;
    TotallyForbidden: !nothing;
';
In this example: - AggresiveCrawler is forbidden edit, oops, and search scripts.
- ReadOnlyUser is permitted view and viewfile but forbidden the others.
- If a script list is preceded by
!, only the listed scripts are permitted for the user.!at the beginning of the list negates the list.
- If a script list is preceded by
- TotallyForbidden is forbidden all actions.
Here's the logic. There is no script named nothing, which means all scripts don't match "nothing", hence all scripts are forbidden.
- Spaces, tabs, new lines are ignored
- It consists of semicolon separated list of per-user specifications
- A specification consists of a user name, colon, and a comma separated list of scripts
- A user name needs to be in the canonical form. In most cases the canonical user name is the same as the wiki name. But if you are using non-standard user mapping, the canonical user name of a user is different from the wiki name.
User masquerading
There are cases where it's handy to access TWiki on behalf of somebody else retaining a trace of your real identity rather than completely becoming a different user. We call it user masquerading. TWiki provides a framework to implement that. Please read UserMasquerading for more information. This is an advanced feature and not many TWiki sites are using, but there is a part in the following section mentioning it, it's mentioned here.Dynamic access control
There are pitfalls and you need to harden your web to avoid unexpected access. Before using this feature, please read this entire section through carefully. You may want to restrict access dynamically -- based on topic name, a form field value, or some combination of factors. To cope with such situations, the dynamic access control mechanism is provided. If you setDYNAMIC_ACCESS_CONTROL 'on' at WebPreferences of the web, TWiki variables in access control variables mentioned above are expanded.
Example 1 - restriction based on topic name
Let's assume you need to restrict changes only to the CroniesGroup members except with topics whose name ends with Public, which need be changed by anybody. That is achieve by the following settings on WebPrefences.
   * Set DYNAMIC_ACCESS_CONTROL = on
   * Set ALLOWWEBCHANGE = %IF{"'%CALCULATE{$SUBSTRING(%TOPIC%, -6, 6)}%' = 'Public'" then="%WIKINAME%" else="CroniesGroup"}%
Example 2 - restriction based on form field
Let's assume:- a web storing requests on topics whose name starts with ReqEnt
- Each request topic has a form field "Requestor", which has the wiki name of the requestor
- Users can view only requests they created
- The members of the SupportGroup mail group can view all requests
   * Set DYNAMIC_ACCESS_CONTROL = on
   * Set ALLOWWEBVIEW = %IF{"'%CALCULATE{$SUBSTRING(%TOPIC%, 1, 6)}%' = 'ReqEnt' and '%FORMFIELD{Requestor}%' != '%WIKINAME%'" then="SupportGroup" else="%WIKINAME%"}%
Specifically the following access control variables are subject to TWiki variable expansion in their values. - DENYTOPIC* (e.g. DENYTOPICVIEW, DENYTOPICCHANGE)
- ALLOWTOIPC*
- DENYWEB*
- ALLOWWEB*
Dynamic access control in accessing a different web's topic
Let's assume WebA has the following lines on WebPreferences.* Set DYNAMIC_ACCESS_CONTROL = on * Set MEMBERS = JaneSmith, JoeSchmoe * Set ALLOWWEBVIEW = %MEMBERS%This is not a good way to use dynamic access control but it does restrict access only to those listed in MEMBERS. However, access control doesn't work as expected when WebA.TopicB is accessed from WebC.TopicD by
%INCLUDE{WebA.TopicB}% or other variables.
This is because %MEMBERS% is defined in WebA and may have a different value in other webs.
You may think the following lines cheat the access control on WebA but actually not.
   * Set MEMBERS = %WIKINAME%
%INCLUDE{WebA.TopicB}%
This is because when a topic (e.g. WebC.TopicD) is accessed from browser and the topic refers to another topic in a different web (e.g. WebA.TopicB) and the different web employs dynamic access control, access to another topic is defined being on the safer side.
Topic level dynamic access control
On a topic, it's possible to use a variable defined on the topic for topic level access restriction. E.g.* Set MEMBERS = JaneSmith, JoeSchmoe * Set ALLOWTOPICVIEW = %MEMBERS%[This is not a good way to use dynamic access control
Dynamic access control and user masquerading
Your user mapping handler may be providing the UserMasquerading feature. In that case, you expect dynamic access control to just work when user masquerading is in effect. Otherwise, you cannot test if your dynamic access control configuration is working as expected on your own. Dynamic access control does work as expected even if user masquerading is in effect. For that, the following things are happening under the hood. Let's think about Example 2 mentioned above. When you masquerading as SomebodyElse, you need to be able to see SomebodyElse's requests only. In the access control setting, a form field value is compared with %WIKINAME%. While user masquerading is in effect, your wiki name is YourNameOnBehalfOfSomebodyElse. It cannot match the form field value. To make dynamic access control work under these circumstances, variable expansion for dynamic access control is skewed as follows. Specifically, the following variables are expanded to the value of SomeboyElse's rather than YourNameOnBehalfOfSomebodyElse's.- WIKINAME
- USERNAME
- WIKIUSERNAME
Avoiding vulnerability
By default, user level preferences are read before web level preferences. This means a user can set a preferences variable at the user level and finalise it. To prevent this sort of attack, you need to harden your web or site by disabling user preferences by e.g. having the following line onlib/LocalSite.cfg
$TWiki::cfg{DemoteUserPreferences}= 1;
and having the following line on your WebPreferences and then finalise DENYUSERPREFEENCES.
* Set DENYUSERPREFEENCES = allPlease read TWikiVariables#ControllingUserLevelPrefsOverride for details. Again by default, predefined variables such as
%IF{...}% can be overridden by preferences variables.
If user preferences are disabled, ordinary users cannot attack using user preferences, but topic level preferences may cause unexpected consequences.
As such, all predefined variables need to be made un-overridable by having the following line on WebPreferences and then finalise OVERRIDABLEPREDEFINEDVARIABLES.
* Set OVERRIDABLEPREDEFINEDVARIABLES =Please read TWikiVariables#PredefinedVariables for details.
Disabling dynamic access control
You may not be comfortable with dynamic access control because it may slow things down. Or you may not want to be bothered by questions raised by users about it. If so, you can disable it by setting DYNAMIC_ACCESS_CONTROL 'off' and then finalizing at the local site level. (cf. TWikiVariables#Setting_Preferences_Variables)Access control and INCLUDE
ALLOWTOPICVIEW and ALLOWTOPICCHANGE only applies to the topic in which the settings are defined. If a topic A includes another topic B, topic A does not inherit the access rights of the included topic B. Examples: Topic A includes topic B- If the included topic B has ALLOWTOPICCHANGE set to block editing for a user, it does not prevent editing the including topic A.
- If the included topic B has ALLOWTOPICVIEW set to block view for a user, the user can still view topic A but he cannot see the included topic B. He will see a message No permission to view B
Customizing "access denied" message
When access is denied, a page as follows is displayed:
You may want to customize the passage annotated in the red rectangle.
For example, with a web restricting access, you may want to show the link to an access request form.
You can achieve that by setting TOPIC_ACCESS_CONTACT varialbe on WebPreferences. e.g.
* Set TOPIC_ACCESS_CONTACT = If you need to access this site, please apply [[Main.AccessForm][here]]Please note that setting it on a topic other than WebPreferences does not take effect. This is a limitation of the current implementation.
Custom user/group notations
You can have custom user/group notations such asUSER:userid and LDAPGROUP:group-name and use them for access control. For example:
* Set ALLOWWEBCHANGE = USER:buzz, LDAPGROUP:foo-barIn a large organization, TWiki may need to depend on user and group data provided by its infrastructure. Custom user/group notations are handy in such situations though it's not trivial to implement. Please read here for details.
Access Control quick recipes
Restrict Access to Whole TWiki Site
In a firewalled TWiki, e.g. an intranet wiki or extranet wiki, you want to allow only invited people to access your TWiki. There are three options: 1. Install TWiki Behind Firewall: The firewall takes care of giving access to TWiki to authorized people only. This is a typical setup for a company wiki. As for TWiki configuration, no special setup is needed. 2. Extranet TWiki Using Template Login: All TWiki content (pages and attachments) need to be access controlled. The Template Login allows users to login and logout. Only logged in users can access TWiki content. Configuration: Follow the default setup, then change these configure settings:- Secure attachments as documented. The TWiki:TWiki.ApacheConfigGenerator is useful to get the setting right.
- Require authentication for all TWiki scripts except
backuprestore,configure,login,logonandresetpasswdwith the following configure setting:
$TWiki::cfg{AuthScripts} = 'attach, changes, edit, manage, oops, preview, rdiff, rdiffauth, register, rename, rest, save, search, twiki_cgi, upload, statistics, view, viewauth, viewfile'; - When you install additional plugins make sure to add scripts they might introduce also to
twiki/binalso to the{AuthScripts}configure setting.
Attention: Some scripts of additional plugins might not be aware of TWiki's template login. Test all new scripts with a non-authenticated user!
twiki/bin and twiki/pub directories to all but valid users. In the Apache config file for TWiki (twiki.conf or .htaccess), replace the <FilesMatch "(attach|edit|... section with this:
<FilesMatch ".*">
       require valid-user
</FilesMatch>
Notes:
- In all three options, content can be restricted selectively with ALLOWWEBVIEW and other access control settings documented above. See also the next quick recipe.
- In the extranet setup, someone with access to the site needs to register new users. If you still want public users to be able to register automatically follow TWiki:TWiki.RegisterOnViewRestrictedSite.
Authenticate and Restrict Selected Webs Only
Use the following setup to provide unrestricted viewing access to open webs, with authentication only on selected webs. Requires TWikiUserAuthentication to be enabled.- Restrict view access to selected Users and Groups. Set one or both of these variables in its WebPreferences topic:
-
Set DENYWEBVIEW = < list of Users and Groups > -
Set ALLOWWEBVIEW = < list of Users and Groups > - Note:
DENYWEBVIEWis evaluated beforeALLOWWEBVIEW. Access is denied if the authenticated person is in theDENYWEBVIEWlist, or not in theALLOWWEBVIEWlist. Access is granted ifDENYWEBVIEWandALLOWWEBVIEWare not defined.
-
Hide Control Settings
Edit topic preference settings under More topic actions menu. Preferences set in this manner are not visible in the topic text, but take effect nevertheless. Access control settings added as topic preference settings are stored in the topic meta data and they override settings defined in the topic text.
Alternatively, place them in HTML comment markers, but this exposes the access setting during ordinary editing.
<!--
* Set DENYTOPICCHANGE = Main.SomeGroup
-->
Obfuscating Webs
Another way of hiding webs is to keep them hidden by not publishing the URL and by preventing theall webs search option from accessing obfuscated webs. Do so by enabling the NOSEARCHALL variable in WebPreferences: -
Set NOSEARCHALL = on
Read-only Skin Mode
It is possible to turn the PatternSkin and TopMenuSkin into read-only mode by removing the edit and attach controls (links and buttons). This is mainly useful if you have TWiki application pages or dashboards where you do not want regular users to change content. The read-only skin mode is not a replacement for access control; you can use it in addition to access control. Details at PatternSkinCustomization#ReadOnlySkinMode.Configuring access control for topics of a certain name in all webs
You may need to restrict access to topics of a certain name in all webs. For example, there might be an add-on refering to a certain topic of all webs. And the add-on does things only administrators are supposed to do. In that case, change to the topic needs to be restricted only to administrators and must not be overridable. Let's say there is AutomationAddOn which refers to WebAutomation of all webs. And WebAutomation needs to be modifable only by administrators. That can be achieved by the following configuration.
$TWiki::cfg{Access}{Topic}{WebAutomation} = {
    DENYCHANGE => 'Main.AllUsersGroup',
};
In addition to ALLOWCHANGE, you can sepcify DENYCHANGE, ALLOWVIEW, DENYVIEW, ALLOWRENAME, and DENYRENAME as follows.
$TWiki::cfg{Access}{Topic}{SpecialTopic} = {
    DENYVIEW  => 'JoeSchmoe',
    ALLOWVIEW => 'FooGroup',
};
$TWiki::cfg{Access}{Topic}{TOPICNAME} has precedence over DENYTOPIC* and ALLOWTOPIC*.
For example, if the configuration for WebAutomation is there as above, there is no way to allow non-adminsitrators to change the WebAutomation topic of any web.
As a way to configure access control, this may look crude.
The reason why configured this way is that this can be part of plugin/add-on/contrib's configuration.
For example, Config.spec of AutomationAddOn would have the following lines, with which proper access control to WebAutomation topics is implemented without the administrator knowing it.
$TWiki::cfg{Access}{Topic}{WebAutomation} = {
    DENYCHANGE => 'Main.AllUsersGroup',
};
TWiki Templates
Definition of the templates used to render all HTML pages displayed in TWikiOverview
Templates are plain text with embedded template directives that tell TWiki how to compose blocks of text together, to create something new. There are two types of template:- Master Templates: Define the HTML used to display TWiki pages.
- Template Topics: Define default text when you create a new topic
Master Templates
TWiki uses master templates when composing the output from all actions, like topic view, edit, and preview. This allows you to change the look and feel of all pages by editing just a few template files. Master templates are also used in the definition of TWikiSkins. Master templates are stored as text files with the extension.tmpl.
They are usually HTML with embedded template directives.
The directives are expanded when TWiki wants to generate a user interface screen.
How Template Directives Work
- Directives are of the form
%TMPL:<key>%and%TMPL:<key>{"attr"}%. - Directives:
-
%TMPL:INCLUDE{"file"}%: Includes a template file. The file is found as described below. -
%TMPL:DEF{"block"}%: Define a block. All text between this and the next%TMPL:END%directive is removed and saved for later use with%TMPL:P. -
%TMPL:END%: Ends a block definition. -
%TMPL:P{"var"}%: Includes a previously defined block. -
%{...}%: is a comment.
-
- Two-pass processing lets you use a variable before or after declaring it.
- Templates and TWikiSkins work transparently and interchangeably. For example, you can create a skin that overloads only the
twiki.tmplmaster template, liketwiki.print.tmpl, that redefines the header and footer. - Use of template directives is optional: templates work without them.
- NOTE: Template directives work only for templates: they do not get processed in normal topic text.
%TMPL:DEF{"x"}% x%P%z%TMPL:END% then %TMPL:P{"x" P="y"}% will expand to xyz.
Note that parameters can simply be ignored; for example, %TMPL:P{"x"}% will expand to x%P%z.
Any alphanumeric characters can be used in parameter names.
You are highly recommended to use parameter names that cannot be confused with TWikiVariables.
Note that three parameter names, context, then and else are reserved.
They are used to support a limited form of "if" condition that you can use to select which of two templates to use, based on a context identifier:
%TMPL:DEF{"link_inactive"}%<input type="button" disabled value="Link>%TMPL:END%
%TMPL:DEF{"link_active"}%<input type="button" onclick="link()" value="Link" />%TMPL:END%
%TMPL:P{context="inactive" then="inactive_link" else="active_link"}% for %CONTEXT%
When the "inactive" context is set, then this will expand the "link_inactive" template; otherwise it will expand the "link_active" template.
See IfStatements for details of supported context identifiers.
Finding Templates
The master templates shipped with a twiki release are stored in the twiki/templates directory. As an example,twiki/templates/view.tmpl is the default template file for the twiki/bin/view script.
You can save templates in other directories as long as they are listed in the {TemplatePath} configuration setting.
The {TemplatePath} is defined in the Miscellaneous section of the configure page.
You can also save templates in user topics (IF there is no possible template match in the templates directory).
The {TemplatePath} configuration setting defines which topics will be accepted as templates.
Templates that are included with an explicit '.tmpl' extension are looked for only in the templates/ directory.
For instance %TMPL:INCLUDE{"example.tmpl"}% will only return templates/example.tmpl, regardless of {TemplatePath} and SKIN settings.
The out-of-the-box setting of {TemplatePath} supports the following search order to determine which template file or topic to use for a particular script or %TMPL:INCLUDE{"script"}% statement.
The skin path is set as described in TWikiSkins.
- templates/web/script.skin.tmpl for each skin on the skin path
- this usage is supported for compatibility only and is deprecated. Store web-specific templates in TWiki topics instead.
-
- templates/script.skin.tmpl for each skin on the skin path
- templates/web/script.tmpl
- this usage is supported for compatibility only and is deprecated. Store web-specific templates in TWiki topics instead.
-
- templates/script.tmpl
- The TWiki topic aweb.atopic if the template name can be parsed into aweb.atopic
- The TWiki topic web.SkinSkinScriptTemplate for each skin on the skin path
- The TWiki topic web.ScriptTemplate
- The TWiki topic %SYSTEMWEB%.SkinSkinScriptTemplate for each skin on the skin path
- The TWiki topic %SYSTEMWEB%.ScriptTemplate
- script refers to the script name, e.g
view,edit - Script refers to the same, but with the first character capitalized, e.g
View - skin refers to a skin name, e.g
dragon,pattern. All skins are checked at each stage, in the order they appear in the skin path. - Skin refers to the same, but with the first character capitalized, e.g
Dragon - web refers to the current web
example template file will be searched for in the following places, when the current web is Thisweb and the skin path is print,pattern:
-
templates/Thisweb/example.print.tmpldeprecated; don't rely on it -
templates/Thisweb/example.pattern.tmpldeprecated; don't rely on it -
templates/example.print.tmpl -
templates/example.pattern.tmpl -
templates/Thisweb/example.tmpldeprecated; don't rely on it -
templates/example.tmpl -
Thisweb.PrintSkinExampleTemplate -
Thisweb.PatternSkinExampleTemplate -
Thisweb.ExampleTemplate -
TWiki.PrintSkinExampleTemplate -
TWiki.PatternSkinExampleTemplate -
TWiki.ExampleTemplate
view and edit scripts, for example when a topic-specific template is required. Two preference variables can be used to override the templates used: -
VIEW_TEMPLATEsets the template to be used for viewing a topic -
EDIT_TEMPLATEsets the template for editing a topic.
view and edit respectively. The template search order is as specified above.
Both VIEW_TEMPLATE and EDIT_TEMPLATE may contain TWiki variables, which are expanded.
For example, the following setting causes Item* topics to be displayed with the custom view template ItemViewTmpl while the other topics are displayed normally.
* Set VIEW_TEMPLATE = %IF{"'%CALCULATE{$SUBSTRING(%TOPIC%, 1, 4)}%' = 'Item'" then="ItemViewTmpl"}%
The following setting causes Item* topics to be edited with the editform template (edits only the TWiki form of the topic without editing the topic text) while the other topics are edited normally.
* Set EDIT_TEMPLATE = %IF{"'%CALCULATE{$SUBSTRING(%TOPIC%, 1, 4)}%' = 'Item'" then="editform"}%
{TemplatePath} so that another directory, such as the %USERSWEB% appears at the front. You can then put your own templates into that directory or web and these will override the standard templates. (Note that such will increase the lookup time for templates by searching your directory first.)
TMPL:INCLUDE recursion for piecewise customization, or mixing in new features
If there is recursion in the TMPL:INCLUDE chain (eg twiki.classic.tmpl contains%TMPL:INCLUDE{"twiki"}%, the templating system will include the next twiki.SKIN in the skin path.
For example, to create a customization of pattern skin, where you only want to over-ride the breadcrumbs for the view script, you can create only a view.yourlocal.tmpl:
%TMPL:INCLUDE{"view"}%
%TMPL:DEF{"breadcrumb"}% We don't want any crumbs %TMPL:END%
and then set SKIN=yourlocal,pattern
The default {TemplatePath} will not give you the desired result if you put these statements in the topic Thisweb.YourlocalSkinViewTemplate. The default {TemplatePath} will resolve the request to the template/view.pattern.tmpl, before it gets to the Thisweb.YourlocalSkinViewTemplate resolution. You can make it work by prefixing the {TemplatePath} with: $web.YourlocalSkin$nameTemplate.
Default master template
twiki.tmpl is the default master template. It defines the following sections.
| Template variable: | Defines: |
|---|---|
%TMPL:DEF{"sep"}% |
"|" separator |
%TMPL:DEF{"htmldoctype"}% |
Start of all HTML pages |
%TMPL:DEF{"standardheader"}% |
Standard header (ex: view, index, search) |
%TMPL:DEF{"simpleheader"}% |
Simple header with reduced links (ex: edit, attach, oops) |
%TMPL:DEF{"standardfooter"}% |
Footer, excluding revision and copyright parts |
Template Topics
The second type of template in TWiki are template topics. Template topics define the default text for new topics. There are four types of template topic:| Topic Name: | What it is: |
|---|---|
| WebTopicViewTemplate | Alert page shown when you try to view a nonexistent topic. This page is usually used as a prompt to help you create a new topic. |
| WebTopicNonWikiTemplate | Alert page shown when you try to view a nonexistent topic with a non-WikiName. Again, this page is used as a prompt to help you create the new topic. |
| WebTopicEditTemplate | Default text used in a new topic. |
| <MyCustomNamed>Template | Whenever you create a topic ending in the word "Template", it is automatically added to the list of available templates in the "Use Template" drop down field on the WebCreateNewTopic page. |
edit script, TWiki locates a topic to use as a content template according to the following search order: - A topic name specified by the
templatetopicCGI parameter- if no web is specified, the current web is searched first and then the TWiki web
- WebTopicEditTemplate in the current web
- WebTopicEditTemplate in the Main web
- WebTopicEditTemplate in the TWiki web
Variable Expansion
TWikiVariables located in template topics get expanded as follows when a new topic is created.1. Default variable expansion
The following variables used in a template topic automatically get expanded when new topic is created based on it:| Variable: | Description: |
|---|---|
%DATE% |
Signature format date. See VarDATE |
%GMTIME% |
Date/time. See VarGMTIME |
%GMTIME{...}% |
Formatted date/time. See VarGMTIME2 |
%NOP% |
A no-operation variable that gets removed. Useful to prevent a SEARCH from hitting an edit template topic; also useful to escape a variable, such as %URLPA%NOP%RAM{...}% escaping URLPARAM |
%STARTSECTION{type="templateonly"}% |
Text that gets removed when a new topic based on the template is created. See notes below. |
%SERVERTIME% |
Date/time. See VarSERVERTIME |
%SERVERTIME{...}% |
Formatted date/time. See VarSERVERTIME2 |
%USERNAME% |
Login name of user who is instantiating the new topic, e.g. guest |
%URLPARAM{"name"}% |
Value of a named URL parameter. See VarURLPARAM. |
%WIKINAME% |
WikiName of user who is instantiating the new topic, e.g. TWikiGuest |
%WIKIUSERNAME% |
User name of user who is instantiating the new tpoic, e.g. Main.TWikiGuest |
2. Preventing variable expansion
In a template topic, embed text that you do not want expanded inside a%STARTSECTION{type="templateonly"}% ... %ENDSECTION{type="templateonly"}% section. For example, you might want to write this in the template topic:
%STARTSECTION{type="templateonly"}%
This template can only be changed by:
   * Set ALLOWTOPICCHANGE = Main.TWikiAdminGroup
%ENDSECTION{type="templateonly"}%
This will restrict who can edit the template topic, but will be removed when a new topic based on that template topic is created.
%NOP% can be used to prevent expansion of TWiki variables that would otherwise be expanded during topic creation. For example, escape %SERVERTIME% with %SER%NOP%VERTIME%.
3. Causing variable expansion in a section
You can forcefully expand TWikiVariables by placing them inside atype="expandvariables" section in the template topic, such as:
...Example: If you have the following content in a template topic:
   * %SYSTEMWEB%.ATasteOfTWiki - view a short introductory presentation on TWiki for beginners
   * %SYSTEMWEB%.WelcomeGuest - starting points on TWiki
   * %SYSTEMWEB%.TWikiUsersGuide - complete TWiki documentation
   * Sandbox.%HOMETOPIC% - try out TWiki on your own
   * Sandbox.%TOPIC%Sandbox - just for me
you will get this raw text in new topics based on that template topic:
   * TWiki.ATasteOfTWiki - view a short introductory presentation on TWiki for beginners
   * TWiki.WelcomeGuest - starting points on TWiki
   * TWiki.TWikiUsersGuide - complete TWiki documentation
   * Sandbox.WebHome - try out TWiki on your own
   * Sandbox.JimmyNeutronSandbox - just for me
4. Specifying variables to be expanded individually
You may want to mix variables to be expanded and variables not to be. By prepending a variable name withEOTC__ (EOTC followed by two underscores; EOTC stands for Expand On Topic Creation), you can have the variable expanded.
Here's an example.
%EOTC__SEARCH{"."
 topic="%URLPARAM{prefix}%*"
 nonoise="on"
 format="$percntINCLUDE{$topic}$percnt" separator="$n"
}%
This yields a series of %INCLUDE{...}%s, which are not expanded.
This is not achievable by an expandvariables section.
Specifying a Form
When you create a new topic based on a template, you often want the new topic to have a form attached to it. You can attach a form to the template topic, in which case it will be copied into the new topic. Sometimes this isn't quite what you want, as it copies all the existing data from the template topic into the new topic. To avoid this and use the default values specified in the form definition instead, you can use theformtemplate CGI parameter to the edit script to specify the name of a form to attach.
See TWikiScripts for information about all the other parameters to edit.
Automatically Generated Unique Topic Names
For TWiki applications it is useful to be able to automatically generate unique topic names, such as BugID0001, BugID0002, etc. You can addAUTOINC<n> to the topic name in the edit and save scripts, and it will be replaced with an auto-incremented number on topic save. <n> is a number starting from 0, and may include leading zeros. Leading zeros are used to zero-pad numbers so that auto-incremented topic names can sort properly. Deleted topics are not re-used to ensure uniqueness of topic names. That is, the auto-incremented number is always higher than the existing ones, even if there are gaps in the number sequence.
Examples: -
BugAUTOINC0- creates topic namesBug0,Bug1,Bug2, ... (does not sort properly) -
ItemAUTOINC0000- creates topic namesItem0000,Item0001,Item0002, ... (sorts properly up to 9999) -
DocIDAUTOINC10001- start withDocID10001,DocID10002, ... (sorts properly up to 99999; auto-links)
AUTOINC<n> are preserved, but are not taken into account when calculating the next increment. Use this to create topic names that have a unique identifier (serial number) and a descriptive text.
Example: -
BlogAUTOINC0001-my-first-blog- creates topic nameBlog0001-my-first-blog -
BlogAUTOINC0001-my-crazy-cats- creates topic nameBlog0002-my-crazy-cats -
BlogAUTOINC0001-fondue-recipe- creates topic nameBlog0003-fondue-recipe
[[%SCRIPTURLPATH{edit}%/%WEB%/BugIDAUTOINC00001?templatetopic=BugTemplate;topicparent=%TOPIC%;t=%SERVERTIME{"$day$hour$min$sec"}%][Create new item]]
Note: After the save operation, the web client is redirected to the newly created topic by default. If the specified topic name contains AUTOINC<n> and you want to redirect to a different URL containing the newly created topic's name, you can use AUTOINC in the redirectto parameter. Let's say the specified topic name is ItemAUTOINC0001, and redirectto is set to %SCRIPTURL{view}%/%WEB%/ViewerTopic?id=ItemAUTOINC. If the latest existing topic is Item0123, a new topic named Item0124 is created, and the web client is redirected to ViewerTopic?id=Item0124 in the current web.
Template Topics in Action
Here is an example for creating new topics (in the Sandbox web) based on a specific template topic and form: The above form asks for a topic name. A hidden input tag namedtemplatetopic specifies ExampleTopicTemplate as the template topic to use. Here is the raw text of the form:
%EDITFORMFIELD{ "new" type="start" action="edit" topic="Sandbox.%TOPIC%" }%
   * New example topic:
     %EDITFORMFIELD{ "topic" type="text" value="ExampleTopicAUTOINC0001" size="30" }%
     %EDITFORMFIELD{ "templatetopic" type="hidden" value="%SYSTEMWEB%.ExampleTopicTemplate" }%
     %EDITFORMFIELD{ "topicparent" type="hidden" value="%HOMETOPIC%" }%
     %EDITFORMFIELD{ "onlywikiname" type="hidden" value="on" }%
     %EDITFORMFIELD{ "onlynewtopic" type="hidden" value="on" }%
     %EDITFORMFIELD{ "form" type="submit" value="Create" }%
%EDITFORMFIELD{ "form" type="end" }%
Here is the equivalent form using a hand-crafted HTML form:
<form name="new" action="%SCRIPTURLPATH{edit}%/Sandbox/%HOMETOPIC%">
   * New example topic:
     <input type="text" name="topic" value="ExampleTopicAUTOINC0001" size="30" />
     <input type="hidden" name="templatetopic" value="%SYSTEMWEB%.ExampleTopicTemplate" />
     <input type="hidden" name="topicparent" value="%HOMETOPIC%" />
     <input type="hidden" name="onlywikiname" value="on" />
     <input type="hidden" name="onlynewtopic" value="on" />
     <input type="submit" class="twikiSubmit" value="Create" />
</form>
save script instead of the edit script in the form action. When you specify the save script in an HTML form tag you have to use the "post" method. This is done automatically when using the EDITFORMFIELD variable. Example when using the HTML form tag:
<form name="new" action="%SCRIPTURLPATH{save}%/Sandbox/" method="post">
    ...
</form>
edit and save scripts understand many more parameters, see TWikiScripts#edit and TWikiScripts#save for details.
%WIKIUSERNAME% and %DATE% variables in your topic templates to include the signature of the person creating a new topic. The variables are expanded into fixed text when a new topic is created. The standard signature is: -- %WIKIUSERNAME% - %DATE%
Using Absolute vs Relative URLs in Templates
When you use TWikiVariables such as %PUBURL% and %PUBURLPATH% in templates you should be aware that using %PUBURL% instead of %PUBURLPATH% puts absolute URLs in the produced HTML. This means that when a user saves a TWiki page in HTML and emails the file to someone outside a company firewall, the receiver has a severe problem viewing it. It is therefore recommended always to use the %PUBURLPATH% to refer to images, CSS, Javascript files etc so links become relative. This way browsers just give up right away and show a usable html file. Related Topics: TWikiSkins, TWikiForms, TWikiScripts, DeveloperDocumentationCategory, AdminDocumentationCategoryTWiki Skins
A skin overlays regular templates to provide specific look and feel to TWiki screens.Overview
TWiki uses TWikiTemplates files as the basis of all the screens it uses to interact with users. Each screen has an associated template file that contains the basic layout of the screen. This is then filled in by the code to generate what you see in the browser. TWiki ships with a default set of template files that give a very basic, CSS-themable, look-and-feel. TWiki also includes support for skins that can be selected to give different, more sophisticated, look and feel. A default TWiki installation will usually start up with the PatternSkin already selected. Skins may also be defined by third parties and loaded into a TWiki installation to give more options. To see how TWiki looks when no skin is selected, view the current page with a non-existing skin. TWiki topic content is not affected by the choice of skin, however a skin can be defined to use a CSS (Cascading Style Sheet) which can provide a radically different appearance to the text layout. Relevant links on TWiki.org:- TWiki:TWiki.TWikiSkinsSupplement - tip: supplemental documentation on TWiki skins
- TWiki:Plugins.SkinPackage - list of all contributed skin packages
- TWiki:Plugins.SkinDevelopment - discussion and feedback on contributed skins
- TWiki:Plugins.SkinBrainstorming - open forum for new skin ideas
- TWiki:Plugins.SkinPackageHowTo - template to create a new skin package
Changing the default TWiki skin
TWiki ships with the TopMenuSkin activated by default. You can set a skin for the whole site, a single web, a single topic, or for each user individually. This is done by setting the SKIN preferences setting to the name of a skin. If the skin you select doesn't exist, then TWiki will pick up the default templates. For example, to make the SKIN setting work across all topics and webs, put it in TWikiPreferences. Skins can cascade using a skin path explained below. One skin can be based on another one, and extensions can introduce additional screen elements. For example, the TagMePlugin adds tag elements to the TopMenuSkin, and the TopMenuSkin is based on the PatternSkin, resulting in this skin path:* Set SKIN = tagme, topmenu, pattern
Defining Skins
You may want to define your own skin, for example to comply with corporate web guidelines, or because you have a aesthetic vision that you want to share. There are a couple of places you can start doing this. The TWikiTemplates files used for skins are located in thetwiki/templates directory and are named according to the skin: <scriptname>.<skin>.tmpl. Skin files may also be defined in TWiki topics - see TWikiTemplates for details.
To start creating a new skin, copy the default TWikiTemplates (like view.tmpl), or copy an existing skin to use as a base for your own skin. You should only need to copy the files you intend to customize, as TWiki can be configured to fall back to another skin if a template is not defined in your skin. Name the files as described above (for example view.myskin.tmpl).
If you use PatternSkin as your starting point, and you want to modify the layout, colors or even the templates to suit your own needs, have a look first at the topics PatternSkinCustomization and PatternSkinCssCookbook.
For your own TWiki skin we encourage you to show a small TWiki logo at the bottom of your skin:
<a href="http://twiki.org/"><img src="%PUBURL%/%SYSTEMWEB%/TWikiLogos/T-badge-88x31.gif" alt="This site is powered by the TWiki Enterprise Collaboration Platform" width="88" height="31" title="This site is powered by the TWiki Enterprise Collaboration Platform" border="0" /></a> |
Renders as: |
%WEBCOPYRIGHT% variable.
text skin, and skin names starting with rss have hard-coded meanings.
The following template files are used for TWiki screens, and are referenced in the TWiki core code. If a skin doesn't define its own version of a template file, then TWiki will fall back to the next skin in the skin path, or finally, to the default version of the template file.
(Certain template files are expected to provide certain TMPL:DEFs - these are listed in sub-bullets) -
addform- used to select a new form for a topic -
attachagain- used when refreshing an existing attachment -
attachnew- used when attaching a new file to a topic -
attachtables- defines the format of attachments at the bottom of the standard topic view-
ATTACH:files:footer,ATTACH:files:header,ATTACH:files:row,ATTACH:versions:footer,ATTACH:versions:header,ATTACH:versions:row
-
-
changeform- used to change the form in a topic -
changes- used by thechangesscript -
edit- used for the edit screen -
form -
formtables- used to defined the format of forms-
FORM:display:footer,FORM:display:header,FORM:display:row
-
-
login- used for loggin in when using the TemplateLoginManager-
LOG_IN,LOG_IN_BANNER,LOG_OUT,LOGGED_IN_BANNER,NEW_USER_NOTE,UNRECOGNISED_USER
-
-
moveattachment- used when moving an attachment -
oopsaccessdenied- used to format Access Denied messages-
no_such_topic,no_such_web,only_group,topic_access
-
-
oopsattention- used to format Attention messages-
already_exists,bad_email,bad_ver_code,bad_wikiname,base_web_missing,confirm,created_web,delete_err,invalid_web_color,invalid_web_name,in_a_group,mandatory_field,merge_notice,missing_action,missing_fields,move_err,missing_action,no_form_def,no_users_to_reset,notwikiuser,oversized_upload,password_changed,password_mismatch,problem_adding,remove_user_done,rename_err,rename_not_wikiword,rename_topic_exists,rename_web_err,rename_web_exists,rename_web_prerequisites,reset_bad,reset_ok,save_error,send_mail_error,thanks,topic_exists,unrecognized_action,upload_name_changed,web_creation_error,web_exists,web_missing,wrong_password,zero_size_upload
-
-
oopschangelanguage- used to prompt for a new language when internationalisation is enabled -
oopsgeneric- a basic dialog for user information; provides "ok" button only -
oopslanguagechanged- used to confirm a new language when internationalisation is enabled -
oopsleaseconflict- used to format lease Conflict messages-
lease_active,lease_old
-
-
preview- used for previewing edited topics before saving -
rdiff- used for viewing topic differences -
registernotify- used by the user registration system -
registernotifyadmin- used by the user registration system -
rename- used when renaming a topic -
renameconfirm- used when renaming a topic -
renamedelete- used when renaming a topic -
renameweb- used when renaming a web -
renamewebconfirm- used when renaming a web -
renamewebdelete- used when renaming a web -
searchbookview- used to format inline search results in book view -
searchformat- used to format inline search results -
search- used by thesearchCGI script -
settings -
view- used by theviewCGI script -
viewprint- used to create the printable view
twiki.tmpl is a master template conventionally used by other templates, but not used directly by code.
<p /> in the generated html. It will produce invalid html, and may break the page layout.
Partial customization, or adding in new features to an existing skin
You can use recursion in the TMPL:INCLUDE chain (e.g.twiki.pattern.tmpl contains %TMPL:INCLUDE{"twiki"}%, the templating system will include the next twiki.SKIN in the skin path (which is explained below). For example, to create a customization of pattern skin, where you only want to remove the edit & WYSIWYG buttons from view page, you create only a view.yourlocal.tmpl:
%TMPL:INCLUDE{"view"}%
%TMPL:DEF{"edit_topic_link"}%%TMPL:END%
%TMPL:DEF{"edit_wysiwyg_link"}%%TMPL:END%
and then set SKIN=yourlocal,pattern.
Variables in Skins
You can use template variables, TWikiVariables, and other predefined variables to compose your skins. Some commonly used variables in skins:| Variable: | Expanded to: |
|---|---|
%WEBLOGONAME% |
Filename of web logo |
%WEBLOGOIMG% |
Image URL of web logo |
%WEBLOGOURL% |
Link of web logo |
%WEBLOGOALT% |
Alt text of web logo |
%WIKILOGOURL% |
Link of page logo |
%WIKILOGOIMG% |
Image URL of page logo |
%WIKILOGOALT% |
Alt text of page logo |
%WEBBGCOLOR% |
Web-specific background color, defined in the WebPreferences |
%WIKITOOLNAME% |
The name of your TWiki site |
%SCRIPTURL% |
The script URL of TWiki |
%SCRIPTURLPATH% |
The script URL path |
%SCRIPTSUFFIX% |
The script suffix, ex: .pl, .cgi |
%WEB% |
The name of the current web. |
%TOPIC% |
The name of the current topic. |
%WEBTOPICLIST% |
Common links of current web, defined in the WebPreferences. It includes a Jump box |
%TEXT% |
The topic text, e.g. the content that can be edited |
%META{"form"}% |
TWikiForm, if any |
%META{"attachments"}% |
FileAttachment table |
%META{"parent"}% |
The topic parent |
%EDITTOPIC% |
Edit link |
%REVTITLE% |
The revision title, if any, ex: (r1.6) |
%REVINFO% |
Revision info, ex: r1.6 - 24 Dec 2002 - 08:12 GMT - TWikiGuest |
%WEBCOPYRIGHT% |
Copyright notice, defined in the WebPreferences |
%BROADCASTMESSAGE% |
Broadcast message at the beginning of your view template, can be used to alert users of scheduled downtimes; can be set in TWikiPreferences |
The Jump Box and Navigation Box
The default skins include a Jump Box, to jump to a topic. The box also understands URLs, e.g. you can typehttp://www.google.com/ to jump to an external web site. The feature is handy if you build a skin that has a select box of frequently used links, like Intranet home, employee database, sales database and such. A little JavaScript gets into action on the onchange method of the select tag to fill the selected URL into the "Go" box field, then submits the form.
Here is an example form that has a select box and the Jump Box for illustration purposes. You need to have JavaScript enabled for this to work:
Note: Redirect to a URL only works if it is enabled in configure (Miscellaneous, {AllowRedirectUrl}).
Using Cascading Style Sheets
CSS files are gererally attachments to the skin topic that are included in the the skin templates - in the case of PatternSkin in the templatestyles.pattern.tmpl.
- To see how CSS is used in the default TWiki skin, see: PatternSkin
- If you write a complete new skin, this is the syntax to use in a template file:
<style type='text/css' media='all'>@import url('%PUBURLPATH%/%SYSTEMWEB%/MySkin/mystyle.css');</style>
Attachment Tables
Controlling the look and feel of attachment tables is a little bit more complex than for the rest of a skin. By default, the attachment table is a standard TWiki table, and the look is controlled in the same way as other tables. In a very few cases you may want to change the content of the table as well. The format of standard attachment tables is defined through the use of special TWiki template macros which by default, are defined in theattachtables.tmpl template using the %TMPL:DEF macro syntax described in TWikiTemplates. These macros are:
| Macro | Description |
|---|---|
ATTACH:files:header |
Standard title bar |
ATTACH:files:row |
Standard row |
ATTACH:files:footer |
Footer for all screens |
ATTACH:files:header:A |
Title bar for upload screens, with attributes column |
ATTACH:files:row:A |
Row for upload screen |
ATTACH:files:footer:A |
Footer for all screens |
| Macro | Description |
|---|---|
ATTACH:versions:header |
Header for versions table on upload screen |
ATTACH:versions:row |
Row format for versions table on upload screen |
ATTACH:versions:footer |
Footer for versions table on upload screen |
ATTACH:row macros are expanded for each file in the attachment table, using the following special tags:
| Tag | Description |
|---|---|
%A_URL% |
viewfile URL that will recover the file |
%A_REV% |
Revision of this file |
%A_ICON% |
A file icon suitable for representing the attachment content |
%A_FILE% |
The name of the file. To get the 'pub' url of the file, use %PUBURL%/%WEB%/%TOPIC%/%A_FILE% |
%A_SIZE% |
The size of the file |
%A_DATE% |
The date the file was uploaded |
%A_USER% |
The user who uploaded it |
%A_COMMENT% |
The comment they put in when uploading it |
%A_ATTRS% |
The attributes of the file as seen on the upload screen e.g "h" for a hidden file |
Packaging and Publishing Skins
See TWiki:Plugins/SkinPackagingHowToBrowsing Installed Skins
You can try out all installed skins in the TWikiSkinBrowser.Activating Skins
TWiki uses a skin search path, which lets you combine skins additively. The skin path is defined using a combination of TWikiVariables and URL parameters. TWiki works by asking for a template for a particular function - for example, 'view'. The detail of how templates are searched for is described in TWikiTemplates, but in summary, the templates directory is searched for a file calledview.skin.tmpl, where skin is the name of the skin e.g. pattern. If no template is found, then the fallback is to use view.tmpl. Each skin on the path is searched for in turn. For example, if you have set the skin path to local,pattern then view.local.tmpl will be searched for first, then view.pattern.tmpl and finally view.tmpl.
The basic skin is defined by a SKIN setting:
-
Set SKIN = catskin, bearskin
?skin=catskin,bearskin:
Setting SKIN (or the ?skin parameter in the URL) replaces the existing skin path setting, for the current page only. You can also extend the existing skin path as well, using covers.
-
Set COVER = ruskin
ruskin, catskin, bearskin). There is also an equivalent cover URL parameter. The difference between setting SKIN vs. COVER is that if the chosen template is not found (e.g., for included templates), SKIN will fall back onto the next skin in line, or the default skin, if only one skin was present, while COVER will always fall back onto the current skin.
An example would be invoking the printable mode, which is achieved by applying ?cover=print. The view.print.tmpl simply invokes the viewprint template for the current skin which then can appropriately include all other used templates for the current skin. Where the printable mode be applied by using SKIN, all skins would have the same printable appearance.
The full skin path is built up as follows: SKIN setting (or ?skin if it is set), then COVER setting is added, then ?cover.
Conditional Skin Activation
TWiki skins can be activated conditionally using IfStatements. For example, you might want to use a mobile skin for iPhone and Android user agents, and the default skin otherwise. This example uses the print skin on iPhone and Android:
   * Set SKIN = %IF{
      "'%HTTP{"User-Agent"}%'~'*iPhone*' OR '%HTTP{"User-Agent"}%'~'*Android*'"
      then="print, pattern"
      else="topmenu, pattern"
     }%
Hard-Coded Skins
Thetext skin is reserved for TWiki internal use.
Skin names starting with rss also have a special meaning; if one or more of the skins in the skin path starts with 'rss' then 8-bit characters will be encoded as XML entities in the output, and the content-type header will be forced to text/xml.
Related Topics: TWikiSkinBrowser, AdminDocumentationCategory, DeveloperDocumentationCategory, TWiki:TWiki.TWikiSkinsSupplementTWiki Variables
Special text strings expand on the fly to display dynamic content, such as user data or system info TWikiVariables are text strings -%VARIABLE% or %VARIABLE{ parameter="value" }% - that expand into content whenever a topic is rendered for viewing. There are two types of variables:
- Preferences variables: Can be defined and changed by the user.
Example:%T%renders as
- Predefined variables: Defined by the TWiki system or by extensions.
Example:%CALCULATE{}%is handled by the SpreadSheetPlugin
TWiki Variables Wizard — to Find and Compose Variables
|
Categories:
|
Variables:
|
Select a category and a variable
Build Your Variable:

Using Variables
To use a variable type its name. For example,- type
%T%to get (a preferences variable)
- type
%TOPIC%to getTWikiVariables(a predefined variable) - type
%CALCULATE{ "$UPPER(Text)" }%to getTEXT(a variable defined by a plugin)
- To leave a variable unexpanded, precede it with an exclamation point, e.g. type
!%TOPIC%to get%TOPIC% - Variables are expanded relative to the topic they are used in, not the topic they are defined in
- Type
%ALLVARIABLES%to get a full listing of all variables defined for a particular topic
Variable Names
Variable names must start with a letter, optionally followed by letters, numbers and underscore '_' characters. Both upper-case and lower-case characters can be used,%MYVAR%, %MyVar%, %My2ndVar%, and %My_Var% are valid names. Variables are case sensitive, e.g. %MyVAR% and %MYVAR% are not the same.
By convention all settings, predefined variables and variables handled by extensions are always UPPER-CASE.
Preferences Variables
Unlike predefined variables, preferences variables can be defined by the user in various places.Setting Preferences Variables
You can set variables in all the following places:- system level in TWiki.TWikiPreferences
- plugin topics (see TWikiPlugins)
- local site level in Main.TWikiPreferences
- user level in individual user topics in Main web
- If UserSubwebs is in effect, the topic specified by
%USERPREFSTOPIC%in the user's subweb is read instead - If
$TWiki::cfg{DemoteUserPreferences}is true, this step is deferred to a later step. On this TWiki installation,$TWiki::cfg{DemoteUserPreferences}is false
- If UserSubwebs is in effect, the topic specified by
- web level in WebPreferences of each web
- If
EXTRAPREFERENCESis defined at this point, it's regarded as having comma separated list of topics. Those topics are read in the listed order as if they were WebPreferences - topic level in topics in webs
- session variables (if sessions are enabled)
- user level preferences are set at this point if
$TWiki::cfg{DemoteUserPreferences}is true as mentioned at the step 4
preview will show the wrong thing, and you must save the topic to see it correctly.
The syntax for setting variables is the same anywhere in TWiki (on its own TWiki bullet line, including nested bullets): [multiple of 3 spaces] * [space] Set [space] VARIABLENAME [space] = [space] value
Examples:
   * Set VARIABLENAME1 = value
      * Set VARIABLENAME2 = value
Spaces between the = sign and the value will be ignored. You can split a value over several lines by indenting following lines with spaces - as long as you don't try to use * as the first character on the following line.
Example:
   * Set VARIABLENAME = value starts here
     and continues here
Whatever you include in your variable will be expanded on display, exactly as if it had been entered directly.
Example: Create a custom logo variable - To place a logo anywhere in a web by typing
%MYLOGO%, define the Variable on the web's WebPreferences topic, and upload a logo file, ex:mylogo.gif. You can upload by attaching the file to WebPreferences, or, to avoid clutter, to any other topic in the same web, e.g.LogoTopic. Sample variable setting in WebPreferences:
* Set MYLOGO = %PUBURL%/%WEB%/LogoTopic/mylogo.gif
You can also set preferences variables on a topic by clicking the link Edit topic preference settings under More topic actions. Use the same * Set VARIABLENAME = value syntax. Preferences set in this manner are not visible in the topic text, but take effect nevertheless.
Controlling User Level Preferences Override
By default, user level variables are set at the step 4 as stated in the previous section. That means a user can finalise some preferences variables so that web level or topic level setting cannot override it. This may result in a situation the web or page owner doesn't expect.$TWiki::cfg{DemoteUserPreferences} has been introduced to avoid it.
If it's set to true, user level variables are set at the last step instead of the step 4.
But this is not enough.
To guarantee a certain result, you need to finalise critical preferences variables set at the web or topic level, which is cumbersome.
So preferences variables DENYUSERPREFEENCES and ALLOWUSERPREFERENCES have been introduced. -
DENYUSERPREFEENCESandALLOWUSERPREFERENCESmay have comma separated list of variable names - If a preferences variable is listed in
DENYUSERPREFEENCES, the variable cannot be overridden at the user level. There is a special value "all", which means no preferences variables can be overridden at the user level - If
ALLOWUSERPREFERENCESis set and not empty, only the listed preferences variables can be overridden. There is a special value "all", which means any preferences variable can be overridden at the user level. But actually, "all" is not necessary since a blank value or not settingALLOWUSERPREFERENCEShas the same effect -
DENYUSERPREFEENCEStakes precedence overALLOWUSERPREFERENCES. If a variable is listed on both, it cannot be overridden. IfDENYUSERPREFEENCESis "all", the value ofALLOWUSERPREFERENCESdoesn't matter.
* Set DENYUSERPREFERENCES = allIf you allow
INYMCEPLUGIN_DISABLE and SKIN to be set at the user level:
* Set ALLOWUSERPREFERENCES = TINYMCEPLUGIN_DISABLE, SKINIf you allow user preferences to set anything other than
TINYMCEPLUGIN_DISABLE or SKIN:
* Set DENYUSERPREFERENCES = TINYMCEPLUGIN_DISABLE, SKINPlease note
DENYUSERPREFEENCES and ALLOWUSERPREFERENCES affect user preferences regardless of $TWiki::cfg{DemoteUserPreferences}.
You can set those variables at the site level while $TWiki::cfg{DemoteUserPreferences} setting to false.
If you do so, you should finalise DENYUSERPREFEENCES and ALLOWUSERPREFERENCES.
Otherwise, they might be overridden by user preferences.
You will get the most benefit of DENYUSERPREFEENCES and ALLOWUSERPREFERENCES by setting $TWiki::cfg{DemoteUserPreferences} to true.
That way, each web can specify how much user level preferences overriding is allowed.
Parameterized Variables (Macros)
It is possible to pass parameters to TWiki variables. This is called a macro in a programming language. To define a parameterized variable, set a variable that contains other variables, such as:
   * Set EXAMPLE = Example variable using %DEFAULT%, %PARAM1% and %PARAM2%
   * Set DEMO = Demo using %DEFAULT{ default="(undefined)" }%,
                %PARAM1{ default="(undefined)" }% and %PARAM2{ default="(undefined)" }%
A special %DEFAULT% variable denotes the default (nameless) parameter of the calling variable. Variables optionally may list a default="..." parameter that gets used in case the calling variable does not specify that parameter.
To use a parameterized variable (or call a macro), add parameters within the curly brackets, such as:
   * %EXAMPLE{ "foo" PARAM1="bar" PARAM2="baz" }%
   * %DEMO{ "demo" PARAM2="parameter 2" }% -- note that PARAM1 is missing
which resolves to: - %EXAMPLE{ "foo" PARAM1="bar" PARAM2="baz" }%
- %DEMO{ "demo" PARAM2="parameter 2" }% -- note that PARAM1 is missing
- Parameter from variable call. In above example,
%PARAM1%gets expanded tobar. - Session variable and preferences settings
Example
Define variables:
   * Set DRINK = red wine
   * Set FAVORITE = My %DEFAULT{default="favorite"}% dish is %DISH{default="steak"}%,
                    my %DEFAULT{default="favorite"}% drink is %DRINK%.
%DISH{default="steak"}%), or as a preferences setting (Set DRINK = ...).
Use Variables:
%FAVORITE{ DISH="Sushi" DRINK="Sake" }%
Returns: %FAVORITE{ DISH="Sushi" DRINK="Sake" }%
%FAVORITE{}%
Returns: %FAVORITE{}%
%FAVORITE{ "preferred" }%
Returns: %FAVORITE{ "preferred" }%
Access Control Variables
These are special types of preferences variables to control access to content. TWikiAccessControl explains these security settings in detail.Local values for variables
Certain topics (a users home topic, web site and default preferences topics) have a problem; variables defined in those topics can have two meanings. For example, consider a user topic. A user may want to use a double-height edit box when they are editing their home topic - but only when editing their home topic. The rest of the time, they want to have a normal edit box. This separation is achieved usingLocal in place of Set in the variable definition. For example, if the user sets the following in their home topic:
   * Set EDITBOXHEIGHT = 10
   * Local EDITBOXHEIGHT = 20
Then when they are editing any other topic, they will get a 10 high edit box. However when they are editing their home topic, they will get a 20 high edit box.
Local can be used wherever a preference needs to take a different value depending on where the current operation is being performed.
Use this powerful feature with great care! %ALLVARIABLES% can be used to get a listing of the values of all variables in their evaluation order, so you can see variable scope if you get confused.
Frequently Used Preferences Variables
The following preferences variables are frequently used. They are defined in TWikiPreferences#Miscellaneous_Settings:-
%BB%- line break and bullet combined -
%BB2%- level 2 bullet with line break -
%BB3%- level 3 bullet with line break -
%BB4%- level 4 bullet with line break -
%BR%- line break -
%BULLET%- bullet sign -
%CARET%- caret symbol -
%VBAR%- vertical bar -
%H%- Help icon
-
%I%- Idea icon
-
%M%- Moved to icon
-
%N%- New icon
-
%P%- Refactor icon
-
%Q%- Question icon
-
%S%- Pick icon
-
%T%- Tip icon
-
%U%- Updated icon
-
%X%- Alert icon
-
%Y%- Done icon
-
%RED% text %ENDCOLOR%- colored text (also%YELLOW%,%ORANGE%,%PINK%,%PURPLE%,%TEAL%,%NAVY%,%BLUE%,%AQUA%,%LIME%,%GREEN%,%OLIVE%,%MAROON%,%BROWN%,%BLACK%,%GRAY%,%SILVER%,%WHITE%) -
%REDBG% text %ENDBG%- colored background (also%YELLOWBG%,%ORANGEBG%,%PINKBG%,%PURPLEBG%,%TEALBG%,%NAVYBG%,%BLUEBG%,%AQUABG%,%LIMEBG%,%GREENBG%,%OLIVEBG%,%MAROONBG%,%BROWNBG%,%BLACKBG%,%GRAYBG%,%SILVERBG%,%WHITEBG%)
Predefined Variables
Most predefined variables return values that were either set in the configuration when TWiki was installed, or taken from server info (such as current username, or date and time). Some, like%SEARCH%, are powerful and general tools.
- Show all TWiki Variables
- Predefined variables can be overridden by preferences variables (except a few such as TOPIC and WEB)
- This has long been the case but may not be desirable since even something as fundamental as
%IF{...}%,%SCRIPT{...}%, and%INCLUDE{...}%can be overridden - So TWiki-6.0.1 has introduced a way to protect predefined variables from being overridden by preferences variables
- The preferences variable
OVERRIDABLEPREDEFINEDVARIABLEShaving a comma separated list of predefined variables specifies which predefined variables are overridable - By default, it's set to "all" (set at TWiki.TWikiPreferences), which means any predefined variable can be overridden, which is for compatibility with prior releases. You can set it to a different value in Main.TWikiPreferences and you may finalise it
- If it's set as below, all predefined variables are protected
*
Set OVERRIDABLEPREDEFINEDVARIABLES = - If it's set as below,
DATEandLANGUAGEpredefined variables can be overridden but all the other predefined variables cannot*
Set OVERRIDABLEPREDEFINEDVARIABLES = DATE, LANGUAGE
- This has long been the case but may not be desirable since even something as fundamental as
- Extensions may extend the set of predefined variables (see individual extension topics for details)
- Take the time to thoroughly read through ALL preference variables. If you actively configure your site, review variables periodically. They cover a wide range of functions, and it can be easy to miss the one perfect variable for something you have in mind. For example, see
%INCLUDINGTOPIC%,%INCLUDE%, and the mighty%SEARCH%.
Search or List Variables by Category
Documenting TWiki Variables
This section is for people documenting TWiki variables of the TWiki core and TWiki extensions. Each variable is documented in a topic namedVar<name> in the TWiki web. For example, a %LIGHTSABER% variable has a documentation topic called VarLIGHTSABER. The topic is expected to have a specific format so that reports in this TWikiVariables topic, in TWikiVariablesSearch and in category topics work as expected.
Basic structure of a variable documentation topic:
- Parent set to TWikiVariables
- An anchor named the same like the topic, such as
#VarLIGHTSABER - A
---+++(level 3) heading with variable name,--, short description - A bullet with description of the variable (optional)
- A
Syntax:bullet with example syntax - A
Parameters:bullet with a table explaining the parameters (optional) - An
Example:bullet or two with examples - An
Expands to:bullet with expanded variable (optional) - A
Note:bullet with notes (optional) - A
Category:bullet with one or more of the TWiki variables categories:
AdministrationVariables, ApplicationsAndComponentsVariables, AttachmentsAndFilesVariables, ChartingAndDrawingVariables, DatabaseAndFormsVariables, DateAndTimeVariables, DevelopmentVariables, EditingAndContentUpdateVariables, EmailAndNotificationVariables, ExportAndPublishingVariables, FormattingAndRenderingVariables, ImportVariables, LinkingAndNavigationVariables, SearchingAndListingVariables, SecurityAndAccessControlVariables, SkinsAndTemplatesVariables, SystemInformationVariables, TablesAndSpreadsheetsVariables, UIAndVisualizationVariables, UsersAndAuthenticationVariables, WorkflowAndAutomationVariables - A
Related:bullet with related links. Links have conditional IF so that links work properly locally in variable documentation topics and in the TWikiVariables topic
VarLIGHTSABER topic:
#VarLIGHTSABER
---+++ LIGHTSABER -- laser sword to fend of unethical competition
   * The =%<nop>LIGHTSABER{}%= variable is handled by the LightsaberPlugin.
   * Syntax: =%<nop>LIGHTSABER{ _parameters_ }%=
   * Parameters:
     | *Parameter* | *Description* | *Default* |
     | =color="..."= | Color: =red=, =glue=, =green= | =white= |
     | =sound="..."= | Sound: =none=, =standard=, =loud= | =none= |
   * Example: =%<nop>LIGHTSABER{ color="red" }%= shows a red Lightsaber
   * Expands to: =%LIGHTSABER{ color="red" }%=
   * Note: The Lightsaber is a fictional weapon in the Star Wars universe, a "laser sword."
   * Category: FormattingAndRenderingVariables, UIAndVisualizationVariables
   * Related: [[%IF{"'%INCLUDINGTOPIC%'='TWikiVariables'" then="#"}%VarPLASMA][PLASMA]], LightsaberPlugin
TWiki Meta Data
Additional topic data, program-generated or from TWikiForms, is stored embedded in the topic text usingMETA: tags
Overview
By default, TWiki stores topics in files on disk, in a really simple and obvious directory structure. The big advantage of this approach is that it makes it really easy to manipulate topics from outside TWiki, and is also very safe; there are no complex binary indexes to maintain, and moving a topic from one TWiki to another is as simple as copying a couple of text files. To keep everything together in one place, TWiki uses a simple method for embedding additional data (program-generated or from TWikiForms) in topics. It does this usingMETA: tags.
META: data includes program-generated info like FileAttachment and topic movement data, and user-defined TWikiForms info.
Meta Data Syntax
- Format is the same as in TWikiVariables, except all fields have a key.
-
%META:<type>{key1="value1" key2="value2" ...}%
-
- Order of fields within the meta variables is not defined, except that if there is a field with key
name, this appears first for easier searching (note the order of the variables themselves is defined).
- Each meta variable is on one line.
- Values in meta-data are URL encoded so that characters such as \n can be stored.
Example of Format
%META:TOPICINFO{version="1.6" date="976762663" author="LastEditorWikiName" format="1.0"}%
   text of the topic
%META:TOPICMOVED{from="Codev.OldName" to="Codev.NewName"
   by="TopicMoverWikiName" date="976762680"}%
%META:TOPICPARENT{name="NavigationByTopicContext"}%
%META:FILEATTACHMENT{name="Sample.txt" version="1.3" ... }%
%META:FILEATTACHMENT{name="Smile.gif" version="1.1" ... }%
%META:FORM{name="WebFormTemplate"}%
%META:FIELD{name="OperatingSystem" value="OsWin"}%
%META:FIELD{name="TopicClassification" value="PublicFAQ"}%
Meta Data Specifications
The current version of Meta Data is 1.0, with support for the following variables.META:TOPICINFO
| Key | Comment |
|---|---|
| version | Same as RCS version |
| date | integer, unix time, seconds since start 1970 |
| author | last to change topic, is the REMOTE_USER |
| format | Format of this topic, will be used for automatic format conversion |
META:TOPICMOVED
This is optional, exists if topic has ever been moved. If a topic is moved more than once, only the most recent META:TOPICMOVED meta variable exists in the topic, older ones are to be found in the rcs history.%META:TOPICMOVED{from="Codev.OldName" to="Codev.NewName" by="talintj" date="976762680"}%
| Key | Comment |
|---|---|
| from | Full name, i.e., web.topic |
| to | Full name, i.e., web.topic |
| by | Who did it, is the REMOTE_USER, not WikiName |
| date | integer, unix time, seconds since start 1970 |
- at present version number is not supported directly, it can be inferred from the RCS history.
- there is only one META:TOPICMOVED in a topic, older move information can be found in the RCS history.
META:TOPICPARENT
| Key | Comment |
|---|---|
| name | The topic from which this was created, typically when clicking on a red-link, or by filling out a form. Normally just TopicName, but it can be a full Web.TopicName format if the parent is in a different Web. |
META:FILEATTACHMENT
| Key | Comment |
|---|---|
| name | Name of file, no path. Must be unique within topic |
| version | Same as RCS revision |
| path | Full path file was loaded from |
| size | In bytes |
| date | integer, unix time, seconds since start 1970 |
| user | the REMOTE_USER, not WikiName |
| comment | As supplied when file uploaded |
| attr | h if hidden, optional |
| Key | Comment |
|---|---|
| movedfrom | full topic name - web.topic |
| movedby | the REMOTE_USER, not WikiName |
| movedto | full topic name - web.topic |
| moveddate | integer, unix time, seconds since start 1970 |
META:FORM
| Key | Comment |
|---|---|
| name | A topic name - the topic represents one of the TWikiForms. Can optionally include the web name (i.e., web.topic), but doesn't normally |
META:FIELD
Should only be present if there is a META:FORM entry. Note that this data is used when viewing a topic, the form template definition is not read.| Key | Name |
|---|---|
| name | Ties to entry in TWikiForms template, is title with all bar alphanumerics and . removed |
| title | Full text from TWikiForms template |
| value | Value user has supplied via form |
Recommended Sequence
There is no absolute need for Meta Data variables to be listed in a specific order within a topic, but it makes sense to do so a couple of good reasons:- form fields remain in the order they are defined
- the
difffunction output appears in a logical order
-
META:TOPICINFO -
META:TOPICPARENT(optional) - text of topic
-
META:TOPICMOVED(optional) -
META:FILEATTACHMENT(0 or more entries) -
META:FORM(optional) -
META:FIELD(0 or more entries; FORM required)
Viewing Meta Data in Page Source
When viewing a topic theRaw Text link can be clicked to show the text of a topic (i.e., as seen when editing). This is done by adding raw=on to URL. raw=debug shows the meta data as well as the topic data, ex: debug view for this topic
Rendering Meta Data
Meta Data is rendered with the %META% variable. This is mostly used in theview, preview and edit scripts.
You can render form fields in topic text by using the FORMFIELD variable. Example:%FORMFIELD{"TopicClassification"}% For details, see VarFORMFIELD. Current support covers:
| Variable usage: | Comment: |
|---|---|
%META{"form"}% |
Show form data, see TWikiForms. |
%META{"formfield"}% |
Show form field value. Parameter: name="field_name". Example:%META{ "formfield" name="TopicClassification" }% |
%META{"attachments"}% |
Show attachments, except for hidden ones. Options: all="on": Show all attachments, including hidden ones. |
%META{"moved"}% |
Details of any topic moves. |
%META{"parent"}% |
Show topic parent. Options: dontrecurse="on": By default recurses up tree, at some cost. nowebhome="on": Suppress WebHome. prefix="...": Prefix for parents, only if there are parents, default "". suffix="...": Suffix, only appears if there are parents, default "". separator="...": Separator between parents, default is " > ". |
TWiki Forms - Foundation of TWiki Applications
Add structure to content with forms attached to twiki topics. TWiki forms (with form fields) and formatted search are the base for building database applications.Overview
By adding form-based input to free form content, you can structure topics with unlimited, easily searchable categories. A form is enabled for a web and can be added to a topic. The form data is shown in tabular format when the topic is viewed, and can be changed in edit mode using edit fields, radio buttons, check boxes and list boxes. Many different form types can be defined in a web, though a topic can only have one form attached to it at a time. Typical steps to build an application based on TWiki forms:- Define a form template
- Enable the form for a web
- Add the form to a template topic
- Build an HTML form to create new topics based on that template topic
- Build a FormattedSearch to list topics that share the same form
Defining a Form
A Form Template specifies the fields in a form. A Form Template is simply a page containing a TWiki table, where each row of the table specifies one form field.- Create a new topic with your form name:
YourForm,ExpenseReportForm,InfoCategoryForm,RecordReviewForm, whatever you need.
The name of a Form Template topic must end in Form.
- Create a TWiki table, with each column representing one element of an entry field:
Name,Type,Size,Values,Tooltip message, andAttributes(see sample below). - For each field, fill in a new line; for the type of field, select from the list.
- Save the topic
Example:See structure of a form for full details of what types are available and what all the columns mean. You can also retrieve possible values for
| *Name* | *Type* | *Size* | *Values* | *Tooltip message* | *Attributes* |
| TopicClassification | select | 1 | NoDisclosure, PublicSupported, PublicFAQ | blah blah... | |
| OperatingSystem | checkbox | 3 | OsHPUX, OsLinux, OsSolaris, OsWin | blah blah... | |
| OsVersion | text | 16 | | blah blah... | |
Name Type Size Values Tooltip message Attributes TopicClassification select 1 NoDisclosure, PublicSupported, PublicFAQ blah blah... OperatingSystem checkbox 3 OsHPUX, OsLinux, OsSolaris, OsWin blah blah... OsVersion text 16 blah blah...
select, checkbox or radio types from other topics:
Example:Field values can also be set using the result of expanding other TWiki variables. For example,
- In the WebForm topic, define the form:
Name Type Size Values Tooltip message Attributes TopicClassification select 1 blah blah... OperatingSystem checkbox 3 blah blah... OsVersion text 16 blah blah...
Valuesfield blank.
- Then in the TopicClassification topic, define the possible values:
| *Name* |
| NoDisclosure |
| Public Supported |
| Public FAQ |
Name NoDisclosure Public Supported Public FAQ
%SEARCH{"Office$" scope="topic" web="%USERSWEB%" nonoise="on" type="regex" format="$web.$topic" separator=", " }%
When used in the value field of the form definition, this will find all topic names in the Main web which end in "Office" and use them as the legal field values.
Adding a Form to a Topic
- To add a Form, follow the "More topic actions" link at the bottom of a topic, select "Add or Replace Form".
- Select a Form Template topic. These are topics with names ending in Form that contain a Form Template table.
- A Form is typically added to a template topic, either to the
WebTopicEditTemplatetopic in a web, or a new topic that serves as an application specific template topic. - Modify the template topic to set the initial Form values.
- Additionally a new topic can be given a Form using the
formtemplateparameter in the (edit or save) URL. Initial values can then be provided in the URLs or as form values:- other than checkboxes:
name, ex:?BugPriority=1 - checkbox:
namevalue=1, ex:?ColorRed=1.
Boxes with a tick must be specified. - Example: This will add a textfield for the new topic name and a "Create"-Button to your topic. When the button is pressed, the topic editor will open with the form "MyForm" already attached to the new topic.
    <form name="newtopic" action="%SCRIPTURLPATH{"edit"}%/%WEB%/">
       <input type="hidden" name="formtemplate" value="MyForm" />
       New topic name <input type="text" name="topic" size="40" />
       <input type="submit" class="twikiSubmit" value="Create" />
    </form>
- other than checkboxes:
- Note: You can create a topic in one step, without going through the edit screen. To do that, specify the
savescript instead of theeditscript in the form action. When you specify thesavescript you have to use the "post" method. Example:<form name="newtopic" action="%SCRIPTURLPATH{"save"}%/%WEB%/" method="post"> ..... </form> - The
editandsavescripts understand many more parameters, see TWikiScripts#edit and TWikiScripts#save for details.
- Tip: For TWiki applications you can automatically generate unique topicnames.
- Note: Initial values will not be set in the form of a new topic if you only use the formtemplate parameter.
Changing a Form
- To change a Form, follow the "More topic actions" link at the bottom of a topic, select "Add or Replace Form", and select a new Form.
- You can change a form definition, and TWiki will try to make sure you don't lose any data from the topics that use that form.
- If you add a new field to the form, then it will appear next time you edit a topic that uses the form.
- If you delete a field from the form, or change a field name, then the data will not be visible when you edit the topic (the changed form definition will be used). If you save the topic, the old data will be lost (though thanks to revision control, you can always see it in older versions of the topic)
- If two people edit the same topic containing a form at exactly the same time, and both change fields in the form, TWiki will try to merge the changes so that no data is lost.
Structure of a Form Template
A Form Template specifies the fields in a form. A Form Template is simply a page containing a TWiki table, where each row of the table specifies one form field. Each row of the table defines one element of an input field:| Name | Type | Size | Values | Tooltip message | Attributes |
|---|
Name, Type and Size columns are required. Other columns are optional. The form template must have a header row, e.g. at least | *Name* | *Type* | *Size* | is required. Columns:
- Name column:
Nameis the name of the form field.
- Type, Size, Value columns:
Type,SizeandValuedescribe the type, size and initial value of this form field. Typetext,checkbox,selectand more are described in the Form Field Types section below.
- Tooltip message column: The
Tooltip messagewill be displayed when the cursor is hovered over the field ineditview.
- Attributes column:
Attributesmay contain additional key="value" form field attributes, separated by space.- A
hidden="1"attribute indicates that this field is hidden, e.g. not shown in view mode. However, the field is available for editing and storing information. The deprecatedHattribute has the same function, it is still supported but might be removed in a future TWiki release.
Tip: The TWiki form header is suppressed in view mode if all fields of the form are hidden. For better usability it is good to hide the whole form if the display and interaction of all form fields is done externally. For example, the display and modification of form field values can be done in a header topic that is included in each page.
- An
mandatory="1"attribute indicates that this field is mandatory. The topic cannot be saved unless a value is provided for this field. If the field is found empty during topic save, an error is raised and the user is redirected to anoopspage. Mandatory fields are indicated by an asterisks next to the field name. The deprecatedMattribute has the same function, it is still supported but might be removed in a future TWiki release. - Additional form field type specific attributes can be used, such as
onfocus="..."andspellcheck="..".
- A
| *Name* | *Type* | *Size* |
| Name   | text   | 80     |
| Date   | date   | 30     |
Field Name Notes:
- Field names have to be unique.
- A very few field names are reserved. If you try to use one of these names, TWiki will automatically append an underscore to the name when the form is used.
- You can space out the title of the field, and it will still find the topic e.g.
Aeroplane Manufacturersis equivalent toAeroplaneManufacturers. - If a
labelfield has no name, it will not be shown when the form is viewed, only when it is edited. - Field names can in theory include any text, but you should stick to alphanumeric characters. If you want to use a non-wikiname for a
select,checkboxorradiofield, and want to get the values from another topic, you can use[[...]]links. This notation can also be used when referencing another topic to obtain field values, but a name other than the topic name is required as the name of the field. - Leading and trailing spaces are not significant.
- The field value will be used to initialize a field when a form is created, unless specific values are given by the topic template or query parameters. The first item in the list for a select or radio type is the default item. For
label,text, andtextareafields the value may also contain commas.checkboxfields cannot be initialized through the form template. - Leading and trailing spaces are not significant.
- Field values can also be generated through a FormattedSearch, which must yield a suitable table as the result.
- Variables in the initial values of a form definition get expanded when the form definition is loaded.
- If you want to use a
|character in the initial values field, you have to precede it with a backslash, thus:\|. - You can use
<nop>to prevent TWiki variables from being expanded. - The FormatTokens can be used to prevent expansion of other characters.
- If you want to use a
- The topic definition is not read when a topic is viewed.
- Form definition topics can be protected in the usual manner, using TWikiAccessControl, to limit who can change the form template and/or individual value lists. Note that view access is required to be able to edit topics that use the form definition, though view access to the form definition is not required to view a topic where the form has been used.
Form Field Types
Each table row of a form template defines one element of an input field:| Name | Type | Size | Values | Tooltip message | Attributes |
|---|
Size, Value and Attributes depend on the Type used. Form field types:
| Type | Description | Size | Value |
|---|---|---|---|
text |
One-line text field | Text box width in number of characters | Initial (default) content |
textarea |
Multi-line text box | Columns x rows, such as 80x6; default is 40x5 |
Initial (default) content |
label |
Read-only text label | Text of the label | |
checkbox |
One or more checkboxes that can be toggled individually | Number of checkboxes shown per line | Comma-space-separated list of item labels - can be a dynamic SEARCH |
checkbox+buttons |
Like checkbox, adding [Set] and [Clear] buttons |
||
radio |
Radio buttons, mutually exclusive; only one can be selected | Number of radio buttons shown per line | Comma-space-separated list of item labels - can be a dynamic SEARCH |
combobox |
 Text field & select combination box, rendered as a text input field and a button to open up a selector box Text field & select combination box, rendered as a text input field and a button to open up a selector box |
Text box width in number of characters | Comma-space-separated list of options of the select box - can be a dynamic SEARCH |
select |
Select box, rendered as a picklist or a multi-row selector box depending on the size value | • 1: Show a picklist • Number > 1: Multi-row selector box of specified size • Range e.g. 3..10: Multi-row selector box with variable size - the box will never be smaller than 3 items, never larger than 10, and will be 5 high if there are only 5 options |
Comma-space-separated list of options of the select box - can be a dynamic SEARCH |
select+multi |
Like select, turning multi-select on, to allow Shift+Click and Ctrl+Click to select (or deselect) multiple items |
||
select+values |
Like select, allowing definition of values that are different to the displayed text. An option is defined as value: title, where the value is the value passed on form submit, and title is the option text shown to the user. For example:| Field 9 | select+values | 3 | One, 2: Two, III: Three | Various values formats | shows but the values of options Two and Three are 2 and III, respectively. A legacy title=value syntax is supported as well, for example: One, Two=2, Three=III. |
||
select+multi+values |
Combination of select+multi and select+values |
||
color |
 Single-line text box and a color picker to pick a color. The color can also be typed into the text box, such as Single-line text box and a color picker to pick a color. The color can also be typed into the text box, such as #123456. An attribute of type="popup" shows a button that, when clicked, opens a color picker popup. |
Text box width in number of characters | Initial (default) color |
date |
 Text input field and a button next to it to pick a date from a pop-up calendar. The date can also be typed into the text box. Text input field and a button next to it to pick a date from a pop-up calendar. The date can also be typed into the text box. |
Text box width in number of characters | Initial (default) date |
- Common attributes: hidden, mandatory, class, form, onblur, onfocus, onchange, onselect, onmouseover, onmouseout, spellcheck, style, tabindex, title, translate
- Type-specific attributes:
-
texttype: id, max, maxlength, min, pattern, placeholder -
textareatype: autocomplete, id, maxlength, minlength, pattern, placeholder, wrap -
labeltype: id, max, maxlength, min -
comboboxtype: max, maxlength, min, pattern, placeholder
-
Values in Other Topics
As described above, you can also retrieve possible values for select, checkbox or radio types from other topics. For example, if you have a rows defined like this:| *Name* | *Type* | *Size* | | AeroplaneManufacturers | select | |the TWiki will look for the topic AeroplaneManufacturers to get the possible values for the
select.
The AeroplaneManufacturers topic must contain a table, where each row of the table describes a possible value. The table only requires one column, Name. Other columns may be present, but are ignored.
For example:
| *Name* |
| Routan |
| Focke-Wulf |
| De Havilland |
Notes:
- The
Valuescolumn must be empty in the referring form definition.
Using a form template on a different web
You can use a form template on a different web by specifying a form template in the WEB.TOPIC format. In addition, you can put a comma separated list of webs in theTWIKIFORMPATH variable.
It's referred to only when a form template is spcified without a web (TOPIC instead of WEB.TOPIC).
The webs in TWIKIFORMPATH are examined in the listed order until the specified template is found.
TWIKIFORMPATH may contain TWiki variables. For example:
* Set TWIKIFORMPATH = %APPLICATION_WEB%, %WEB%If
TWIKIFORMPATH is defined, the current web is examined only if all the webs listed in it don't have the form template.
Extending the range of form data types
You can extend the range of data types accepted by forms by using TWikiPlugins. All such extended data types are single-valued (can only have one value) with the following exceptions:- any type name starting with
checkbox - any type name with
+multianywhere in the name
Hints and Tips
Editing Just Form Data, Without Topic Text
In some cases you want to change only the form data. You have the option of hiding the topic text with two methods:- To display only the form whenever you edit a topic, set the preference variable EDITACTION to value
form(see details). - To change the edit action in a URL, add a
action=formparameter to the edit URL string, such as
%SCRIPTURL{edit}%/%BASEWEB%/%BASETOPIC%?t=%SERVERTIME{$epoch}%;action=form(see details).
Build an HTML Form to Create New Form-based Topics
New topics with a form are created by simple HTML forms asking for a topic name. For example, you can have aSubmitExpenseReport topic where you can create new expense reports, a SubmitVacationRequest topic, and so on. These can specify the required template topic with its associated form. Template topics has more.
A Form Template specifies the fields in a form. A Form Template is simply a page containing a TWiki table, where each row of the table specifies one form field.
Update Specific Form Fields
All the form fields are shown and can be updated when editing a topic that has a form. It is possible to have more control over the layout of a form, or update just a subset of the form fields by using a custom HTML form. For example, in a bug tracker, each topic would include a header topic that shows a form with some fields to update specific form fields of the bug item. Use the EDITFORMFIELD variable to easily create this form in the header topic. Example:
%EDITFORMFIELD{ "form" type="start" action="save" topic="%BASETOPIC%" }%
| Priority: | %EDITFORMFIELD{ "Priority" topic="%BASETOPIC%" }% |
| Status:   | %EDITFORMFIELD{ "Status"   topic="%BASETOPIC%" }% |
|  | %EDITFORMFIELD{ "form" type="submit" value="Update" }% |
%EDITFORMFIELD{ "LastUpdate" type="hidden" value="%SERVERTIME{$year-$mo-$day}%" }%
%EDITFORMFIELD{ "form" type="end" }%
Assuming the base topic has a BugForm with Priority and Status fields of type select, a LastUpdate field of type text, and some other fields. Above form shows a table with selectors for Priority and Status, and an Update button. On form submit, the Priority, Status and LastUpdate fields are updated in the base topic.
Searching for Form Data
TWiki Forms accept user-input data, stored as TWikiMetaData. Meta data also contains program-generated info about changes, attachments, etc. To find, format and display form and other meta data, see TWikiMetaData, EDITFORMFIELD, FORMFIELD, SEARCH and METASEARCH variables in TWikiVariables, and TWiki Formatted Search.ExampleSearching forms this way is obviously pretty inefficient, but it's easy to do. If you want better performance, take a look at some of the structured wiki extensions that support higher performance searching e.g. TWiki:Plugins.DBCachePlugin
TWiki users often want to have an overview of topics they contributed to. With the$formfieldparameter it is easy to display the value of a classification field next to the topic link:| *Topic* | *Classification* | %SEARCH{"%USERSWEB%.UserName" scope="text" nosearch="on" nototal="on" sort="modified" reverse="on" format="|<b>[[$web.$topic][$topic]]</b> |<nop>$formfield(TopicClassification) |" web="Sandbox"}%
Gotcha!
- Some browsers may strip linefeeds from
textfields when a topic is saved. If you need linefeeds in a field, make sure it is atextarea.
TWiki Plugins
Add functionality to TWiki with readily available plugins; create plugins based on APIsOverview
You can add plugins to extend TWiki functionality, without altering the core code. A plug-in approach lets you:- add virtually unlimited features while keeping the main TWiki code compact and efficient;
- heavily customize an installation and still do clean updates to new versions of TWiki;
- rapidly develop new TWiki functions in Perl using the plugin API.
- TWiki:TWiki.TWikiPluginsSupplement - tip: supplemental documentation on TWiki plugins
- TWiki:Plugins.PluginPackage - list of all contributed plugin packages
- TWiki:Plugins.PluginDevelopment - discussion and feedback on contributed plugins
- TWiki:Plugins.PluginBrainstorming - open forum for new plugin ideas
- TWiki:Plugins.PluginPackageHowTo - template to create a new plugin package
Installing Plugins
The TWiki:Pluginsyum, apt-get, rpm, etc) to install dependent libraries.
If available, install CPAN (Comprehensive Perl Archive Network) libraries with the OS package manager. For example, to install IO::Socket::SSL on Fedora/RedHat/CentOS, run yum install perl-IO-Socket-SSL. CPAN modules can also be installed natively, see TWiki:TWiki.HowToInstallCpanModulesOn-Site Pretesting
If you have a mission critical TWiki installation and you are concerned about installing new plugins, you can test new plugins before making them available by creating a second test TWiki installation, and test the plugin there. It is also possible to configure this test TWiki to use the live data. You can allow selected users access to the test area. Once you are satisfied that it won't compromise your primary installation, you can install it there as well. InstalledPlugins shows which plugins are: 1) installed, 2) loading properly, and 3) what TWiki:Codev.PluginHandlers%FAILEDPLUGINS% variable can be used to debug failures. You may also want to check your webserver error log and the various TWiki log files.
Some Notes on Plugin Performance
The performance of the system depends to some extent on the number of plugins installed and on the plugin implementation. Some plugins impose no measurable performance decrease, some do. For example, a Plugin might use many Perl libraries that need to be initialized with each page view (unless you run mod_perl). You can only really tell the performance impact by installing the plugin and by measuring the performance with and without the new plugin. Use the TWiki:Plugins.PluginBenchmarkAddOnab utility. Example on Unix:time wget -qO /dev/null /twiki/bin/view/TWiki/AbcPlugin
DISABLEDPLUGINS to be a comma-separated list of names of plugins to disable. Define it in Main.TWikiPreferences to disable those plugins everywhere, in the WebPreferences topic to disable them in an individual web, or in a topic to disable them in that topic. For example,
* Set DISABLEDPLUGINS = SpreadSheetPlugin, EditTablePlugin
Managing Installed Plugins
Some plugins require additional settings or offer extra options that you have to select. Also, you may want to make a plugin available only in certain webs, or temporarily disable it. And may want to list all available plugins in certain topics. You can handle all of these management tasks with simple procedures:Enabling/Disabling Plugins
Plugins can be enabled and disabled with the configure script in the Plugins section. An installed plugin needs to be enabled before it can be used.Plugin Evaluation Order
By default, TWiki executes plugins in alphabetical order on plugin name. It is possible to change the order, for example to evaluate database variables before the spreadsheet CALCs. This can be done with{PluginsOrder} in the plugins section of configure.
Plugin-Specific Settings
Plugins can be configured with 1. preferences settings and/or 2. with configure settings. Older plugins use plugin preferences settings defined in the plugin topic, which is no longer recommended. 1. Use preferences settings: Adinistrators can set plugin-specific settings in the local site preferences at Main.TWikiPreferences and users can overload them at the web level and page level. This approach is recommended if users should be able to overload settings. For security this is not recommended for system settings, such as a path to an executable. By convention, preferences setting names start with the plugin name in all caps, and an underscore. For example, to set the cache refresh period of the TWiki:Plugins.VarCachePlugin-
Set VARCACHEPLUGIN_REFRESH = 24
%<pluginname>_<setting>%, such as %VARCACHEPLUGIN_REFRESH%.
To learn how this is done, use the TWiki:Plugins.VarCachePlugin- Create a Config.spec file in
lib/TWiki/Plugins/YourPlugin/with variables, such as
$TWiki::cfg{Plugins}{RecentVisitorPlugin}{ShowIP} = 0; - In the plugin, use those those variables, such as
$showIP = $TWiki::cfg{Plugins}{RecentVisitorPlugin}{ShowIP} || 0;
- As a setting in the plugin documentation, which is needed for the extension reports on twiki.org. Example:
-
Set SHORTDESCRIPTION = Show recent visitors to a TWiki site
-
- As a global Perl package variable in the plugin package, which is needed by TWiki to show info on installed plugins. Example:
our $SHORTDESCRIPTION = 'Show recent visitors to a TWiki site';
our $NO_PREFS_IN_TOPIC = 1;
Listing Active Plugins
Plugin status variables let you list all active plugins wherever needed. This site is running TWiki version TWiki-6.1.0, Mon, 16 Jul 2018, build 30610, plugin API version 6.10 %ACTIVATEDPLUGINS%
On this TWiki site, the enabled plugins are: SpreadSheetPlugin, BackupRestorePlugin, ColorPickerPlugin, CommentPlugin, DBIQueryPlugin, DatePickerPlugin, EditTablePlugin, HeadlinesPlugin, InterwikiPlugin, JQueryPlugin, PreferencesPlugin, SetGetPlugin, SlideShowPlugin, SmiliesPlugin, TWikiSheetPlugin, TablePlugin, TagMePlugin, TinyMCEPlugin, TwistyPlugin, WatchlistPlugin, WysiwygPlugin.
%PLUGINDESCRIPTIONS%
- SpreadSheetPlugin (2018-07-05, $Rev: 30478 (2018-07-16) $): Add spreadsheet calculation like
"$SUM( $ABOVE() )"to TWiki tables or anywhere in topic text - BackupRestorePlugin (2018-07-10, $Rev: 30551 (2018-07-16) $): Administrator utility to backup, restore and upgrade a TWiki site
- ColorPickerPlugin (2018-07-05, $Rev: 30442 (2018-07-16) $): Color picker, packaged for use in TWiki forms and TWiki applications
- CommentPlugin (2018-07-05, $Rev: 30530 (2018-07-16) $): Quickly post comments to a page without an edit/preview/save cycle
- DBIQueryPlugin (2011-03-13, $Rev: 20722 (2011-05-10) $): Make complex database queries using DBI Perl module
- DatePickerPlugin (2018-07-05, $Rev: 30446 (2018-07-16) $): Pop-up calendar with date picker, for use in TWiki forms, HTML forms and TWiki plugins
- EditTablePlugin (2018-07-05, $Rev: 30448 (2018-07-16) $): Edit TWiki tables using edit fields, date pickers and drop down boxes
- HeadlinesPlugin (2018-07-13, $Rev: 30560 (2018-07-16) $): Show headline news in TWiki pages based on RSS and ATOM news feeds from external sites
- InterwikiPlugin (2018-07-05, $Rev: 30454 (2018-07-16) $): Write
ExternalSite:Pageto link to a page on an external site based on aliases defined in a rules topic - JQueryPlugin (2018-07-05, $Rev: 30456 (2018-07-16) $): jQuery JavaScript library for TWiki
- PreferencesPlugin (2018-07-05, $Rev: 30528 (2018-07-16) $): Allows editing of preferences using fields predefined in a form
- SetGetPlugin (2018-07-05, $Rev: 30472 (2018-07-16) $): Set and get variables and JSON objects in topics, optionally persistently across topic views
- SlideShowPlugin (2018-07-05, $Rev: 30474 (2018-07-16) $): Create web based presentations based on topics with headings.
- SmiliesPlugin (2018-07-05, $Rev: 30476 (2018-07-16) $): Render smilies as icons, like
:-)as or :eek:as
- TWikiSheetPlugin (2018-07-15, $Rev: 30604 (2018-07-16) $): Add TWiki Sheet spreadsheet functionality to TWiki tables
- TablePlugin (2018-07-05, $Rev: 30480 (2018-07-16) $): Control attributes of tables and sorting of table columns
- TagMePlugin (2018-07-05, $Rev: 30482 (2018-07-16) $): Tag wiki content collectively or authoritatively to find content by keywords
- TinyMCEPlugin (2018-07-10, $Rev: 30541 (2018-07-16) $): Integration of the Tiny MCE WYSIWYG Editor
- TwistyPlugin (2018-07-06, $Rev: 30497 (2018-07-16) $): Twisty section JavaScript library to open/close content dynamically
- WatchlistPlugin (2018-07-10, $Rev: 30536 (2018-07-16) $): Watch topics of interest and get notified of changes by e-mail
- WysiwygPlugin (2018-07-06, $Rev: 30528 (2018-07-16) $): Translator framework for WYSIWYG editors
%FAILEDPLUGINS%
| Plugin | Errors |
|---|---|
| SpreadSheetPlugin | none |
| BackupRestorePlugin | none |
| ColorPickerPlugin | none |
| CommentPlugin | none |
| DBIQueryPlugin | none |
| DatePickerPlugin | none |
| EditTablePlugin | none |
| HeadlinesPlugin | none |
| InterwikiPlugin | none |
| JQueryPlugin | none |
| PreferencesPlugin | none |
| SetGetPlugin | none |
| SlideShowPlugin | none |
| SmiliesPlugin | none |
| TWikiSheetPlugin | none |
| TablePlugin | none |
| TagMePlugin | none |
| TinyMCEPlugin | none |
| TwistyPlugin | none |
| WatchlistPlugin | none |
| WysiwygPlugin | none |
| Handler | Plugins |
|---|---|
| afterEditHandler | WysiwygPlugin |
| afterRenameHandler | TagMePlugin WatchlistPlugin |
| afterSaveHandler | TagMePlugin WatchlistPlugin |
| beforeCommonTagsHandler | DBIQueryPlugin EditTablePlugin PreferencesPlugin TWikiSheetPlugin TwistyPlugin WysiwygPlugin |
| beforeEditHandler | TinyMCEPlugin WysiwygPlugin |
| beforeMergeHandler | WysiwygPlugin |
| beforeSaveHandler | CommentPlugin WatchlistPlugin WysiwygPlugin |
| commonTagsHandler | SpreadSheetPlugin BackupRestorePlugin CommentPlugin DBIQueryPlugin EditTablePlugin JQueryPlugin SlideShowPlugin SmiliesPlugin TWikiSheetPlugin |
| initPlugin | SpreadSheetPlugin BackupRestorePlugin ColorPickerPlugin CommentPlugin DBIQueryPlugin DatePickerPlugin EditTablePlugin HeadlinesPlugin InterwikiPlugin JQueryPlugin PreferencesPlugin SetGetPlugin SlideShowPlugin SmiliesPlugin TWikiSheetPlugin TablePlugin TagMePlugin TinyMCEPlugin TwistyPlugin WatchlistPlugin WysiwygPlugin |
| modifyHeaderHandler | WysiwygPlugin |
| postRenderingHandler | DBIQueryPlugin PreferencesPlugin WysiwygPlugin |
| preRenderingHandler | InterwikiPlugin SmiliesPlugin TablePlugin |
The TWiki Plugin API
The Application Programming Interface (API) for TWiki plugins provides the specifications for hooking into the core TWiki code from your external Perl plugin module.Available Core Functions
The TWikiFuncDotPm module (lib/TWiki/Func.pm) describes all the interfaces available to plugins. Plugins should only use the interfaces described in this module.
Func.pm, you run the risk of creating security holes. Also, your plugin will likely break and require updating when you upgrade to a new version of TWiki.
Predefined Hooks
In addition to TWiki core functions, plugins can use predefined hooks, or callbacks, as described in thelib/TWiki/Plugins/EmptyPlugin.pm module.
- All but the initPlugin are commented out. To enable a callback, remove the leading
#from all lines of the callback.
Hints on Writing Fast Plugins
- Delay initialization as late as possible. For example, if your plugin is a simple syntax processor, you might delay loading extra Perl modules until you actually see the syntax in the text.
- For example, use an
evalblock like this:
eval { require IPC::Run }
return "<font color=\"red\">SamplePlugin: Can't load required modules ($@)</font>" if $@;
- For example, use an
- Keep the main plugin package as small as possible; create other packages that are loaded if and only if they are used. For example, create sub-packages of BathPlugin in
lib/TWiki/Plugins/BathPlugin/. - Avoid using preferences in the plugin topic; Define
$NO_PREFS_IN_TOPICin your plugin package as that will stop TWiki from reading the plugin topic for every page. Use Config.spec or preferences settings instead. (See details). - Use registered tag handlers.
- Measure the performance to see the difference.
Version Detection
To eliminate the incompatibility problems that are bound to arise from active open plugin development, a plugin versioning system is provided for automatic compatibility checking.- All plugin packages require a
$VERSIONvariable. This should be an integer, or a subversion version id.
- The
initPluginhandler should check all dependencies and return 1 if the initialization is OK or 0 if something went wrong.- The plugin initialization code does not register a plugin that returns 0 (or that has no
initPluginhandler).
- The plugin initialization code does not register a plugin that returns 0 (or that has no
-
$TWiki::Plugins::VERSIONin theTWiki::Pluginsmodule contains the TWiki plugin API version, currently 6.10.- You can also use the
%PLUGINVERSION{}%variable to query the plugin API version or the version of installed plugins.
- You can also use the
Security
- Badly written plugins can open huge security holes in TWiki. This is especially true if care isn't taken to prevent execution of arbitrary commands on the server.
- Don't allow sensitive configuration data to be edited by users. it is better to add sensitive configuration options to the
%TWiki::cfghash than adding it as preferences in the plugin topic.- Integrating with
configuredescribes the steps - TWiki:Plugins.MailInContrib has an example
- TWiki:Plugins.BuildContrib can help you with this
- Integrating with
- Always use the TWiki::Sandbox to execute commands.
- Always audit the plugins you install, and make sure you are happy with the level of security provided. While every effort is made to monitor plugin authors activities, at the end of the day they are uncontrolled user contributions.
Creating Plugins
With a reasonable knowledge of the Perl scripting language, you can create new plugins or modify and extend existing ones. Basic plug-in architecture uses an Application Programming Interface (API), a set of software instructions that allow external code to interact with the main program. The TWiki Plugin API provides the programming interface for TWiki. Understanding how TWiki is working at high level is beneficial for plugin development.Anatomy of a Plugin
A (very) basic TWiki plugin consists of two files:- a Perl module, e.g.
MyFirstPlugin.pm - a documentation topic, e.g.
MyFirstPlugin.txt
MyFirstPlugin topic. Other needed Perl code is best placed in a lib/TWiki/Plugins/MyFirstPlugin/ directory.
The plugin API handles the details of connecting your Perl module with main TWiki code. When you're familiar with the Plugin API, you're ready to develop plugins.
The TWiki:Plugins.BuildContribCreating the Perl Module
Copy filelib/TWiki/Plugins/EmptyPlugin.pm to <name>Plugin.pm. The EmptyPlugin.pm module contains mostly empty functions, so it does nothing, but it's ready to be used. Customize it. Refer to the Plugin API specs for more information.
If your plugin uses its own modules and objects, you must include the name of the plugin in the package name. For example, write Package MyFirstPlugin::Attrs; instead of just Package Attrs;. Then call it using:
use TWiki::Plugins::MyFirstPlugin::Attrs;
$var = MyFirstPlugin::Attrs->new();
Writing the Documentation Topic
The plugin documentation topic contains usage instructions and version details. It serves the plugin files as FileAttachments for downloading. (The doc topic is also included in the distribution package.) To create a documentation topic:- Copy the plugin topic template from TWiki.org. To copy the text, go to TWiki:Plugins/PluginPackage and:
- enter the plugin name in the "How to Create a Plugin" section
- click Create
- select all in the Edit box & copy
- Cancel the edit
- go back to your site to the TWiki web
- In the JumpBox enter your plugin name, for example
MyFirstPlugin, press enter and create the new topic - paste & save new plugin topic on your site
- Customize your plugin topic.
- Important: In case you plan to publish your plugin on TWiki.org, use Interwiki names for author names and links to TWiki.org topics, such as TWiki:Main/TWikiGuest. This is important because links should work properly in a plugin topic installed on any TWiki, not just on TWiki.org.
- Important: In case you plan to publish your plugin on TWiki.org, use Interwiki names for author names and links to TWiki.org topics, such as TWiki:Main/TWikiGuest
- Document the performance data you gathered while measuring the performance
- Save your topic, for use in packaging and publishing your plugin.
OUTLINE: Doc Topic Contents
Check the plugins web on TWiki.org for the latest plugin doc topic template. Here's a quick overview of what's covered: Syntax Rules: <Describe any special text formatting that will be rendered.>" Example: <Include an example of the plugin in action. Possibly include a static HTML version of the example to compare if the installation was a success!>" Plugin Settings: <Description and settings for custom plugin %VARIABLES%, and those required by TWiki.>" Plugin Installation Instructions: <Step-by-step set-up guide, user help, whatever it takes to install and run, goes here.>" Plugin Info: <Version, credits, history, requirements - entered in a form, displayed as a table. Both are automatically generated when you create or edit a page in the TWiki:Plugins
Packaging for Distribution
The TWiki:Plugins.BuildContribPlugin, ex: MyFirstPlugin.pm, and a documentation page with the same name(MyFirstPlugin.txt).
- Distribute the plugin files in a directory structure that mirrors TWiki. If your plugin uses additional files, include them all:
-
lib/TWiki/Plugins/MyFirstPlugin.pm -
data/TWiki/MyFirstPlugin.txt -
pub/TWiki/MyFirstPlugin/uparrow.gif[a required graphic]
-
- Create a zip archive with the plugin name (
MyFirstPlugin.zip) and add the entire directory structure from Step 1. The archive should look like this:-
lib/TWiki/Plugins/MyFirstPlugin.pm -
data/TWiki/MyFirstPlugin.txt -
pub/TWiki/MyFirstPlugin/uparrow.gif
-
Measuring and Improving the Plugin Performance
A high quality plugin performs well. You can use the TWiki:Plugins.PluginBenchmarkAddOnPublishing for Public Use
You can release your tested, packaged plugin to the TWiki community through the TWiki:Plugins- Post the plugin documentation topic in the TWiki:Plugins/PluginPackage:
- enter the plugin name in the "How to Create a Plugin" section, for example
MyFirstPlugin - paste in the topic text from Writing the Documentation Topic and save
- enter the plugin name in the "How to Create a Plugin" section, for example
- Attach the distribution zip file to the topic, ex:
MyFirstPlugin.zip - Link from the doc page to a new, blank page named after the plugin, and ending in
Dev, ex:MyFirstPluginDev. This is the discussion page for future development. (User support for plugins is handled in TWiki:Support.)
- Put the plugin into the SVN repository, see TWiki:Plugins/ReadmeFirst (optional)
Recommended Storage of Plugin Specific Data
Plugins sometimes need to store data. This can be plugin internal data such as cache data, or data generated for browser consumption such as images. Plugins should store data using TWikiFuncDotPm functions that support saving and loading of topics and attachments.Plugin Internal Data
You can create a plugin "work area" using theTWiki::Func::getWorkArea() function, which gives you a persistent directory where you can store data files. By default they will not be web accessible. The directory is guaranteed to exist, and to be writable by the webserver user. For convenience, TWiki::Func::storeFile() and TWiki::Func::readFile() are provided to persistently store and retrieve simple data in this area.
Web Accessible Data
Topic-specific data such as generated images can be stored in the topic's attachment area, which is web accessible. Use theTWiki::Func::saveAttachment() function to store the data.
Recommendation for file name: - Prefix the filename with an underscore (the leading underscore avoids a name clash with files attached to the same topic)
- Identify where the attachment originated from, typically by including the plugin name in the file name
- Use only alphanumeric characters, underscores, dashes and periods to avoid platform dependency issues and URL issues
- Example:
_GaugePlugin_img123.gif
TWiki::Func::saveAttachment() function to store the data.
Recommendation for file names in plugin attachment area: - Prefix the filename with an underscore
- Include the name of the web in the filename
- Use only alphanumeric characters, underscores, dashes and periods to avoid platform dependency issues and URL issues
- Example:
_Main_roundedge-ul.gif
Integrating with configure
Some TWiki extensions have setup requirements that are best integrated into configure rather than trying to use TWiki preferences variables. These extensions use Config.spec files to publish their configuration requirements.
Config.spec files are read during TWiki configuration. Once a Config.spec has defined a configuration item, it is available for edit through the standard configure interface. Config.spec files are stored in the 'plugin directory' e.g. lib/TWiki/Plugins/BathPlugin/Config.spec.
Structure of a Config.spec file
The Config.spec file for an extension starts with the extension announcing what it is:
# ---+ Extensions
# ---++ BathPlugin
# This plugin senses the level of water in your bath, and ensures the plug
# is not removed while the water is still warm.
This is followed by one or more configuration items. Each configuration item has a type, a description and a default. For example:
# **SELECT Plastic,Rubber,Metal**
# Select the plug type
$TWiki::cfg{BathPlugin}{PlugType} = 'Plastic';

# **NUMBER**
# Enter the chain length in cm
$TWiki::cfg{BathPlugin}{ChainLength} = 30;

# **BOOLEAN EXPERT**
# Set this option to 0 to disable the water temperature alarm
$TWiki::cfg{BathPlugin}{TempSensorEnabled} = 1;
The type (e.g. **SELECT** ) tells configure to how to prompt for the value. It also tells configure how to do some basic checking on the value you actually enter. All the comments between the type and the configuration item are taken as part of the description. The configuration item itself defines the default value for the configuration item. The above spec defines the configuration items $TWiki::cfg{BathPlugin}{PlugType}, $TWiki::cfg{BathPlugin}{ChainLength}, and $TWiki::cfg{BathPlugin}{TempSensorEnabled} for use in your plugin. For example,
if( $TWiki::cfg{BathPlugin}{TempSensorEnabled} && $curTemperature > 50 ) {
    die "The bathwater is too hot for comfort";
}
The Config.spec file is read by configure, which then writes LocalSite.cfg with the values chosen by the local site admin.
A range of types are available for use in Config.spec files:
| BOOLEAN | A true/false value, represented as a checkbox |
| COMMAND length | A shell command |
| LANGUAGE | A language (selected from {LocalesDir} |
| NUMBER | A number |
| OCTAL | An octal number |
| PASSWORD length | A password (input is hidden) |
| PATH length | A file path |
| PERL | A perl structure, consisting of arrays and hashes |
| REGEX length | A perl regular expression |
| SELECT choices | Pick one of a range of choices |
| SELECTCLASS root | Select a perl package (class) |
| STRING length | A string |
| URL length | A url |
| URLPATH length | A relative URL path |
| EXPERT | means this an expert option |
| M | means the setting is mandatory (may not be empty) |
| H | means the option is not visible in configure |
lib/TWiki.spec for many more examples.
Config.spec files for non-plugin extensions are stored under the Contrib directory instead of the Plugins directory.
Note that from TWiki 5.0 onwards, CGI scripts (in the TWiki bin directory) provided by extensions must also have an entry in the Config.spec file. This entry looks like this (example taken from PublishContrib)
# **PERL H**
# Bin script registration - do not modify
$TWiki::cfg{SwitchBoard}{publish} = [ "TWiki::Contrib::Publish", "publish", { publishing => 1 } ];
PERL specifies a perl data structure, and H a hidden setting (it won't appear in configure). The first field of the data value specifies the class where the function that implements the script can be found. The second field specifies the name of the function, which must be the same as the name of the script. The third parameter is a hash of initial context settings for the script.
TWiki:TWiki/SpecifyingConfigurationItemsForExtensionsMaintaining Plugins
Discussions and Feedback on Plugins
Each published plugin has a plugin development topic on TWiki.org. Plugin development topics are named after your plugin and end inDev, such as MyFirstPluginDev. The plugin development topic is a great resource to discuss feature enhancements and to get feedback from the TWiki community.
Maintaining Compatibility with Earlier TWiki Versions
The plugin interface (TWikiFuncDotPm functions and plugin handlers) evolve over time. TWiki introduces new API functions to address the needs of plugin authors. Plugins using unofficial TWiki internal functions may no longer work on a TWiki upgrade. Organizations typically do not upgrade to the latest TWiki for many months. However, many administrators still would like to install the latest versions of a plugin on their older TWiki installation. This need is fulfilled if plugins are maintained in a compatible manner.
    if( $TWiki::Plugins::VERSION >= 1.1 ) {
        @webs = TWiki::Func::getListOfWebs( 'user,public' );
    } else {
        @webs = TWiki::Func::getPublicWebList( );
    }
Handling deprecated functions
From time-to-time, the TWiki developers will add new functions to the interface (either to TWikiFuncDotPm, or new handlers). Sometimes these improvements mean that old functions have to be deprecated to keep the code manageable. When this happens, the deprecated functions will be supported in the interface for at least one more TWiki release, and probably longer, though this cannot be guaranteed. When a plugin defines deprecated handlers, a warning will be shown in the list generated by %FAILEDPLUGINS%. Admins who see these warnings should check TWiki.org and if necessary, contact the plugin author, for an updated version of the plugin. Updated plugins may still need to define deprecated handlers for compatibility with old TWiki versions. In this case, the plugin package that defines old handlers can suppress the warnings in %FAILEDPLUGINS%. This is done by defining a map from the handler name to theTWiki::Plugins version in which the handler was first deprecated. For example, if we need to define the endRenderingHandler for compatibility with TWiki::Plugins versions before 1.1, we would add this to the plugin:
package TWiki::Plugins::SinkPlugin;
use vars qw( %TWikiCompatibility );
$TWikiCompatibility{endRenderingHandler} = 1.1;
If the currently-running TWiki version is 1.1 or later, then the handler will not be called and the warning will not be issued. TWiki with versions of TWiki::Plugins before 1.1 will still call the handler as required.
Warning: Can't find topic TWiki.MonitoringSiteActivity
Managing Topics
Browser-based rename, move, and delete for individual topicsOverview
You can use browser-based controls to change a topic's name, move it to another TWiki web, or delete it to a hiddenTrash web.
How to Rename/Move/Delete a Topic
- Click on
[More topic actions](bottom right of page) on the topic to be changed, then, in the new screen, on[Delete topic]or[Rename/move topic]. You can now rename and/or move/delete in one operation: - To web: Select the target web if other than the current web.
- To topic: Enter the new topic name - default is current name
NOTE: You'll be warned if any of the topics to be affected are locked (being edited), or if there is a name conflict.
- Update links: Prevent updates by unchecking individual items on the list of referring links - these topics will NOT to be updated with the new name (by default, all referring links will be updated).
- Click on
[Rename/Move]: the topic will be renamed and links to the topic updated as requested.- If any of the referring pages are locked then they will be listed: you can correct these later by again pressing
[Rename/Move]. - There is a Put back feature that allows you to undo a
Rename/Move/Delete- an instruction line and undo link will appear at the bottom of the modified topic. This allows you to revert from the last modification only.
- If any of the referring pages are locked then they will be listed: you can correct these later by again pressing
Deleted Topics: How to Clear the Trash
Deleted topics are moved to a specialTrash web - they are NOT physically erased from the server. All webs share Trash - in case of a name conflict with a topic already Trash, the user is alerted and asked to choose a new name.
The Trash web should be be cleared periodically, by archiving (saving) the text and RCS files if required (recommended), then deleting them from the Trash directory.
- This can only be done from on the server, not through the browser.
- Since simple FTP access to the
Trashdirectory is all that's required for maintenance, it's possible to grantTrashadmin privileges to multiple users, while strictly limiting server access.
-
Redirecting from an Old Topic
You can use TWikiMetaData to place a command in the WebTopicViewTemplate and WebTopicNonWikiTemplate that will indicate that a topic has been moved by searching for%META:TOPICMOVED{...}%. Customize something like this:
%METASEARCH{type="topicmoved" web="%WEB%" topic="%TOPIC%"
title="This topic used to exist and was moved to: "}%
Note: Do not modify the TWiki.WebTopicViewTemplate - modifications would be lost on the next TWiki upgrade. Instead, create a WebTopicViewTemplate in the Main web with the same content and modify it to your needs.
How Rename/Move Works
-
%SEARCH%, with a special template, finds and displays all occurrences of the topic name in other topics, site-wide. These referring links are by default automatically changed to the new topic and/or web name. This includes relevant TWikiMetaData definitions.- User can omit one or more topics from the update list by unchecking them.
-
<pre>and<verbatim>are honored - no changes are made to text within these areas.
- The topic is moved (if locks allow).
- References are changed (locks and permissions permitting).
- Any referring topics that can't be changed due to locks are listed - user can take note and change them at another time.
How Referring Topics Are Found
First, matching topics in the current web are listed - matches are totopic. Next, all webs (including the current one) are listed that match web.topic. All webs will be searched during rename, even if NOSEARCHALL is defined on a web, though access permissions will of course be honored.
Changed references are kept are as short as possible, ex: topic is used in preference to web.topic.
Effect of User Access Settings
User permissions affect the 'rename' functions in various ways. To rename a topic, you need all ofVIEW, CHANGE and RENAME access to that topic. To alter referring topics, you need CHANGE access. See TWikiAccessControl for information on setting up access permissions.
Special Considerations
Consider carefully whether to make browser-based Rename/Move/Delete widely available, or to restrict it to an administrator/moderator group. Allowing all users to easily manipulate topics can be extremely useful in refactoring a busy web or site. However, there are at least two significant potential drawbacks to take into account:- When referring links are updated, the modified topics appear in WebChanges, creating the impression that editorial changes were made. This can undermine the usefulness of WebChanges.
- Due to current limitations, fairly heavy use of Rename/Move/Delete functions can lead to an accumulation of minor technical problems (ex: broken links) and usability issues (ex: user confusion). If Rename... is used heavily, these negatives will obviously increase, in number and effect.
Known Issues
Rename/Move is fairly complicated due to the dynamic generation of links. Ideally, it would be possible to run the required part of rendering in a way that would allow identification of the text to be changed. Unfortunately, these hooks don't exist in TWiki at present. Instead, %SEARCH% is used with a special template to show the text to be changed, and the selected topics are then altered. One drawback is thatsearch can show matches that will not be updated due to case differences. Other mismatches with actual rendered output are also possible as the approaches are so different.
The following shows some limitations of square bracket processing.
[[Old Topic]]  => [[NewTopic][Old Topic]]
[[old topic]]  => [[NewTopic][old topic]]
[[old t opic]] => not changed
[[OldTopic]]   => [[NewTopic]]
Related Topics: UserDocumentationCategory, AdminDocumentationCategory
Managing Webs
Adding, renaming and deleting webs are all web-based operations.Overview
A TWikiSite is divided into webs; each one represents one workspace, one area of collaboration. Each web is a container for topics. Each topic is a container for page content and attachments. Administrators can add/rename/delete webs.Namespace and URL
The name of the web and topic is represented in the page URL. For example,http://twiki.example.com/do/view/Sandbox/WebNotify tells us that we view topic WebNotify located in the Sandbox web.
/WebHome by default. The name of the homepage topic can safely be omitted to make for shorter and more legible links. For example, http://twiki.example.com/do/view/Sandbox links to the homepage of the Sandbox web.
Choose Web Template
New webs are based on a web you specify. There are two types of webs you can use to create a new web:- Use a specially designed TemplateWeb. This is an invisible web that begins with an underscore "_" character (for example
_default). - Use an existing web as a template web. This may be useful if you already have a web that you would like to use as a starting point.
Adding a New Web
Notes:- You must have
ROOTCHANGEaccess to create a top-level web (one with no parent) - Only the person who created it has permission to change the WebPreferences in the new web
Hierarchical Webs
You can only create hierarchical webs (webs within webs) if the{EnableHierarchicalWebs} setting in configure is enabled. Hierarchical webs are currently enabled.
Bar inside a web named Foo, use Foo/Bar or Foo.Bar as the new web name in the form above.
Sub-web Preferences are Inherited
The preferences of a sub-web are inherited from the parent web and overridden locally. Preferences are ultimately inherited from the TWiki.TWikiPreferences topic. Example Preference Inheritance forSandbox/TestWeb/SubWeb.SubWebTopic topic:
-
TWiki.TWikiPreferencessite-wide preferences -
Sandbox.WebPreferencesinherits from and overrides settings inTWiki.TWikiPreferences -
Sandbox/TestWeb.WebPreferencesinherits from and overrides settings inSandbox.WebPreferences -
Sandbox/TestWeb/SubWeb.WebPreferencesinherits from and overrides settings inSandbox/TestWeb.WebPreferences -
Sandbox/TestWeb/SubWeb.SubWebTopicinherits from and overrides settings inSandbox/TestWeb/SubWeb.WebPreferences
Navigation
The PatternSkin indicates sub-webs by indenting them in the sidebar relative to their level in the hierarchy. The SiteMap shows a list of webs; sub-webs are separated by dots, such asWeb.SubWeb.SubSubWeb.
Renaming or Deleting a Web
Rename a web via the Tools section in each web's WebPreferences topic. You may delete a web by moving it into a Trash web.Permissions
You may only rename a web if you have the following permissions- You must be allowed to rename and changes topics in the web you want to rename
- You must be allowed to rename topics in the parent web of the web you want to rename
- If the web is a root web (i.e. it has no parent web) then you must have permission to both create and rename root webs. These permissions are controlled by the ALLOWROOTCHANGE preference, which can be set in Main.TWikiPreferences.
- If you move the web to another parent web you must be allowed to create and change topics in the new parent web.
Edit Conflicts
If anyone is editing a topic which requires updating, or which lives in the web being renamed, a second confirmation screen will come up which will indicate which topics are still locked for edit. You may continue to hit the refresh button until an edit lease is obtained for each topic which requires updating (the "Refresh" button will change to "Submit"), or hit "Cancel", which will cancel your edit lease on all affected topics.Renaming the TWiki or Main webs
Although technically possible, it is strongly advised not to rename the TWiki and Main webs. It complicates upgrades, and some extensions may make assumptions on the names of those system webs. For this reason, the rename web link is disabled in the WebPreferences topic in those webs.- Physically move the webs below
twiki/dataandtwiki/pubon the shell level. - Change the
{SystemWebName},{UsersWebName}and/or{LocalSitePreferences}settings in the configuration using the configure interface.
Warning: Can't find topic TWiki.AppendixFileSystem
This topic: TWiki > TWikiDocumentation
Topic revision: r36 - 2001-09-15 - MikeMannix
Ideas, requests, problems regarding TWiki? Send feedback
Note: Please contribute updates to this topic on TWiki.org at TWiki:TWiki.TWikiDocumentation.